Changing the Chart's Data Source


You may change many aspects of how Formula One for Java interprets the data range for the chart. You may:

This documentation breaks down the different tasks for changing the chart's data source into two main topics: Changing the Entire Chart's Data Source and Changing Chart's Data Source for Series and Headings.

Changing the Entire Chart's Data Source

To change the data source linked to the entire chart:

  1. Select the chart object by holding down the CTRL key and clicking on the chart.
  2. Choose the Format > Object menu option. The system will display the Chart Data tab.
  3. Click the Entire Data Range button. The system will display the Chart Data dialog, shown below.

  4. The dialog will display the address of the data range currently linked to the chart, unless the chart data source has already been edited and is no longer one contiguous range. In that case, the dialog will state "Data range formula is too complex to show."
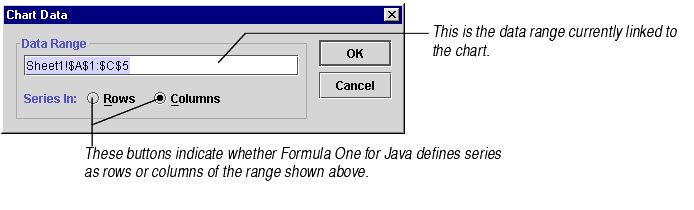
    Type in a different range reference that you want to attach to this chart. It can be an absolute or relative reference. For information on absolute and relative range references, see Understanding Cell References.
  5. Choose whether you want rows or columns of the range you entered to become series data by clicking either the Rows or Columns button.
  6. Press OK.

Formula One for Java will re-parse the chart data using the data range and series information you entered. A sample of the chart using the new data range will appear in the Sample frame of the Format Object dialog.

Changing Chart's Data Source for Series and Headings

To change the chart's data source for series and headings:
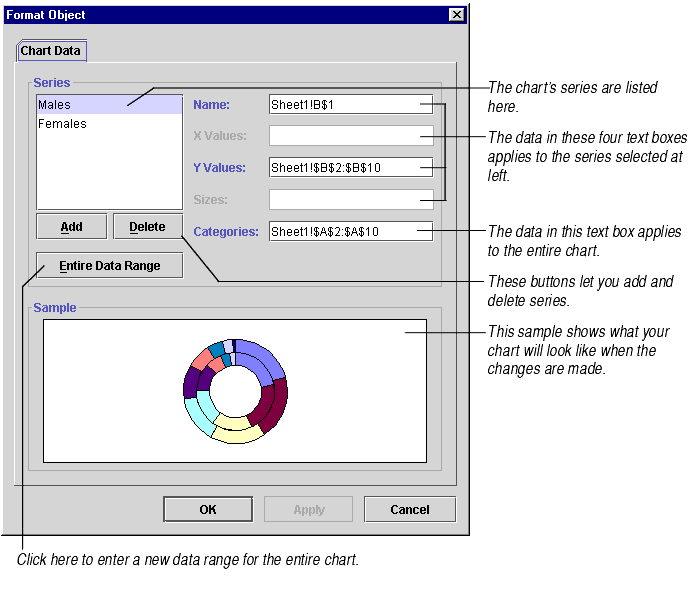
  1. Select the chart object by holding down the CTRL key and clicking on the chart.
  2. Choose the Format > Object menu option. The system will display the Chart Data tab, shown below.

  3. The notes in the following table describe each text box and button on this dialog box and explain how to use it. When you are finished changing the chart's data source, click Apply to view your changes or OK to accept your changes.
    Name text box
    This is the name of the selected series.
    You may enter:
    • A reference to a cell containing the name.
    • The name. Any text you enter will become the series name. You do not have to enclose it in quotation marks. Entering text here disconnects the series name from the worksheet.
    X Values text box
    These are the data points' X values for the selected series.
    This text box is enabled only for XY and bubble charts. For more information, see About Bubble Charts and About XY (Scatter) Charts.
    Y Values text box
    These are the data points that correspond to the selected series.
    You may enter:
    • A reference to cells containing the data point values. If the range reference contains fewer cells than the number of categories, the last categories will show 0 values for that series. If it contains more cells than the number of categories, that many more categories will be added to the chart.
    • An array constant containing the data point values. Enclose the array constant in curly brackets {}. Entering an array constant here disconnects the data points in this series from the worksheet.
    Sizes text box
    These are the bubble sizes for the selected series.
    This text box is enabled only for bubble charts. For more information, see About Bubble Charts.
    Categories text box
    These are the names of the categories on the chart.
    You may enter:
    • A reference to cells containing the category names. If the range reference contains fewer cells than the number of categories, the last categories will show numeric values for those category names. If it contains more cells than the number of categories, that many more categories will be added to the chart.
    • An array constant containing the category names. Enclose the array constant in curly brackets {}. Text values in array constants must be enclosed in quotation marks. Entering an array constant here disconnects the category names from the worksheet.
    Since bubble and XY charts have no categories, this text box is disabled for those chart types.
    Add button
    This button lets you add a series to the chart.
    Click this button to add a series to the chart. A new series will appear at the bottom of the series list. (Later, you may rearrange the series order in the Option tab of the Format Series dialog.) The series data points won't appear on the chart until you set data point values in the Y Values text box. Similarly, the series name will default to Series# until you establish a name in the Name text box.
    Delete button
    This button lets you remove a series from the chart.
    Select the series you want to delete, then click this button. The series data points will be removed from the chart and the series name will be removed from the legend.
    Entire Data Range button
    This button lets you change the data range linked to the entire chart.
    For information, see Changing the Entire Chart's Data Source.