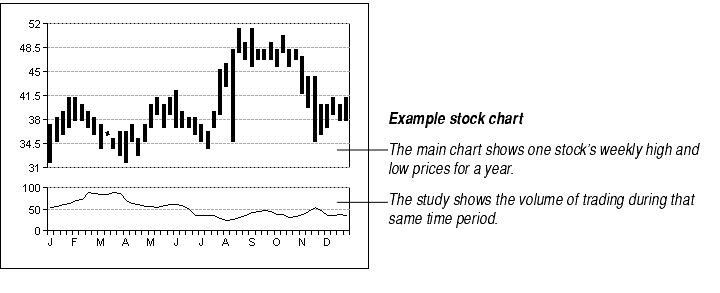
A study is a separate chart shown below the main chart in the same plot area. Studies share the same X axis and usually show similar data on a different scale. Stock charts, which show the activity of a particular stock over a length of time, frequently display studies that show the volume of stocks traded during that same time period.
Studies are useful for comparing data on vastly different scales.
All charts that have axes can have studies. You may create one or many studies for a particular chart. Since studies share the same plot, characteristics of the plot such as fill area and line style must be the same for the main chart and the study. Similarly, since they share the same X axis, they must also share the same X axis grid lines, tick marks, axis labels, etc. However, since the two charts have separate Y axes, they may show different types of Y axis grid lines, tick marks, axis labels, etc.
Unlike the main chart, studies cannot have second Y axes.
To create a study, follow the steps outlined in the table below.
| Task | Description | For more information |
|---|---|---|
| Set the number of studies (optional) | Setting the Number of Studies for a Chart | |
| Indicate which series should appear on which study. | Displaying a Series in a Study | |
| Assign length ratios to main chart and study | Assigning Length Ratios to the Main Chart and Studies | |
| Hide one of the X axes (optional) | Hiding the X Axis for a Main Chart or Study |
To create a chart with studies, you may begin by establishing how many studies the chart has. You may also begin by assigning a data series to a study, which will automatically create a new study. Since the process of assigning a series to an as-yet nonexistent study automatically creates the study, establishing the number of studies first is optional.
To set the number of studies in a chart:
Displaying a series in a study will remove that series of data points from the main chart and display it on a study below the main chart. You may display a series on a study that has already been created for a chart. You may also create a study by assigning a series to a study axis. Assigning the series to the as-yet nonexistent study axis automatically creates the study.
To display one of a chart's series in a study:
The main chart and its study occupy the same plot area on the chart. You can determine how much of the plot area the main chart and each study take up by entering ratios for each. The fraction of the plot assigned to each Y axis is determined by dividing the axis' length ratio by the total of all length ratios for all Y axes in the chart.
By default, the main chart and each study all have a length ratio of 1. This means that the Y axes on the main chart and each study will all be equal in length. Length ratios of 4 for the main chart and 1 for the study mean the main chart's Y axis will be 4 times as long as the study's Y axis, and will take up 4/5 of the plot area.
To assign a length ratio to the main chart or study:
Both the main chart and its studies share the same X axis. Since displaying the X axis on both charts duplicates information, one of the X axes is usually hidden when a chart has a study.
To hide the X axis for a chart that has a study:
