


This chapter describes how to archive and retrieve files and directories using the optional Archive Application.
The Backup and archive processes serve very different purposes. The backup process is short-term insurance against data loss. Backup keeps track of backups in the online file index to enable users to quickly recover lost or corrupted files. This online file index requires considerable disk space. Because archives theoretically are kept forever, Backup does not track them in the online file index - Backup only tracks archives in the online media index.
The Archive is a long-term strategy for preserving data on media called archive volumes. Archive volumes are similar to backup volumes, except they do not have an expiration date, which simply means that Backup will keep track of them forever.
Once files are safely stored on archive volumes, the archived files can be removed from local disk, freeing up space on your system. If you ever need to restore archived files to your system, you may do so at any time using the Retrieve window.
To a user, archiving files is like backing up files, except that the Archive Application allows you to automatically groom archived files and directories. Grooming means that files and directories are deleted from your filesystems after they have been successfully archived.
To a system administrator, backup has a different purpose than archive. The goal of backing up filesystems is to protect against loss of data due to hardware failure or user error. The goal of archiving is to make more space available on disk while maintaining a snapshot of removed files for quick retrieval in the future.
Since archived files are not tracked in the online file index, the Retrieve window does not display archived files and directories in the same manner as other Backup windows. Archives made on the server appear in alphabetical order in the Archives display of the Retrieve window.
Note - To remember what an archive contains, record the archive date and create a meaningful annotation. See "Starting an Archive" on page 60 for details.
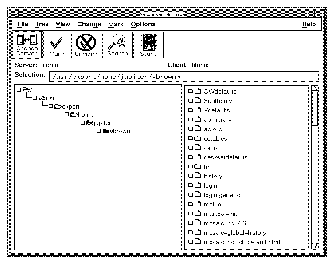
If the Archive Application is running on your system, you see the
Archive icon or the Archive window on your screen. Click the icon, shown
below, to open the window.

The Archive window appears, as shown..
If you do not see the Archive icon or the Archive window, start the application from a command line on your system.
To start the Archive Application from a command line, enter the nwarchive command, followed by the server name and an ampersand (&) to run the application in the background:
----------------------------------

# nwarchive -s server_name &

----------------------------------
If you have a multi-server network and do not specify a server name, Backup chooses an archive server for you.
To start an archive:
The Change Server command is described in Chapter 4, "Backing up and Recovering Files."
Note - Marking a directory also marks all the subdirectories and files it contains. If you want to archive most (but not all) files in a directory, first mark the directory, then unmark files you do not want to archive.
The Archive Options dialog box appears, as shown. The Archive Title field shows the pathname of the currently-selected directory or file.
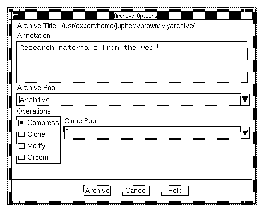
When choosing a meaningful annotation, keep in mind that annotation searches are case-sensitive. The Annotation field accepts up to 1024 characters, including spaces and punctuation.
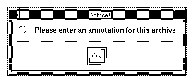
Note - If you do not enter an annotation before starting the archive, a dialog box appears, reminding you to enter an annotation.
Click the arrow button next to the Archive Pool field to view a list of the choices available. Click the arrow button again to close the list. If an Archive Pool is not specified, the volume pool defaults to "Archive." If you do not know which pool to choose, contact the system administrator.
If the box next to an option is highlighted, the option is selected. The following choices are available options:
See the sections following these instructions for an explanation of the Clone, Verify, and Groom options.
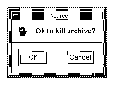
The Archive Status dialog box appears, showing the archive process. Click Cancel if you need to stop the archive process. A dialog box appears, asking for confirmation. Click OK to kill the archive, or Cancel to continue.
Cloning makes a duplicate copy of your archive. Two backup devices are required to make a clone. Each backup device must have a valid, writable archive volume mounted. Check with your system administrator before making clones of your archives.
When you select Clone in the Archive Options dialog box, Backup duplicates your archived data on another archive volume. If you specify a Clone Pool, the archive clone is sorted to a volume associated with that pool. Otherwise, the archive clone goes to "Archive Clone," the default clone pool,
Click the arrow button next to the Clone Pool field to view a list of the choices available. Click the arrow button again to close the list.
When you select Verify in the Archive Options dialog box, Backup checks the data written on the archive volume. If you also select Clone in the Archive Options dialog box, the clone volume is verified. The archive completion report in the Archive Status dialog box alerts you to any problems with the archived or cloned data.
When you select Groom in the Archive Options dialog box, Backup deletes all marked files after the archive successfully completes. Select the Verify option when you choose Groom to ensure files are properly archived before they are groomed from your disk.
Caution -

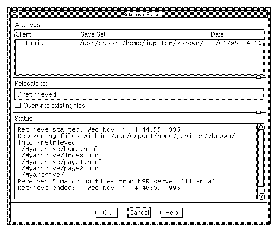
Use the Archive Status dialog box to monitor the archive process.
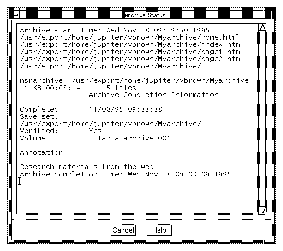
The Archive Status dialog box provides the archive start time and the archive completion time. The names of the archived files and directories scroll across the Archive Status dialog box as the archive proceeds. When the archive completes, the full pathname of the directory, the amount of data, the amount of time it took, and the number of files archived are displayed. The Archive Completion Information gives you details about the archive, including the volume your save set was archived to and the Annotation you assigned to the archive.
Note - Write down the annotation and volume information and include it with your project documentation to make it easier to retrieve the data at a later date.
Retrieval involves the copying of files back to local disk from archive volumes.
If the retrieve utility for the Archive Application is running on your system, you see the Retrieve icon or the Retrieve window on your screen. Click the icon, shown below, to open the Retrieve window.

If you do not see the Retrieve icon or the Retrieve window, start the application from a command line on your system.
To start Retrieve from a command line, enter the nwretrieve command, followed by the server name and an ampersand (&) to run the application in the background:
-----------------------------------

# nwretrieve -s server_name &

-----------------------------------
If you have a multi-server network and do not specify a server name, Backup chooses a retrieval server for you.
The Retrieve window has fewer menus than the other Backup windows. Since archived save sets are not maintained in the online file index, the Tree, View, and Mark menus are not present. The File, Change, Options, and Help menus are navigated in the same manner described for the Backup, Recover, and Archive windows.
When you start the nwretrieve program, the Archives scrolling list is empty. The currently-selected server is indicated directly beneath the speedbar. To display a list of archive save sets available on the currently-selected server, click the Query button.
The window displays a list of the archived save sets available for retrieval.
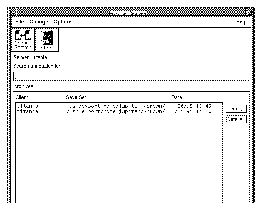
To search for a particular save set using all or part of its annotation, enter all or part of the annotation in the Search annotation for field and click the Query button. All archive save sets with matching annotations appear highlighted in the Archives list.
Note - Since the search for annotations is case-sensitive, use regular expressions like [Aa] to search for upper or lower case.
To see details about the currently-highlighted archive save set, click the Details button. The Retrieve Details dialog box appears.
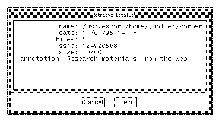
The fields in this dialog box provide the following information:
name - full name of the save set (including path)
date - date the save set was archived
files - number of files in the save set
ssid - save set ID
size - file size, in bytes
The Retrieve Details dialog box also shows the archive annotation, which can be used in the Search annotation for field in the Retrieve window.
Note - The currently-highlighted save set is the only one whose details are displayed in the Retrieve Details dialog box. To view details on another save set without exiting the Retrieve Details dialog box, highlight the new save set in the Archives list.
To retrieve a save set to your system:
Note - You may select multiple save sets for retrieval. To avoid overwriting later copies of files when the Overwrite existing files option is selected, Backup retrieves the files in chronological order.
The Retrieve Status dialog box appears, as shown. The Archives list displays all archive save sets you selected for retrieval in the Retrieve window.
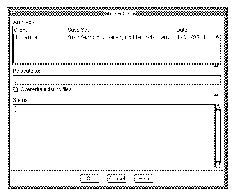
The appropriate archive volume(s) must be mounted (mounting is automatic in an autochanger).
During the retrieve operation, messages appear in the Status field to inform you of progress.
To stop a retrieve in progress, or to dismiss the Retrieve Status dialog box before retrieval has begun, click the Cancel button.
Archiving files is like placing them into a bank safe deposit box. They are meant to remain safe and last forever. But just as paper in safe deposit boxes can age and yellow, tapes used to archive files do not last forever. Optical discs last longer, but are still vulnerable to fire. Choosing the Clone option, which makes an extra copy of the archive, increases the protection of vital data.
Deleting files from disk, using the Groom option, conserves the space for current projects. However, if your site policy is to move archives offsite for increased protection, retrieving archived files could take awhile. Contact your system administrator to find out whether the archive volume you need is available for immediate retrieval.