


This chapter provides information specific to configuring and operating Backup with the Archive Application. It also includes explanations that compare and contrast the different methods used for protecting data across a network.
The Backup archive server provides file archiving and retrieval services to a range of client machines. It is packaged as an add-on extension to existing Backup backup servers, and uses the same license mechanism as Backup.
The Backup archive client can be any machine on a network that employs archive services provided by the archive server. Clients may be enabled for backups, for archives, or for both.
Data archiving is the process of taking a snapshot of files or directories as they reside on primary media (usually disk) at a given point in time. The snapshot image is typically stored on removable media, such as tape or optical disc. Once the snapshot is safely stored on removable media, related files can optionally be deleted to conserve space on disk.
The following sections explain the features and use of the various Backup Archive windows.
Before archiving can occur, you must configure Backup to recognize each archive client. Select the Clients Setup command from the Clients pull-down menu to open the Clients window.
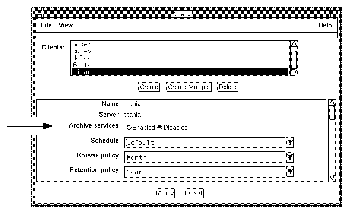
The Archive services choices enable or disable archives for the currently- selected client in the Clients list. To allow archives for the client, click the Enabled choice for Archive services. If archive services remain Disabled, the client will not be able to perform an archive.
Note - When you enable archive services for one client, you also enable other clients of the same name on that server.
Find the Archive users list at the bottom of the scrolling section of the Clients window. To allow users on the client to perform manual archives, enter their username into the Archive users list. To schedule an archive request of an entire workstation, root (or equivalent) must be on the Archive users list for that client, or root@client must be in the Administrator list for the server.
Note - For a complete description of the Clients window, see Chapter 3, "Configuring and Monitoring Clients."
To schedule an archive on a one-time basis, choose Archive Requests from the Customize menu.
The Archive Requests window appears, as shown.
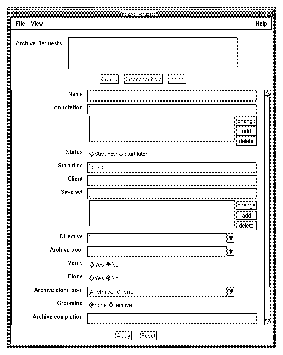
The Archive Requests scrolling list displays archives previously requested on this server. You can add new archive requests and delete old ones using the Create and Delete buttons.
The scrolling panel displays the following information:
Caution -

To see the results of an archive request, or to start or disable a scheduled
archive, choose Archive Request Control from the Server
pull-down menu.
The Archive Request Control window appears, as shown.
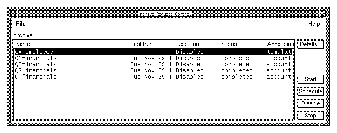
The most-recently-run archive request is initially highlighted in the Archive list. Usually it is Disabled, since scheduled archives only run once. To see details about when this archive completed and how successfully it ran, click the Details button.
If you want details about, or control over, a different archive request, select the one you want from the Archive list.
To initiate an archive request immediately, click the Start button. This has the same effect as selecting a Status of Start now for that archive request in the Archive Requests window.
To reschedule an archive request, click the Schedule button and enter a new starting time. This has the same effect as selecting Start later and specifying a new Start time in the Archive Requests window.
To disable an archive request that you scheduled here or in the Archive Requests window, click the Disable button. To halt an archive in progress, click the Stop button.
To see the progress of a recent archive (the one currently selected), click the Details button inside the Archive Request Control window.
The Archive Request Details window appears, as shown.
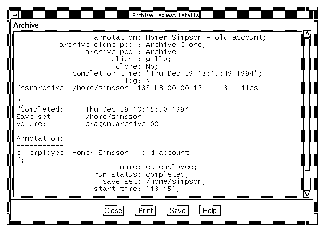
This window provides information about the completion of an archive request. Some of the information in this window, such as annotation, archive clone pool, archive pool, client, clone, name, save set, start time, status, and verify, also appears in the Archive Requests window.
The completion time field displays when the archive finished. Its duration is the difference between this and start time. The log field shows messages generated by the archive. The run status field shows the outcome of the archive request, either completed, failed, or partial.
Note - For more information about failed archives, see the log file, usually /nsr/logs/daemon.log on the server.
Suppose you must shut down and remove the workstation (and hostname) of someone who has left the company. It would be wise to archive the system data first, in case its filesystems contain essential files you need to access later.
This section gives an example of how to schedule and run an archive request.
Only registered archive clients can use the archive facility. To create an archive client, follow these steps.
(It is unlikely that you would want to allow manual archives and retrieves on a workstation about to be shut down.)
Machine hostname is now a registered archive client. However, an archive will not take place until you request one.
Note - If you want to allow archives on the server, make sure that archives are enabled for the server as a client of itself.
Valid archive users may request archives manually using the nwarchive command. However, a manual archive often takes a long time. To avoid overloading a busy network with an archive request during the day, schedule it late at night when the network has less traffic.
To make an archive request, follow these steps:
Accept the default Archive Clone pool.
------------------------------------------------

/usr/ucb/mail -s archive_request admin@titania

------------------------------------------------
You have now requested an archive of a client machine hostname to begin that night at 3:33 a.m.
The next morning, you should check the outcome of the archive. If you set up an Archive completion notice, look for an e-mail message containing a log of the archive request.
To check details of the archive, follow these steps:
If the archive failed, you can reschedule it (see the following section.)
You may use the Archive Request Control window to start, schedule, disable, or stop another archive.
Suppose that the archive of hostname did not complete last night because, for example, an energy-conscious employee turned off the computer. You decide to reschedule for the next night.
To reschedule the archive, follow these steps:
The archive request executes again that night, at the time you specified. If you change your mind and want to discontinue the archive, click the Disable button in the Archive Request Control window.
Backup contains two preconfigured volume pools for use with archiving: Archive and Archive Clone. If you want to create a new volume pool for archives, follow these steps:
Caution -

Now when you schedule a new archive request, you may use the new archive volume pool you created. If you choose to clone archive data, you should also create a new archive clone pool. Backup will write archive data only to an archive volume and archive clone data only to an archive clone volume.
If you have already made an archive and want to make a clone of it, follow these steps:
Note - Click the More button and enter "Archive" in the Pool field.
To verify data already archived on an archive volume, you have two alternatives:
------------------------------

# nsrretrieve -n -S ssid

------------------------------
Both alternatives verify the integrity of the data, but do not actually compare archived data with data on disk.
Chapter 5 and Chapter 6 in this manual provide more information about volume pools and save set cloning.
To schedule and run an archive request, follow this general procedure:
Name and Client are mandatory, as is the Start time if you Start later. Save set defaults to empty, Directive and Archive pool to the default, Verify and Clone to No, and Grooming to none.
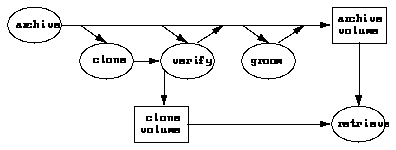
Archive save sets are similar to backup save sets. The principal difference is that archive save sets have no expiration date. Also, archives are always full - there are no levels of differential saves, or incremental saves.
Note - Archives are not recorded in the online file index, so they are not affected by the browse policy. This feature helps conserve disk space.
Retrieve is similar to recover, except that it works with archive save sets instead of backup save sets. Since archived files are not recorded in the file index, the user interface for retrieve is based on save sets, rather than on a directory hierarchy.
Users on the Backup administrator list have permission to configure archive services. These users, and users registered on the Archive users list in the Clients window, have permission to use the archiving and retrieval facilities. Registered users may archive any file for which they have read permission.
Anyone can browse archive save sets - that is, look at information in the media database. However, you may only retrieve files that you own, unless you are superuser, in which case you may retrieve any file.
Note - If you want to overwrite an archive tape, first make sure nobody will ever need the data again. Then simply relabel the volume, as you would a backup volume.
The following describes the three categories of archive functions.
Data archiving can be performed by end users or by the system administrator. Registered users can perform manual archives that start right away. System administrators can perform manual archives or schedule an archive to take place anytime during the next 24 hours. For example, the best time to perform a large archive might be in the middle of the night.
Both users and administrators can request an extra copy of their archive save set, called a clone. Backup Archive employs the volume pools feature to separate backup volumes from archive volumes and archive volumes from archive clone volumes.
After archiving is complete, users and administrators are given the option of deleting archived files and directories or leaving them in place. This option is called grooming. Grooming helps conserve disk space after a project is finished.
This chapter describes the Archive Application using the Backup GUI. For information on archiving using the command line interface, see the nsrarchive man page.
Since archived files are often deleted from the system, Backup provides an extra measure of security to make sure archived data is correct. Backup verifies data in two ways.
If a volume is suspect, or if there are problems with the data on the tape, Backup issues a warning and suspends grooming.
If you decide to groom files, we recommend you also select Verify or Clone to avoid deleting improperly archived files.
When you use Backup Retrieve, the Backup Retrieve window displays archived save sets for the selected server, listed by client name. You can only retrieve a save set if you have administrator or archive user privileges for that server, are the owner of files in the save set, or are root.
It is possible to search for specific archives and to alter the sort order of archive save sets in the viewing list. See Chapter 5, "Archiving and Retrieving Files" in the User's Guide for more details on retrieving archived files.
When the user picks an archive save set to retrieve, and the administrator ensures that the relevant archive volume (or a clone of that volume) is mounted on the Backup server, retrieval can begin.
Retrieved save sets can be relocated, renamed, or allowed to overwrite existing files of the same name, as with the Backup recover feature.
Data backup is the process of storing copies of files and directories from local disk onto removable media, usually tapes. These copies can be recovered in case the original files are lost or damaged. The system administrator usually schedules backups on a daily basis. Any new files, or files that changed since the last backup, are copied to tape so they can be restored on disk if necessary.
Archiving is normally performed on data associated with specific projects, rather than on an entire system. Unlike data backup, end users usually archive their files on an as-needed basis, so a network-wide archiving policy is not needed. Archives, unlike backups, are not associated with a level (full, differential, or incremental).
When users archive project data, they can choose to automatically delete the files from the system disk to conserve space. In this case, archived files need to be placed on long-lasting archive media.
Hierarchical storage management (HSM) is a data management strategy where data is automatically migrated from one storage medium to another, based on a set of rules. The rule most often employed is access rate - the longer a file is inactive, the more likely it is to migrate.
Storage hierarchy is usually governed by the cost of storage for each media. The benefit of HSM is that it provides users with a seemingly infinite storage capacity, at the lowest possible cost.
The principal goals of backup, archiving, and HSM are as follows: