
Many elements of graphical objects can be formatted using the Format Object dialog box. The following options are discussed in this section:
The Format Object dialog box allows you to choose a color for lines and for the outlines of arcs, polygons, ovals, and rectangles.
To choose a color for lines and graphical object outlines:
The Format Object dialog box allows you to put arrowheads on the last-drawn endpoint of line graphical objects. You may also choose the style and size of arrowheads.
To add an arrow to a line and specify the arrow size and style:

Formula One for Java will put the arrow with the formatting you chose on the last-drawn endpoint of the selected line. The arrow color corresponds to the line color.
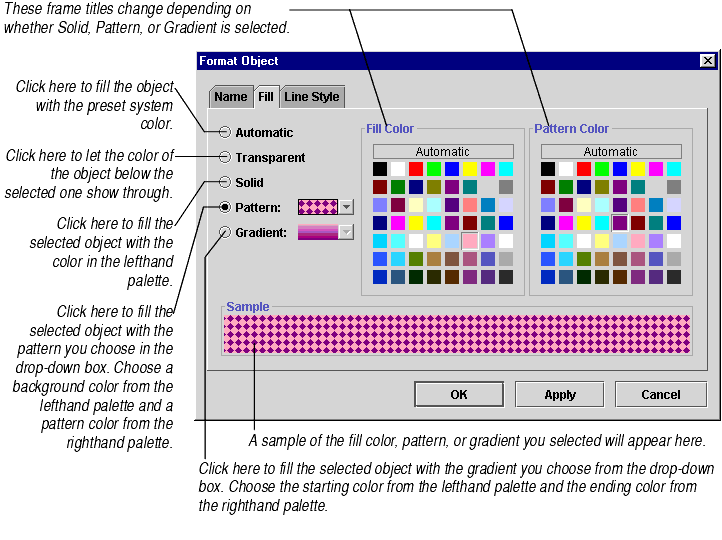
After you create an arc, oval, polygon, or rectangle, the Format Object dialog box allows you to fill that object with the color, pattern, or gradient fill of your choice.
To set a fill for an arc, oval, polygon, or rectangle:
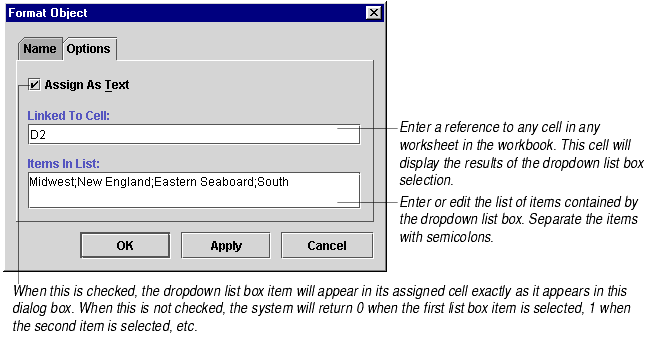
Dropdown list boxes let you give the user a particular set of values to choose from. The selected value then appears in a cell linked to the list box. List boxes can be used to establish a value required in one or more of the workbook's formulas.
For example, a workbook that calculates a mortgage payment schedule might include a behind-the-scenes worksheet that calculates payments based on the interest rate of your choice. A front-end worksheet might include a dropdown list box that lets users choose the interest rate, as well as cells displaying the calculated payments.
When you add a dropdown list box to your worksheet, you can set or change the cell it references, specify whether text or a value should appear in the cell, and define the list of selections from which you can choose in the list. You must type the list of selections into a dialog box; you cannot make the list box display the contents of a range of cells on the worksheet.
For users to choose an item in a dropdown list box, the list box itself cannot be selected and the pointer must be in normal worksheet editing mode.
When you link a cell to a list box, from then on the contents of that cell are controlled by the list box. The list box will overwrite any formula you enter in that cell. You may, however, enter one of the list box values in the referenced cell, and that value will then display in the list box. For example, if you enter 0 in the cell, a list box that references that cell displays its first item.
To set or edit dropdown list box items:
The following illustration shows the results.

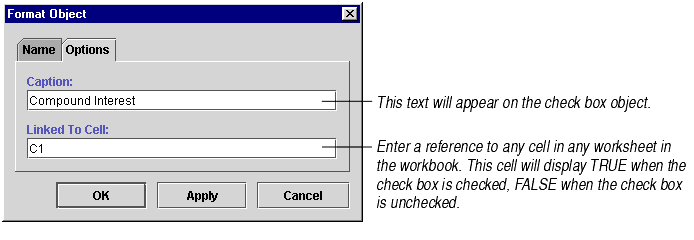
Check boxes let you solicit a yes/no response from the user. The user's choice appears as a TRUE or FALSE entry in a cell linked to the check box. Check boxes can be used to turn on or off certain workbook formula calculations.
For example, a budgeting workbook might contain a behind-the-scenes worksheet that calculates future monthly costs based on the household's current budget. There could be two sets of formulas: basic ones and ones that adjust for inflation. A front-end worksheet could include a check box called Adjust for Inflation. When the user checks that box, the inflation formula set is used; when the user leaves the box un-checked, the other formula set is used.
When you add a check box to your worksheet, you can specify its caption and the cell to link it to on the worksheet.
To set the value of a check box, the check box itself cannot be selected and the pointer must be in normal worksheet editing mode.
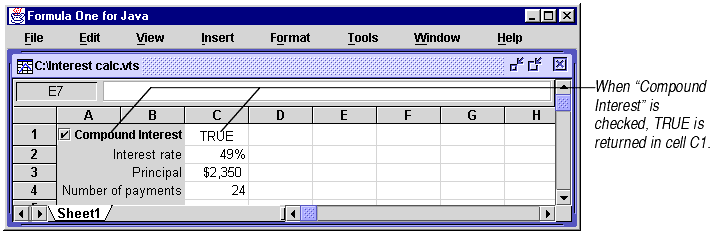
When you link a cell to a check box, from then on the contents of that cell are controlled by the check box. The check box will overwrite any formula you enter in that cell. You may, however, enter TRUE or any number in the referenced cell to check the check box. Enter FALSE or 0 in the referenced cell to un-check the check box.
To edit check box options:
The following illustration shows the results.
Buttons let you link snippets of Java code to the worksheet in order to perform a specific task. For example, you might create Java code that displays a custom dialog box when the button is pressed. Or a button might be coded to print the worksheet, change to a different worksheet, etc.
Buttons require custom Java code except in the situation described in Using Buttons to Link to URLs in Applets. In the Workbook Designer, you can set the text displayed on the button.
To edit button text:

Buttons require custom Java code except in one situation: When the button appears on a worksheet displayed as part of an applet in a browser, you can enter a URL in the button name text box and the browser will link to that URL when the button is pressed. Note that this only works with applets.
To link a button on a worksheet in an applet to a URL:

You can edit polygons in either of two editing modes: normal and polygon point editing.
To use normal polygon editing, click the polygon and click and drag the selection handles. If you want to use polygon point editing, click the polygon point editing tool and click and drag the selection handles of the polygon. You may also select the polygon and choose Edit > Polygon Points. The following illustration shows a selected polygon when normal polygon editing and polygon point editing modes are enabled.

To reshape a polygon:
When you insert a picture using the Insert > Picture Object menu command, you are really inserting a placeholder for the picture. The picture placeholder looks like a rectangle. To insert the picture into the placeholder you've drawn, you have to tell Formula One for Java the name of the picture file you want to insert.
You may insert pictures of file types JPG or JPEG and GIF. You must know the file's URL in order to insert it.
To insert a picture file in a picture object:

The image contained in the file of the name you entered will appear in the picture placeholder. The image will be scaled to fit the dimensions of the placeholder. If the shape of the placeholder doesn't correspond to the shape of the image, the image may be stretched out of proportion. You may resize the image by dragging its selection handles.
