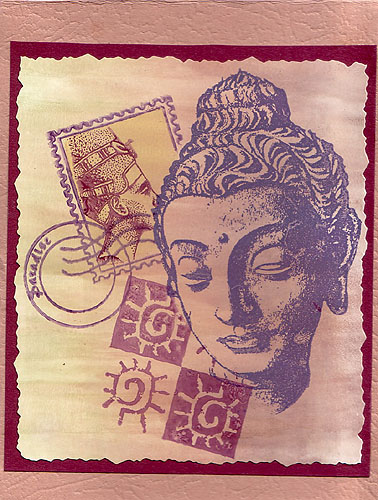
Step 1. Create the background. Ink a rubber brayer with Ranger's Woodlands multicolor ink pad. Roll the brayer a few times on a piece of light colored cardstock, then roll, pressing hard, onto a 4 x 6 glossy card. Save the light colored cardstock for another card. Use only the glossy card for this project.
Step 2. Stamp primary image. Ink stamp image (Postmodern Design - India Buddha)with grape colored ink. Stamp image on the glossy card (horizontally - to the right of center; vertically - centered).
Step 3. Create mask of primary image. Without reinking, stamp image again on a 2 x 3 Post-It. Try to get the majority of the image on the sticky part of the Post-It. Cut out the image and place on top of the stamped image on the glossy card.
Step 4. Add the faux postage. Stamp postage stamp to the left of the Buddha's head. Make sure a portion of the postage stamp goes onto to the masked image.
Step 5. Create mask of faux postage. Without reinking, stamp image again on a 2 x 3 Post-It. Try to get the majority of the image on the sticky part of the Post-It. Use an exacto knife to cut out only the inside of the postage stamp. The Post-It should be pretty much in tact except for the missing rectangle you removed to create an "opening" in the postage stamp. Place the Post-It on the glossy card to cover the postage image.
Step 6. Complete the faux postage. Use a sponge to add color from an ink pad to the postage stamp. Color in the complete rectangle. Let dry then stamp into postage image with the Nefertiti stamp.
Step 7. Complete collage. Add dark green or brown ink to the INKADINKADO image and stamp image onto the bottom corner of the Buddha image.
Step 8. Complete the card. Use decorative scissors to cut around the glossy card. Apply adhesive and stick to a darker coordinating color of cardstock (this is your cardfront). Using another coordinating color of cardstock, cut the paper in half width-wise. Fold one half of the cardstock. Apply cardfront to card.
[Back]