"Tech's Adventure" Walkthrough
by Mark Gottlieb
Answer: 🎃
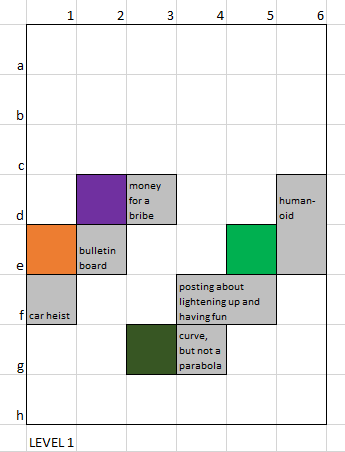
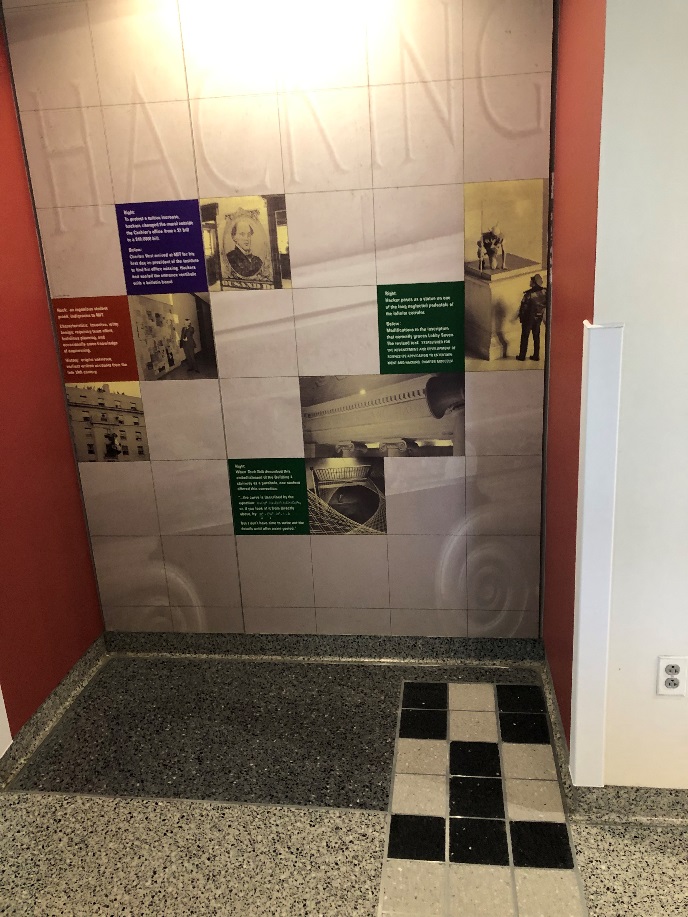
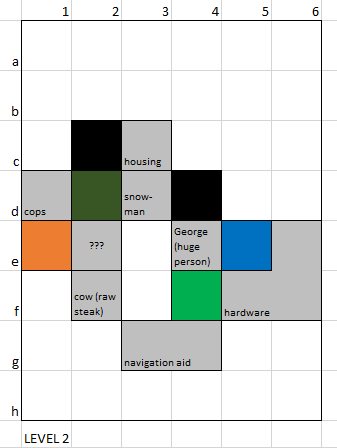
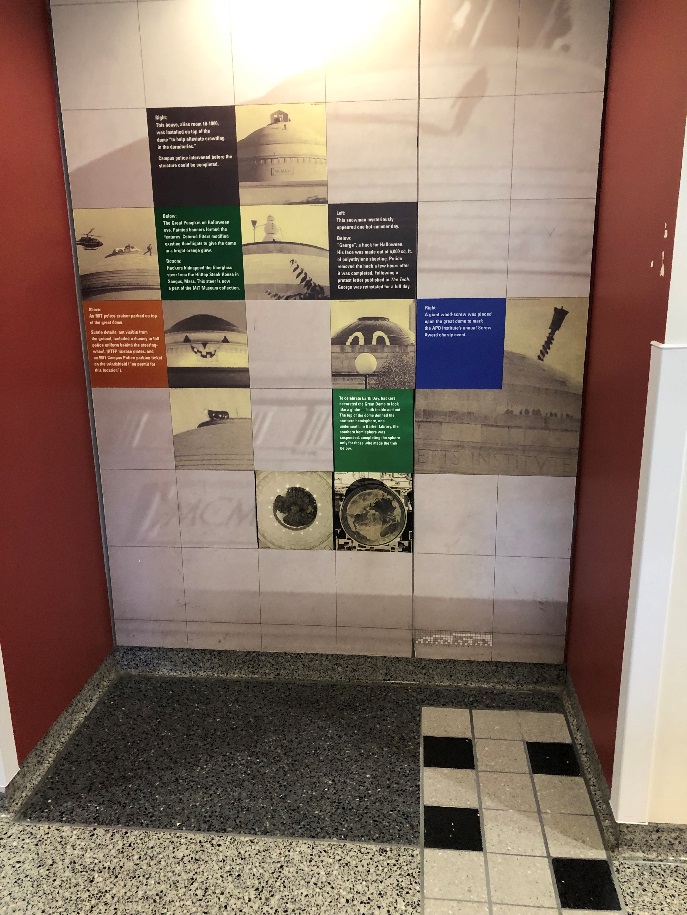
The dungeon in the game walkthrough consists of the four panels of MIT hack photos in Building 56. Following the path allows you to reconstruct the shape of the panels, including the colors of the text squares and (sometimes obliquely) the contents of the photos.
The one unused item in the dungeon is in room 2e of Level 2, which depicts the Great Dome turned into a jack-o’-lantern. The answer is the :JACK_O_LANTERN: emoji.
Walkthrough of the walkthrough
Enter the dungeon. You’ll start in a rectangular room on the east side of the top level. The colors in the room are a muted grayscale, as they are in each room that doesn’t contain a gem. (L1, 6d/6e)
The only door is in the south half of the room. Head west through it. In the adjacent room, you’ll be able to pick up an emerald. This entire room is a bright, vivid green; each room containing a gem is saturated in its gem’s color. (L1, 5e, green)
Go down the staircase to level 2. That room contains a sapphire; pick it up. That activates your blue crystal. Use it to unlock the first quest. (L2, 53, blue)
QUEST 1: PASS ROBOTICS CLASS
From the room you’re in, head either east or south. Either action will put you into the largest room in the dungeon, and the only one with a bend in it. That room contains something you’d find in a hardware store; pick it up. (L2, 6e/5f/6f, giant screw on the Great Dome)
The southwest section of the room has a door that heads west. Go through it and you’ll be in a room with the second emerald. Collect it. That activates your light green crystal. (L2, 4f, green)
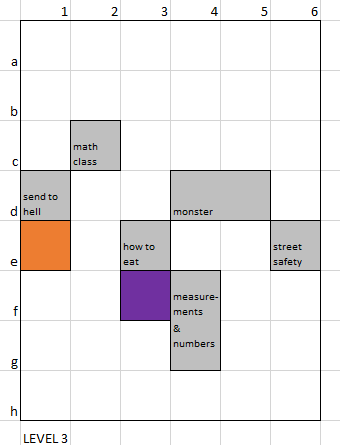
Go down the stairs and you’ll be in the north half of a rectangular room. (L3, 4f)
Go down another flight of stairs to the bottom level of the dungeon. (L4, 4f)
Walk north one room, (L4, 43)
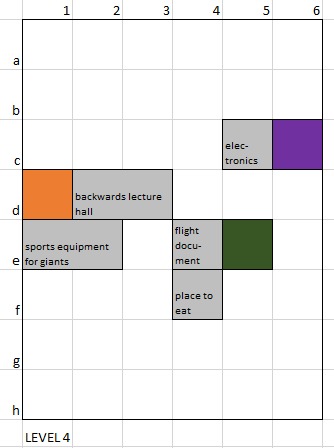
then east one room. Here you’ll pick up your first jade. (L4, 5e, dark green)
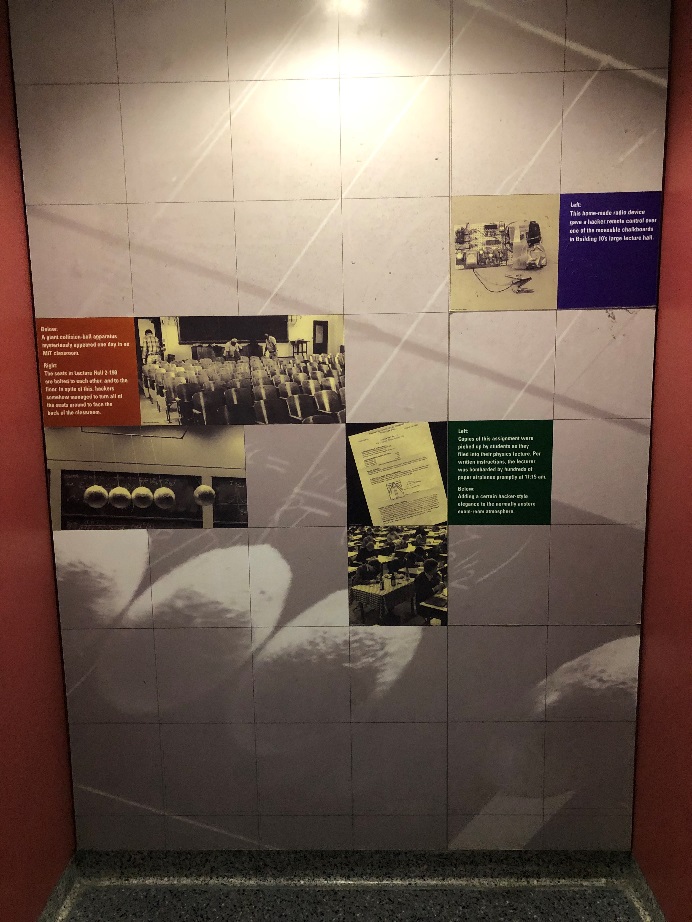
You’ll also have to pull off one of the trickiest maneuvers in the game. There’s a door on the north wall of this room, but there’s no room immediately beyond it; just nothingness. You’ll need to step through anyway. You’ll float through space for the length of one room until you find solid ground again; you emerge in a room containing some electronic components. Pick them up. (L4, 5c, electronics used to control a mechanical chalkboard)
While you’re here, pop into the room to the east to pick up an amethyst. (L4, 6c, purple)
Then backtrack all the way to the very beginning, to where you entered the dungeon. This room seemed empty the first time you visited it, but it is part of the blue quest path—now that the blue quest has been unlocked, the room’s item has appeared. Combine the sculpted body you find here with the previous items you’ve collected to build an almost-but-not-quite-lifelike humanoid. (L1, 6d/6e, human statue)
It’s a bit more autonomous than you expected, so rather than being a project at MIT, it wants to be a student at MIT! Bring it with you as you head back out through the only door in the room, (L1, 5e)
then go down the stairs, (L2, 5e)
west, (L2, 4e)
north (and pick up an onyx), (L2, 4d, black)
west, (L2, 3d)
and north. Leave your new friend here in its new living quarters! (L2, 3c, house on top of the Great Dome to help alleviate crowding in the dorms)
QUEST 1 COMPLETE
Use your light green crystal to unlock the second quest.
QUEST 2: PASS MATH CLASS
From the room where you finished your first quest, head west. Pick up your second onyx. That activates your black crystal. (L2, 2c, black)
Go down the stairs to level 3. You found your math class! Good start… but you’re late, so you’d be better off sneaking into the lecture through the back. (L3, 2c, Tropic of Calculus door)
Go back up the stairs, (L2, 2c)
then head south. Pick up your second jade. (L2, 2d, dark green)
Move west, (L2, 1d)
go down a flight of stairs, (L3, 1d)
then go down another flight. Pick up your first citrine. (L4, 1d, orange)
Head east. You’re in the west half of a rectangular room. The good news is that you snuck into the back of the lecture hall. The bad news is that somehow everyone is looking directly at you anyway. You’ll need to really impress from here on out. (L4, 2d/2e, lecture hall 2-190 with all the seats facing backward)
Backtrack four steps, (L2, 2d)
then head east, (L2, 3d)
east, (L2, 4d)
south, (L2, 4e)
south, (L2, 4f)
and down the stairs. Now you’re getting somewhere; you’re in a rectangular room with measurements and numbers. Collect them. (L3, 4f/4g, the Harvard Bridge getting measured in Smoots & the 250 Smoot marker)
Move into the south half of the room, then take the stairs up a floor into another rectangular room. (L2, 3g/4g)
Move into the west half of this room and take the stairs up a floor. Pick up the last jade; your dark green crystal activates. (L1, 3g, dark green)
Head east. This room contains a three-dimensional curve that is definitely not a parabola. Pick it up and combine it with your numbery bits for a math class project that’s so obtuse no one could possibly understand it—and thus couldn’t possibly refute or disprove it either. (L1, 4g, curve added to a Building 4 staircase that is described in Tech Talk as a parabola until a student corrected them)
QUEST 2 COMPLETE
Use your black crystal to unlock the third quest.
QUEST 3: PARTICIPATE IN INTRAMURAL SPORTS
From your last room, head north. You’ll be in the west half of a rectangular room with a posting that emphasizes the need to lighten up and have fun. Collect it. (L1, 4f/5f, modification to the Lobby 7 inscription that recasts MIT’s mission as being devoted to “entertainment and hacking”)
Head down the staircase in your side of the room, (L2, 4f)
…then go north. There’s an unreasonably immense person here but he’s too shy to talk. (L2, 4e, “George,” a giant face on the Great Dome)
Go north again, (L2, 4d)
then west, (L2, 3d)
up the stairs to level 1, (L1, 3d)
west (collect the second amethyst), (L1, 2d, purple)
and south. This room contains a number of postings pinned to the wall. Scan them until you find signups for the giantball team. Take it. (L1, 2e, bulletin board covering Charles Vest’s office door)
Backtrack to the room with the very tall fellow and show him the two items you collected. He introduces himself as George, and he’s eager to play. (L2, 4e)
Bring him with you as you go north, (L2, 4d)
west, (L2, 3d)
west, (L2, 2d)
west, (L2, 1d)
then south. Pick up your second citrine, (L2, 1e, orange)
go down one flight of stairs, pick up your third citrine, (L3, 1e, orange)
then go down another flight of stairs. You’re in the west half of a rectangular room. Collect everything here and you’re ready to play five games at once! (L4, 1e/2e, giant collision ball apparatus featuring five huge balls)
QUEST 3 COMPLETE
Use your dark green crystal to unlock the fourth quest.
QUEST 4: A FEAST FOR THE BEAST FROM THE EAST
Backtrack six steps, (L2, 4d)
then go down the stairs. You’re in the west half of a rectangular room. There’s a monster here. Capture it. (L3, 4d/5d, MIT monster Eats Boston/Back Bay sign)
Go back up the stairs you just descended, (L2, 4d)
then head south, (L2, 4e)
south again, (L2, 4f)
and down a flight of stairs. You’re in the north half of a rectangular room. (L3, 4f)
Stay in that half and go down another flight of stairs. This looks like a good place to feed the monster. Leave it here, (L4, 4f, Italian restaurant table set up in the middle of an exam room)
backtrack four steps, (L3, 4f) (L2, 4f) (L2, 4e) (L2, 4d)
then go west, (L2, 3d)
west, (L2, 2d)
south, (L2, 2e)
and south. This looks like something tasty to feed the monster. Bring it with you as you continue. (L2, 2f, cow on the Great Dome)
Backtrack seven steps. Once again, stay in the north half of the rectangular room you’re in, (L3, 4f)
but this time, head west. Pick up the last amethyst (your purple crystal activates), (L3, 3f, purple)
then go north. It turns out that the monster is inordinately stupid and needs explicit instructions on how to eat the dinner you procured for it. That’s what’s in this room. Once you’ve collected the contents of this room, (L3, 3e, Don’t Walk/Chew sign, with “Chew” lit up)
retrace your steps all the way back to where you dropped off the monster, give it the extremely raw steak you’ve been leading around, and tell it what to do with it. Bon appétit! (L4, 4f)
QUEST 4 COMPLETE
Use your purple crystal to unlock the fifth quest.
QUEST 5: GRAND THEFT AUTO
Head back to the dungeon’s largest room. (L2, 6e/5f/6f)
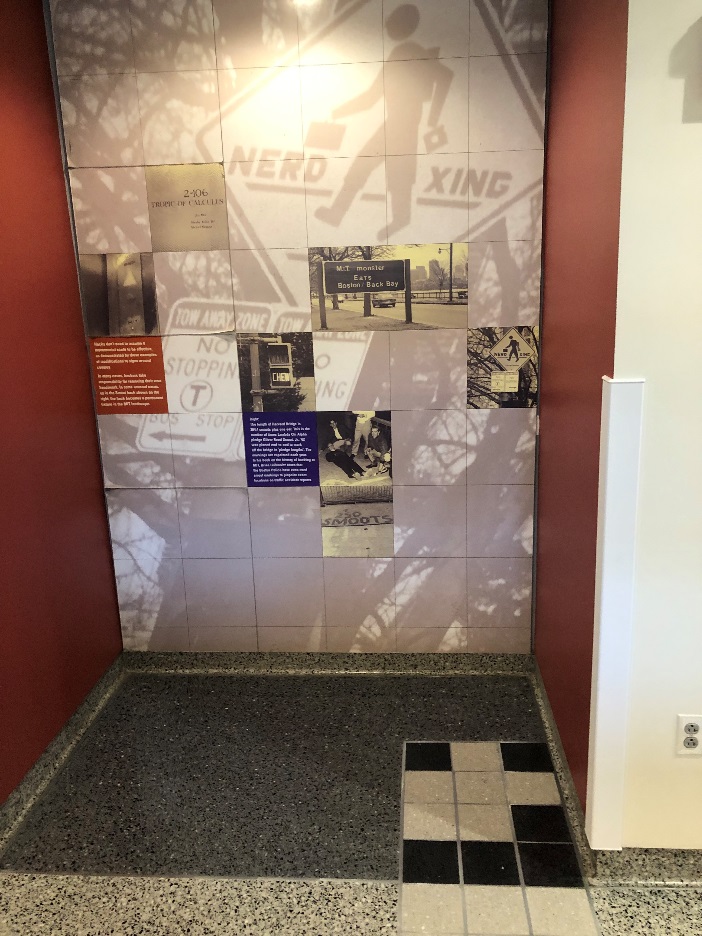
The northeast section of this room has a staircase. Take it down one flight. There’s an item here that indicates where it’s safe for you to be out on the street. Collect it, (L3, 6e, Nerd Xing sign)
then go back up the stairs. (L2, 6e)
From the section of the room you’re in, head west, (L2, 5e)
then go west again, (L2, 4e)
north, (L2, 4d)
west, (L2, 3d)
west, (L2, 2d)
south, (L2, 2e)
west, (L2, 1e)
and up one flight. Collect the last citrine, activating your orange crystal. (L1, 1e, orange)
Head south. This is the spot to pull off a very clever car heist. (L1, 1f, car being hoisted up a building)
Go back north, (L1, 1e)
down one flight, (L2, 1e)
north—oh, crap, it’s the cops! (L2, 1d, cop car on the Great Dome)
Lead them on a short chase: east, (L2, 2d)
up a flight, (L1, 2d)
and east again. Then take what you find here and bribe those cops. Bribe ’em silly! (L1, 3d, $10,000 bill outside the Bursar’s Office)
QUEST 5 COMPLETE
Use your orange crystal to unlock the sixth quest.
QUEST 6: YETI OR NOT
Head down one flight of stairs and you’ll find a new friend. He’s very cold and just wants to go home. Take him with you. (L2, 3d, snowman on the Great Dome)
Head east, (L2, 4d)
then south, (L2, 4e)
south, (L2, 4f)
south. You’re in the east half of a rectangular room. Pick up a navigation aid that can help you get your companion back to the far-off place he came from. (L2, 3g/4g, globe hemispheres under the Barker Library ceiling and on the top of the Great Dome)
Backtrack one step, (L2, 4f)
head down a flight of stairs into the north half of a rectangular room, (L3, 4f)
then descend another flight. (L4, 4f)
Move north. This room contains a document that’ll help you arrange a flight; pick it up. (L4, 4e, paper airplane instructions)
Backtrack three steps, (L2, 4f)
then head north twice, (L2, 4d)
then west three times. (L2, 1d)
Go down a flight of stairs. Oh, did your abominable associate think you were sending him to a happy place? No, you’re sending him straight to hell. Melt, you fiend! (L3, 1d, elevator indicator with up pointing to Heaven and down point to MIT—aka Hell)
QUEST 6 COMPLETE
QUEST 7: TECH’S ADVENTURE (WALK THROUGH)
This is the point in the game when players hit the wall. You can’t advance any farther digitally; you must transition from virtual reality to actual reality. The original versions of your game maps have been on display in the halls of MIT for over ten years, ever since they were installed in the 50s. Go on a literal walk through campus to find them. Compare them to your maps and pick up the one unused item in the entire dungeon. (L2, 2e, Great Dome turned into a jack-o’-lantern; “hit the wall” means you’re looking for these maps on a wall and “in the 50s” refers to the number of the MIT building where you can find the hack photo tiles)