Changing Row Height and Column Width
You can set the width of columns and the height of rows using menu commands or click and drag actions.
Setting Default Row Height and Column Width
Formula One for Java provides menu commands that allow you to define the default row height and default column width for your entire worksheet. This section describes how to define these default settings.
To define the default row height of a worksheet:
- Select Format > Row > Default Height to display the Default Row Height dialog box, shown below.

- Select the Custom option button to define the default height of rows.
- Enter a custom setting for the row height in the Custom text box.
- Select inches or centimeters from the Units drop-down list.
- Click OK.
To define the default column width of a worksheet:
- Select Format > Column > Default Width to display the Default Column Width dialog box, shown in the following illustration.

- Enter a default width for columns
- Select a unit from the Units drop-down list.
- Click OK.
Sizing Rows and Columns Using Menu Commands
You can set the width of selected columns and the height of selected rows using menu commands. This section describes the commands that allow you to perform these functions.
To set the row height of a selection:
- Select the cell(s) for which you want to set the height.
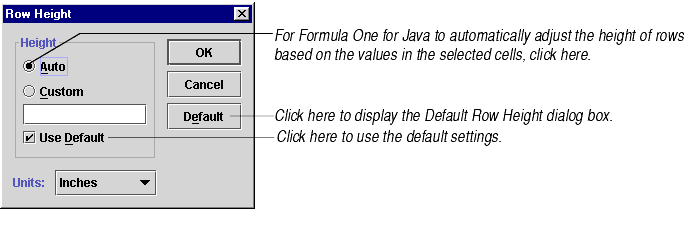
- Select Format > Row > Height to display the Row Height dialog box, shown below.

- Select the Custom option button to define a custom row height for the selected rows.
- Enter a custom setting for the row height in the Custom text box.
- Select inches or centimeters from the Units drop-down list.
- Click OK.
To set the column width of a selection:
- Select the cell(s) for which you want to set the width.
- Select Format > Column > Width to display the Column Width dialog box, shown below.

- Enter a custom width for the selected columns.
- Select a unit from the Units drop-down list.
- Click OK.
To widen a column to match the width of text in that column:
- Select the cell that contains the text that you want the column width to match. You may also select an entire column to make the column width match the longest text in that column.
- Select Format > Column > Autofit Selection.
Formula One for Java automatically widens the column to fit the text in the selection.
Sizing Rows and Columns Using Click and Drag
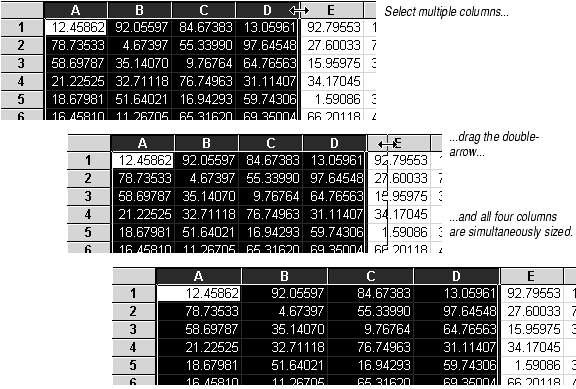
When you position the pointer on the right edge of a column heading or the bottom edge of a row heading, the pointer changes to a double arrow to indicate that the row or column can be resized. Click and drag to resize the column or row.

You can select multiple rows or columns and resize them simultaneously by clicking and dragging, as shown below.

Automatically Sizing Rows and Columns
You can automatically adjust the height of all cells in a row to accommodate the largest font size in the row. You can also automatically adjust the width of all cells in a column to accommodate the largest entry in that column.
You can automatically size a selected group of columns or rows to match the size of an existing row or column.
To automatically size a row or column:
- Double-click on the double-arrow over the bottom border of the row header. Double-click on the double-arrow over the right border of the column header.
To match a row or column's size to another row or column's size:
- Select the row(s) or column(s) you want to resize and the row or column whose size you want to match.
- Click the right border of the column header whose size you want to match. Click the bottom border of the row header whose size you want to match.
- The selected row(s) or column(s) are resized to match the size of the row or column you clicked.


