Manipulating Workbooks and Worksheets
Once you create a Formula One for Java workbook, you can add, insert, delete, name, and select the worksheets contained in your workbook. For more specific information about working with workbooks and worksheets, refer to Understanding Workbooks, Worksheets, and Views.
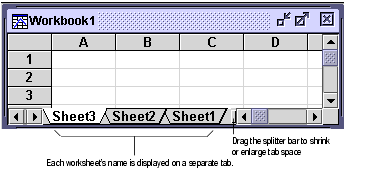
The following illustration shows a workbook with three worksheets:
Selecting Worksheets
Typically, you perform most of your work in one worksheet at a time in the active worksheet. When you have multiple worksheets in a workbook, you can use the mouse to click on a worksheet's tab to make it the active worksheet. The tab is highlighted and moves on top of the other tabs.
You can save time and effort by performing some tasks on several worksheets at once. For example, if you want all three worksheets in your workbook to use the same data used as column or row titles in a chart, you can select all three worksheets and enter the titles on the active worksheet. The data for the titles is automatically entered in the other selected worksheets as well.
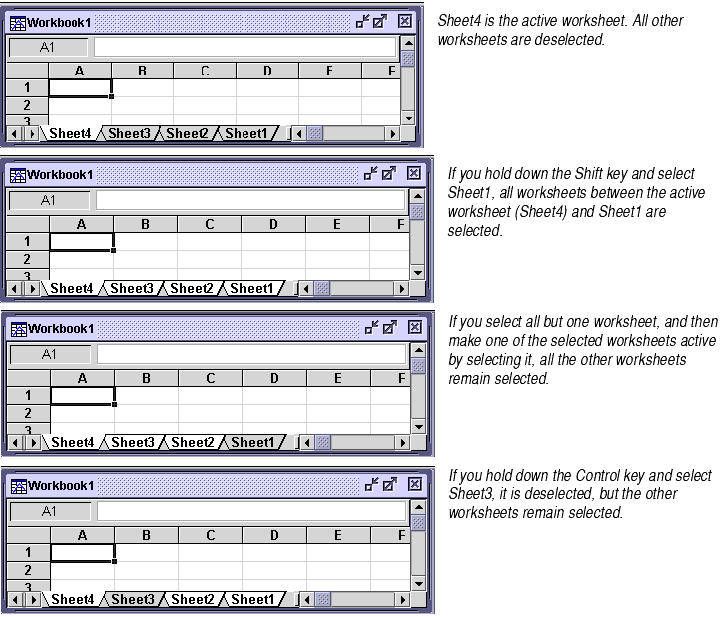
To select multiple worksheets in the Workbook Designer:
- Use one of the following key/mouse combinations, depending on whether you want to select adjacent or non-adjacent worksheets:
| Action |
Result |
| CTRL-Click on worksheet tab |
Selects or deselects non-adjacent worksheets. Any other selected worksheets remain selected. |
| SHIFT-Click on worksheet tab |
Selects all adjacent worksheets between the active worksheet and the worksheet you clicked on. All other worksheets are deselected. |
The following illustration shows various groupings of selected worksheets:
Inserting Worksheets
By default, a workbook contains only one worksheet. You may insert up to 32,767 additional worksheets.
To add worksheets using the Workbook Designer:
- Click on the Workbook to which you want to add worksheets.
- Select Insert > Worksheet.
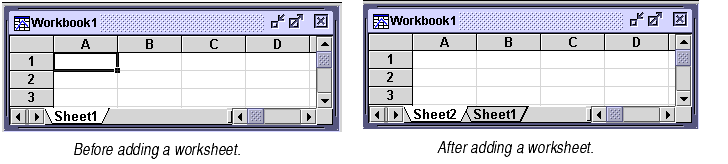
A new worksheet is inserted in the workbook. It becomes the active worksheet. Its tab appears to the left of the tab for the originally selected worksheet, as shown in the following illustrations:
Appending Worksheets
Formula One for Java also allows you to append a worksheet -- insert a new worksheet while keeping the current worksheet active.
To append worksheets using the Workbook Designer:
- Click on the Workbook component to which you want to add worksheets.
- Select Insert > Worksheet while holding down the control key.
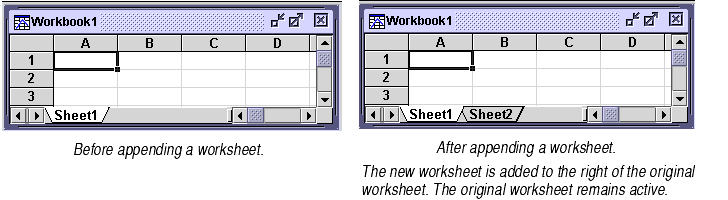
A new worksheet is appended to the workbook. The originally selected worksheet (Sheet1 in the illustration) remains the active worksheet. The appended worksheet's tab appears to the right of the tab for the originally selected worksheet.
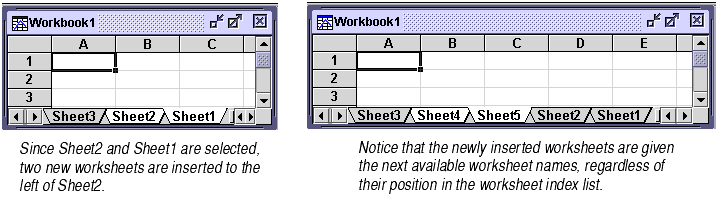
Inserting Multiple Worksheets
The directions below describe how to insert more than one worksheet at a time into the workbook. The resulting number and position of the tabs of the inserted worksheets depends on number and position of the tabs of the worksheets in the workbook prior to inserting multiple worksheets.
To insert more than one worksheet at a time:
- Select the number of worksheet tabs corresponding to the number of worksheets you want to insert immediately to the right of where you want to insert the new worksheet tabs. For example, to insert two worksheets, select two worksheets.
- Select Insert > Worksheet. The following illustration shows this process:
Naming Worksheets
Formula One for Java provides a default name for each worksheet. You can change the names to more meaningfully describe the worksheets' contents.
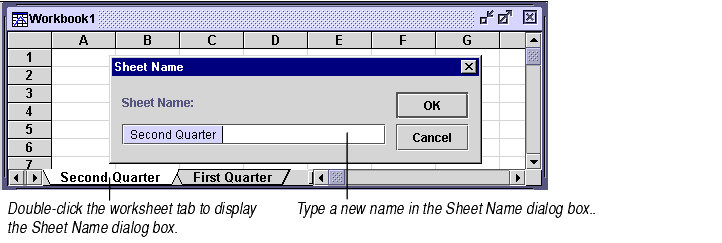
To name a worksheet in the Workbook Designer:
- Double-click the worksheet tab.
- Type a name for the worksheet in the Sheet Name text box.
- Click OK.
- or
- Select Format > Sheet > Properties.
- Click the General tab.
- Enter the name in the Sheet Name text box.
- Click OK
Worksheet Index List
Each workbook maintains an indexed list of the worksheets it contains. Worksheets are indexed from left to right beginning with 0. As you add worksheets, the index is adjusted so the leftmost worksheet is always index 0. Most methods reference worksheets by index rather than name. It is important to remember that the worksheet index is different from the name that appears on the worksheet tab.
Notice in the illustration under "Inserting Worksheets" that the inserted worksheet is given the next available name "Sheet2." However, Sheet2 is index 0 and Sheet1 is index 1.
Working with a Group of Worksheets
When you have multiple worksheets selected, you can think of them as a group of worksheets. Some actions you perform affect all worksheets in the group. Other actions effect only the active worksheet.
In the Workbook Designer, the following actions affect all selected worksheets:
- changing cell selection
- entering values via the formula bar
- inserting rows, columns, or ranges of cells
- deleting rows, columns, or ranges of cells
- clearing rows, columns, or ranges of cells
- setting TopLeft/Row/Column header text
- setting column width
- setting row height
- moving and copying with the mouse
Displaying Items on Worksheets
The Workbook Designer allows you to determine how formulas and zero values are displayed. It lets you zoom in or out on the worksheet cells and determine whether certain parts of the Workbook Designer are displayed. You may display or hide horizontal and vertical scroll bars, gridlines, and row and column headings.
To control how worksheets display data and Workbook Designer elements:
- Select the worksheet or worksheets.
- Choose the Format > Sheet > Properties option and click the View tab.
- Check the Formulas box to display formulas in workbook cells. In theView Formulas mode, number formatting is changed to general and displayed left-aligned. Uncheck the Formulas box to display the computed values and formatting in workbook cells.
.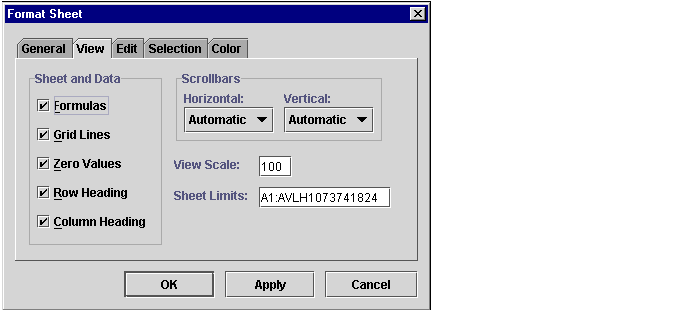
- Check the Gridlines box to display the worksheet gridlines. Uncheck it to display the worksheet without gridlines.
- Check the Zero Values box to display zeroes in cells when they are entered as values or calculated by formulas. Uncheck it to leave cells with zero values blank.
- Check the Row Heading box to display the row headings. Uncheck it to hide row headings.
- Check the Column Heading box to display the column headings. Uncheck it to hide column headings.
- Choose settings for the Horizontal and Vertical Scrollbars in the Scrollbars dropdown list boxes. On means scroll bars are displayed; Off means they are hidden; and Automatic means they are displayed only when the workbook is active (when it has the input focus).
- Enter the scale to display the workbook cells and headings in the View Scale box. You may enter values from 10 to 400. The View Scale setting corresponds to the setting in the View > Zoom menu.
- Set the limits of the range reference in the Sheet Limits box. You may enter a range reference for a sheet with a single row and column (A1:A1) to a sheet with more than a billion (1,076,741,824) rows and up to 32,768 columns (A1:AVLH1073741824).
- Click OK
Controlling Worksheet Usage
Sometimes you may want to keep users from taking certain actions like moving data from place to place, changing the worksheet layout, or selecting cells or objects. For each worksheet, you may choose whether to allow users to:
- use the Arrow, Delete, and Tab keys,
- enter or edit data in cells,
- move the active cell using the Enter key,
- resize rows and columns,
- fill or move cell ranges by dragging,
- change row and column headings,
- enter formulas,
- select cells and/or objects,
- select cell-by-cell or row-by-row, and
- see the active cell.
To control user access to editing tasks for the selected worksheet(s):
- Choose the Format > Sheet > Properties option and click the Edit tab.
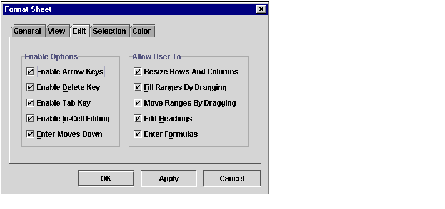
- Check or uncheck the appropriate boxes to allow or deny users use of the Arrow keys, the Delete key, and the Tab key.
- Check the Enable In-Cell Editing box to allow users to enter data in cells. (See Note, below.) Checking this box allows users to double-click a cell or press F2 to cause the cursor to appear in the cell itself instead of in the Formula Bar.
- Check the Enter Moves Down box to move the active cell down one cell after a user presses Enter. To leave the active cell in place after a user presses Enter, leave this box unchecked.
- Check or uncheck the appropriate boxes to allow or forbid users to resize rows and columns, to fill or move ranges by dragging, to edit row or column headings, and to enter formulas. (If the Enter Formulas box is unchecked, Formula One for Java will beep whenever any cell entry starts with an equals sign.)
- Click OK.
Note When the Enable In-Cell Editing box is unchecked, users will still be able to enter data in cells when the Formula Bar is displayed. To deny users editing access, either hide the Formula Bar or lock the cells. See Locking Cells and Hiding Formulas.
To control user access to selecting tasks for the selected worksheet(s):
- Choose the Format > Sheet > Properties option and click the Selection tab.
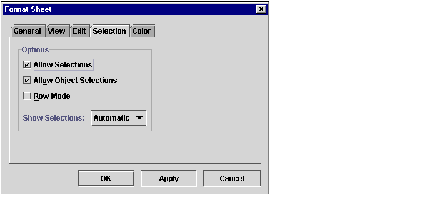
- Check Allow Selections to allow users to select cells and graphical objects (if the Allow Object Selections box is also checked). To disallow all selections, both of cells and graphical objects, uncheck this box.
- Check Allow Object Selections to allow users to select objects. (In order for this to work, the Allow Selections box must be checked.) To deny users the ability to select objects, uncheck this box.
- Check Row Mode to select the entire row any time a user selects a cell.
- Choose a setting for the Show Selections drop-down list box. On means users see which cell or object is selected. Off means users will not see what is selected. (Users may still enter data, change the selection within a formula with the mouse, and navigate the worksheet using arrow keys, but they won't be able to see what they selected or use the mouse to navigate within the worksheet.) Automatic means users see the selection only when the workbook has the focus.
- Click OK.
Deleting Worksheets
To delete a worksheet in the Workbook Designer:
- Select the worksheet you want to delete.
- Select Edit > Delete Sheet.
- Formula One for Java displays a dialog box with the message, "Are you sure you want to delete the selected sheet(s)?"
- Click OK to delete the sheet.
