6.005 Elements of Software Construction
|
Before coming to lab, please do the following:
Readings:
JUnit is a widely-adopted Java unit testing library, and we will use it heavily in 6.005. A major component of the 6.005 design philosophy is to decompose problems into minimal, orthogonal units, which can be assembled into the larger modules that form the finished program. One benefit of this approach is that each unit can be tested thoroughly, independently of others, so that faults can be quickly isolated and corrected, as code is rewritten and modules are configured. Unit testing is the technique of writing tests for the smallest testable pieces of functionality, to allow for the flexible and organic evolution of complex, correct systems.
By writing thoughtful unit tests, it is possible to verify the correctness of one's code, and to be confident that the resulting programs behave as expected. In this lab, you will learn the basic vocabulary of JUnit, how to run existing tests, and how to write new ones. In 6.005, we will use JUnit version 4.
JUnit unit tests are written method by method. There is nothing special a class has to do to be used by JUnit; it only need contain methods that JUnit knows to call, which will be referred to as test methods for the remainder of the lab. Test methods are specified entirely through annotations, which may be thought of as keywords (more specifically, they are a type of metadata), that can be attached to individual methods and classes. Though they do not themselves change the meaning of a Java program, at run-time other Java code can detect the annotations of methods and classes, and make decisions accordingly. The Java annotation system, judiciously used, can create dynamic and powerful code. Though we will not deeply explore annotations in 6.005, you will see how other libraries, such as JUnit, make effective use of them.
In the lab package of your project repository, you will find a pair of files, FibonacciGenerator.java, and FibonacciTest.java. FibonacciGenerator.java contains the implementation for a class that is a bidirectional generator of Fibonacci numbers. The FibonacciGenerator and the FibonacciTest classes are written to be used in an object oriented style. That is, a FibonacciGenerator is an object that maintains state in its fields (first and second), that can only be operated on by the methods exposed through the class (next and previous). FibonacciTest is written similarly, though it is intended to be used in a specific way, by the JUnit library.
Look closely at FibonacciTest.java, and note the @Before, @Test, and @After symbols, that precede method definitions. These are examples of annotations. The JUnit library uses these particular annotations to determine which methods to call when running unit tests. The @Test annotation denotes a test method; there can be any number in a single class. Even if one test method fails, the others will be run. The two test methods are very different. The generateAndCheck method contains calls to assertEquals, which is an assertion that compares two objects against each other and fails if they are not equal. Here is a list of the other assertions supported by JUnit. If an assertion in a test method fails, that test method returns immediately, and JUnit records a failure for that test.
The other test method, callIllegalPrevious, operates very differently, as it contains no assertions itself. Instead, the assertion is contained within the annotation itself! What the annotation expresses is that running the callIllegalPrevious method should result in an uncaught IllegalStateException being thrown. If you look at the previous() method in FibonacciGenerator.java, you can see how the exception can be thrown. For the callIllegalPrevious test method to succeed, that line must be executed.
The final two annotations, @Before and @After, are easier to explain. Each denotes a method that is called either before or after, respectively, each test method is called. @Before methods are a good way to share common setup code betweeen multiple tests. @After methods can ensure that cleanup code runs, even if a test fails. For example, if you are testing code that writes to a temporary files on disk, you may want to ensure that the temporary files are deleted whether or not the tests fail.
To run the tests in FibonacciTest, simply right click on the FibonacciTest.java file in either your Package Explorer or Navigator view, and mouse-over the 'Run As' option. Click on the 'JUnit Test' option, and you should see the JUnit view appear, with a green bar indicating that all test methods ran successfully.
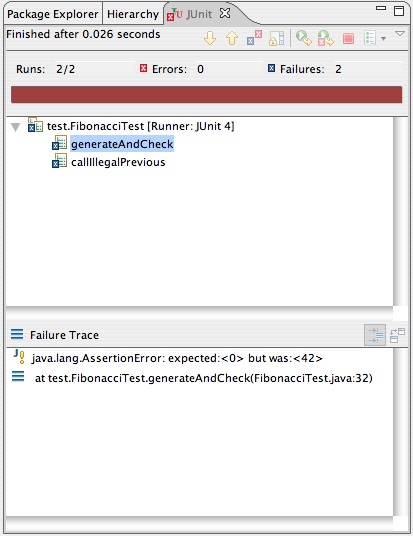
To see what a test failure looks like, try changing the initial value of first in FibonacciGenerator to something outrageous (like 42), then rerun the tests. You should now see a red bar in the JUnit view, and if you click on generateAndCheck, you will see a stack trace in the bottom box, which provides a brief explanation of what went wrong. In this case, it expected the first value of the generator to be 0, but it was actually 42 (or whatever value you chose). Double clicking on lines in the Failure Trace will bring up the code for the test that failed.
Note that both you and your partner may have just modified the same FibonacciGenerator.java file in your shared Subversion repository. If you both committed this change, unless it happened to be the same, it would result in a conflict. We'll learn more about how to resolve these issues in the next lab, but for now you should just revert the file to its last committed state (i.e. its original state) by right-clicking on it and choosing Team → Revert...
For a more thorough introduction, O'Reilly has a JUnit and Eclipse tutorial, with screen-shots to help you get acquainted with using JUnit from within Eclipse. The guide was written for JUnit 3, so the code samples use the older (but still supported) JUnit API.
Later in the lab, you'll write some unit tests of your own.
Take a moment to study the layout of the project's various resources. The project layout will be similar in later assignments.
Run the application by right-clicking on ui/Main.java and choosing Run As → Java Application You should see the applications interface appear in a new window. It can't do anything right now, but it will be able to download complex multipart files once you have finished the project.
Now, let's get back to doing something. Let's locate the first entry point to the multi-part downloader code.
Open src/multipart/Multipart.java. Insert the following code in the Multipart() constructor:
System.err.println("This is the constructor for Multipart.");
Build and run the application again. Eclipse will automatically rebuild the application, so when you run Main.java, which uses Multipart, you should see your change when you click Download. Look in the Console area at the bottom of Eclipse, which is where System.err and other 'standard output' is displayed. (Note that in a graphical program this sort of output should only be used for debugging!)
Insert debugging output into the getPart and error methods of Multipart. Place similar println statements at the beginnings of getPart and error, and re-run the program in Eclipse. Note which methods are called when Download is clicked. Without looking into it too deeply, why do you think that, when using this skeleton Multipart class, Main never calls getPart?
Note that, again, you will probably want to Revert these change instead of committing them.
Your job in Project 1 is to write functionality for the multipart downloader. You will hook your new functionality into the application through the four methods of Multipart which the UI calls. This does not mean you are limited to using four methods, or even one class, but these four methods are the sole entry points to your code.
The project contains unit tests that test the multipart downlaoder.
Open src/multipart/MultipartTest.java. This class contains the unit tests for Multipart. Run the tests by right-clicking on MultipartTest.java and selecting Run as... → JUnit test. The test should run and fail, because Multipart isn't actually implemented yet.
Now you have a better feel for how the application works, you know the entry points into which you need to connect your implementation, and you have a way of measuring success by running the JUnit tests.
Another important tool to know about is javadoc, which generates documentation from comments written in Java source code. Javadoc comments start with two asterisks, like /** ... */, and typically appear before a class or a method to describe the specification of that class or method. The article How To Write Doc Comments for the Javadoc Tool is a useful resource for learning about what you can and should say in a documentation comment. We will have much more to say about this topic in another handout and in lecture as well.
When you turn in your assignment, you will need to update the project's javadocs to include documentation that you created.
Run Project → Generate Javadoc... to regenerate the documentation. Select the multipart project, and make sure that the Destination field under Use Standard Doclet points to the api directory of the project. Click on Finish and updated documentation will be generated in the api directory.
Find the file api/index.html and open it to see what the resulting documentation looks like. (If you see the raw HTML instead of a rendered web page, you need to right-click on it and select Open With → Web Browser to view it. If you prefer to use your own web browser to view it, rather than Eclipse's built-in web browser, then find your Eclipse workspace directory in your operating system file manager and drill down until you find api/index.html.)
Find and read the documentation for the IDownloader interface and the Downloader class. You will be needing these in the next exercise.
In this exercise, you will get familiar with the IDownloader interface, which is a simple wrapper that your code will use to retrieve URLs from the web.
The IDownloader interface currently has only one functional implementation, Downloader. Your job is to write JUnit tests for Downloader that exercise its two methods.
Make a new class in the same package as Downloader to hold your unit tests. Since you are sharing this repository with your partner, and both of you are creating a test class for this exercise, you should name your test class something unique, such as DownloaderTest_username.
Start by writing a test for downloadAsString() that you expect to always succeed. It should fetch a known URL and somehow confirm that the data it fetched was correct. (Conveniently, there are some very simple text files for Project 1 in http://mit.edu/6.005/www/project1/.) Run your test to make sure it works.
Note that there is no multi-line string syntax in Java, but for clarity you can write something like:
String s = "line 1\n"
	+ "line 2\n"
	+ "...";
Note also that some or all of your tests will either need to catch exceptions and then fail, or be declared as throwing the exceptions, in which case they will fail automatically if the exception is thrown.
Now think about various ways that downloadAsString() might fail, and devise tests for each failure condition to make sure that it fails as desired. You may find the Javadoc for IDownloader helpful, and the unit tests in FibonacciTest useful for examples of how to test that an exception is thrown.
Now do the same for the download() method: create a test for normal (successful) operation, and tests for each failure condition. You may find ByteArrayOutputStream and its toString() method very useful.
This is the end of the lab. Be sure to commit your Downloader JUnit tests to your group Subversion repository. Since both you and your partner are sharing the same repository, be careful to check for conflicts when you commit, and don't break the build for your partner.