Programming in ArcGIS using Visual Basic for Applications
Like many Windows programs, ArcGIS supports Visual Basic for Applications (VBA). It also supports Visual Basic and integrates DLLs that were created with Visual Basic using ESRI add-ins. Both of these environments are supported through the ArcObjects Developers Support online help.
This exercise takes your through the VBA programming environment and two Arcmap processes coded in VBA.
How to access the VBA environment in ArcGIS
VBA programming is accessible through the Tools->Macros->Visual Basic Editor menu choice. You will see this window when you click on the Editor:
![]()
But before we start:
-- FYI: Getting help
There is ample help available. First, the ArcObjects Developers Help (for VB, available from the Start menu -> All Programs -> ArcGIS tree) contains all of the objects, methods, and properties that are available through VB and VBA for ArcGIS.
Second, VBA help is available from the Help menu in the VBA window.
Third, help can be found, or not, using the http://forums.esri.com web site. You can look up specific commands and see what issues people had, or how they used them, and also ask questions. You need to become a registered user in order to ask questions. There is no fee for registration for this service.
Back to starting to program:
You can add macros and forms using the Visual Basic interface. Both of these can be called directly from ArcGIS. You add forms and modules using the Insert menu choice. Modules can contain both subroutines (Subs) and functions. (Sub don't return values while functions do return values. Both can be called with arguments - the values of variables that your program uses.) In this exercise you will add both.
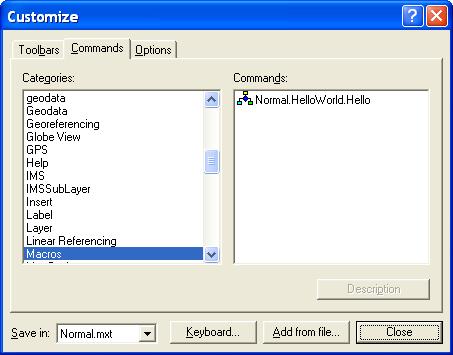
You add the macros through the ArcGIS customize button (under the Tools menu choice):
![]()
This one is empty, as your Customize window should be. Once you have this window open, with a functioning macro (or sub), you can add your macro as a button to any toolbar. You can also make a new toolbar and add the macro to it.
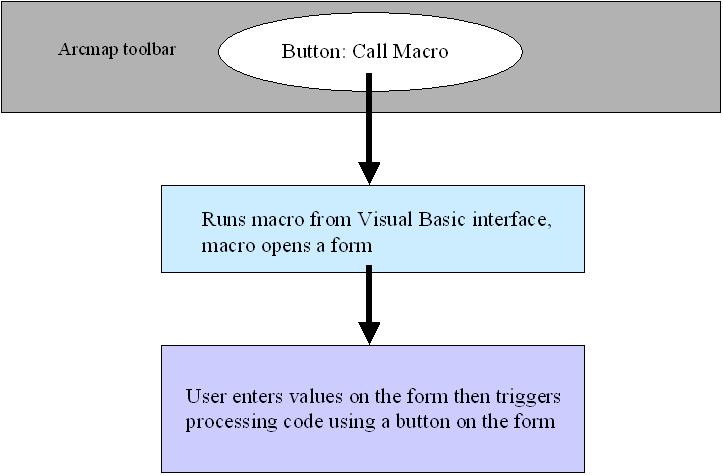
A general structure for interacting with ArcGIS
A common structure for interacting with ArcGIS through VB or VBA is to have a button on a toolbar which calls a form. (For ArcGIS users, this should seem like a common experience.) Once you have a form up, you have the user enter information on the form. The form has a button which causes an action, like processing some data or adding a layer on the map. The processing code could be added directly to the form. A schematic of the typical interaction might look like this:
We will use this structure later but for now we will create a simple macro that calls a message box with the message "Hello, World".
In this example, you will create a simple macro that calls a message box, with a very simple message. You will be working in the Microsoft Visual Basic window. Change to the Normal.Mxt window (which means that your macros are saved so that they are visible in Arcmap, rather than on visible only in the project that you are working in (which should be blank). Start by inserting a new module (under the Insert menu choice). Once you do this, you should see a new text window in your VB window. Find the Properties window in the lower right corner of the screen. Change the name of the Module to HelloWorld. Type in the following text into this window (notice that the "End Sub line is automatically added when you type in the Sub line):
Sub Hello()
MsgBox "Hello, World", vbExclamation, "First Program"
End Sub
Be aware that as you type functions (like MsgBox), the structure of the function is illustrated for you. So you know that "Hello, World" is the prompt, vbExclamation is the vbMsgBoxStyle variable, and "First Program" is the title. This feature of VB is very useful for more complicated ArcGIS method and properties that you will use.
To add the macro, open the Customize window (from the Tools menu). You should now see your macro:
To add your macro to a toolbar, simply drag the icon from the customize window to any toolbar. Later, to remove the icon, drag it from the toolbar back to the open Customize window.
To run the macro, simply click on it. Does it work?
Calling a form from a macro
Returning to the structure outlined above, let's add a form, then call it. For now, the form will have a single button, which closes it.
First close the HelloWorld module then create a new module (again, from the Insert menu). Call this module "OpenForm". Next, insert a form. Once the form is open, you will see this palette of tools:
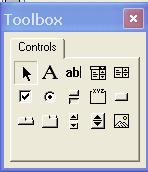
These are the widgets that you can add to the form. Before adding a widget, change the properties of the form. It's name should be "frmTest" and it's caption should be "Test Form". Then add a widget, a command button (second row, at right). Change the name to "btnClose" and the caption to close. Double click on the CloseForm button. You should now see a code window that is associated with the form. You should be focused on the sub that is called when you click on the button. The code in the sub should look like this:
Private Sub btnClose_Click()
End Sub
Add "me.hide" to this sub. "me" is the form itself so the method is "hide", the object is the form. This will cause the form to hide.
When your form is active (rather than the command button), you window should look like this:

Now open the OpenForm Module. Start by typing the name of the sub, "Opener", preceded by "Sub". Notice again that the End Sub line is automatically added. Next add the line:
Load frmTest
This loads the form so it can be used. Now show the form. Start by typing the name of the form on the next line. One of the options available with a form is show. Type "." then type S. You should see "show" (you may need to scrool down the list that appears before seeing it). Click on it. Now your code is ready.
Recall how you added the first macro. Open the customize window. If your first button is there, drag it to the customize window. Draw the icon for your new macro to any toolbar. Does it all work?
Reading a variable in a field on a form
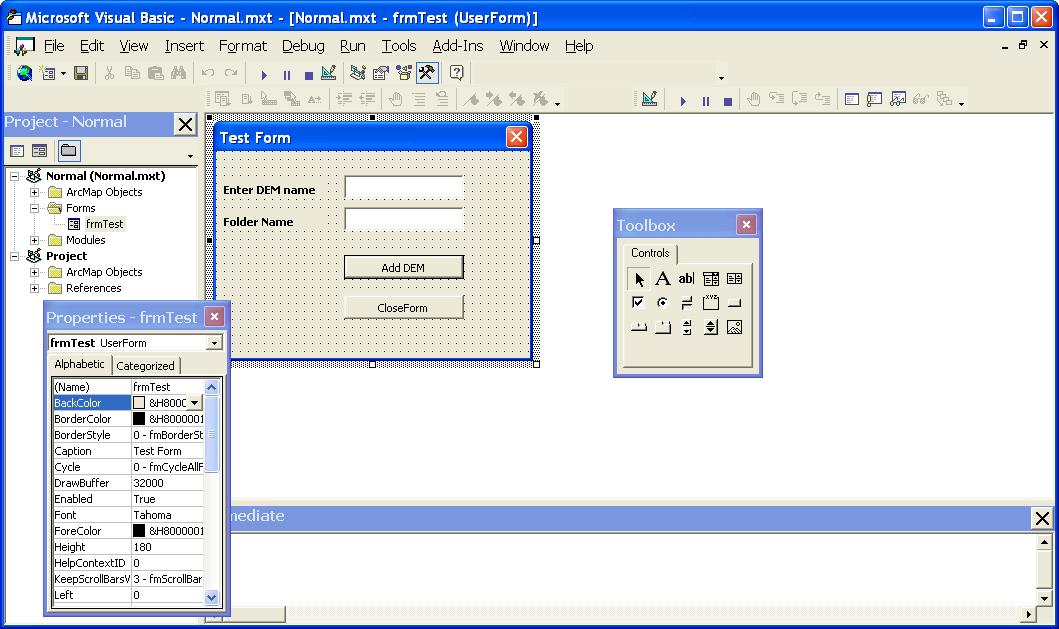
Now let's get a value from the form and display it. You will need to add three widgets, a label, a text field, and a command button. Change the caption of the label to "Enter DEM name". Change the name of the text field to txtDEMname. Change the caption of the command button to "Print Name".
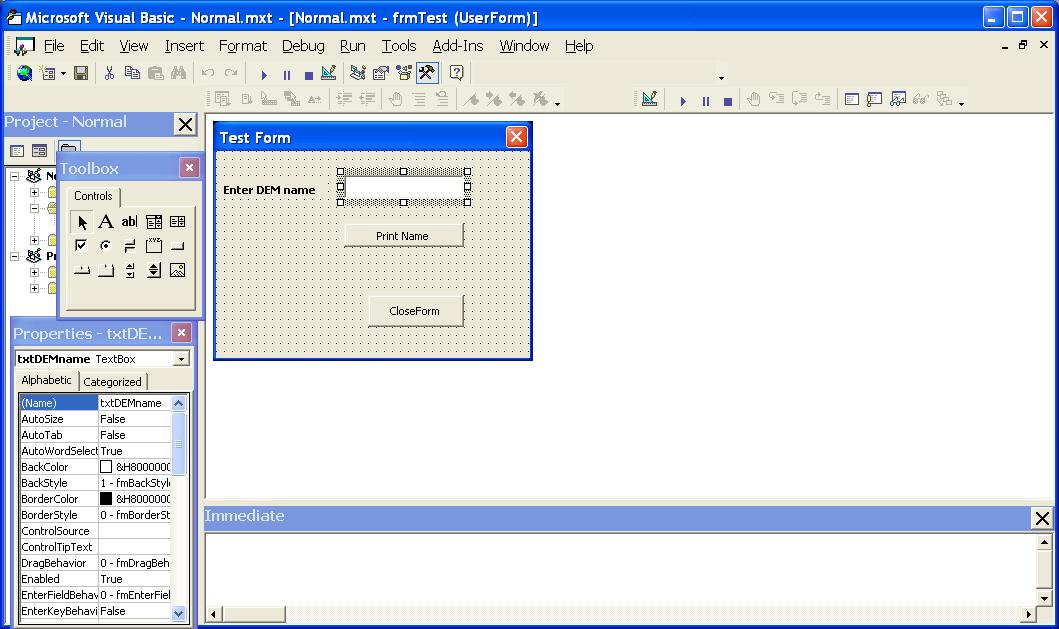
Next, double click on the command button to get to the sub that is run when the button is clicked. Add this text:
Dim DEMname As String
DEMname = Me.txtDEMname.Text
MsgBox DEMname
The Dim statement dimensions a variable as a string. The next statement pulls the text in the txtDEMname field and loads it into the DEMname variable. Finally, the MsgBox statement prints the name in a message box.
Adding a layer to the map
Now we will look at interacting with Arcmap directly. In this part of the exercise, we will add a raster data layer to the map. If you don't have a DEM, follow the instructions from the instructor.
First you need to add a new text label to the form and a new text field. The new text field should be call txtDEMfolder. You should also change the caption of "Print Name" to "Add DEM". Your form should now look like this:
Now add the code to the "Add DEM" button. This is code:
Dim sDir As String
Dim DEMname As String
sDir = Me.txtDEMfolder.Text
DEMname = Me.txtDEMname.Text
' Open raster dataset in a workspace
Dim pWsFact As IWorkspaceFactory
Dim pWS As IRasterWorkspace
' set up a workspace factory to open a workspace (a folder) where the DEM is stored
Set pWsFact = New RasterWorkspaceFactory
Set pWS = pWsFact.OpenFromFile(sDir, 0)
Dim RasterData As IRasterDataset
Set RasterData = pWS.OpenRasterDataset(DEMname)
Set pWsFact = Nothing
Set pWS = Nothing
'Create a raster layer. Use CreateFromRaster method when creating from a Raster.
Dim pRasterLy As IRasterLayer
Set pRasterLy = New RasterLayer
pRasterLy.CreateFromDataset RasterData
'Add the raster layer to ArcMap
Dim pMxDoc As IMxDocument
Set pMxDoc = ThisDocument
pMxDoc.FocusMap.AddLayer pRasterLy
pMxDoc.ActiveView.Refresh
You can copy the code from the addlayercode.txt text file.
This code first loads the variables containing the folder and the DEM name. It then opens the workspace and finds the DEM as an IRasterDataset. It then creates a raster layer and adds that layer to the map.
Try running this code and let the instructor know if you have any problems.
Walk through quiz
Create a script which makes the DEM layer invisible. To do this you will need to find the Document and its Focusmap. There are methods for the Focusmap which returns layers. Assume that the DEM is the first layer (or index = 0 - which is the first cell in an array in most programming languages). Once you find the layer, assume that there is a property of a layer that can be set to visible or invisible. You will need to use ArcObjects Developers Help for this.
We will work on this for 15 minutes, take a break, then walk through the solution.
Processing raster data using the IRasterModel interface
In this section you will implement and evaluate a major piece of code. You will then modify the code to take an additional step not in the original program.
First, create a slope grid for your DEM. Next, add a new button to your form. Change the caption to "Process DEM". Then add the code from processdemcode.txt into the sub that runs when this button is clicked. Next add the supplementary functions (which finds layers and does other raster data management tasks) from supplementalprocesscode.txt into the form's code window at the bottom - after the End Sub for Process DEM code.
The key elements of this code are these lines:
'Specify map algebra expression, use vbLf to create separate lines
pRasModel.Script = "[out1] = [dem] / 12 * 39.37" + vbLf + _
"[out2] = ([slope] < 3.0 and [dem] < 400) > 0"
'Execute map algebra expression(s)
pRasModel.Execute
This code uses an IRasterModel to execute an operation that you might use in the Raster Calculator.
The code also finds the output of these operations (there are two output rasters) and adds them as layers to the map. The first output raster converts the DEM Z units from meters to feet. The second one creates a binary output - 1 where the slope is less that 3 degrees (since the example slope map is in degrees) and the elevation of the original DEM is 400 meters, and 0 elsewhere in the DEM.
Before running this code you will have to alter the code in processdemxode.txt so that the original dimension of the Application variable and setting this variable are removed and replacing it with a reference to the Application (which is universally available in VBA) and the Document. Your code for this might look like this:
MyDocumentVariable = Application.Document
Try this code and let the instructor know how it worked.
Quiz: Modifying the raster code
Modify the code so that a third raster layer is created in the IRasterModel. This raster should have the elevation for only those cells that meet the conditions in the current second step of the model. You should assume that the raster you already produced is not available (therefore your calculation should include this). Recall that the places were the condition is true, the raster cell value is 1. You can multiply this to get the DEM value. You will have to look at how the output is manipulated into a raster layer and added to the map.
Where to go from here
Use the samples!