by Palmer Mebane
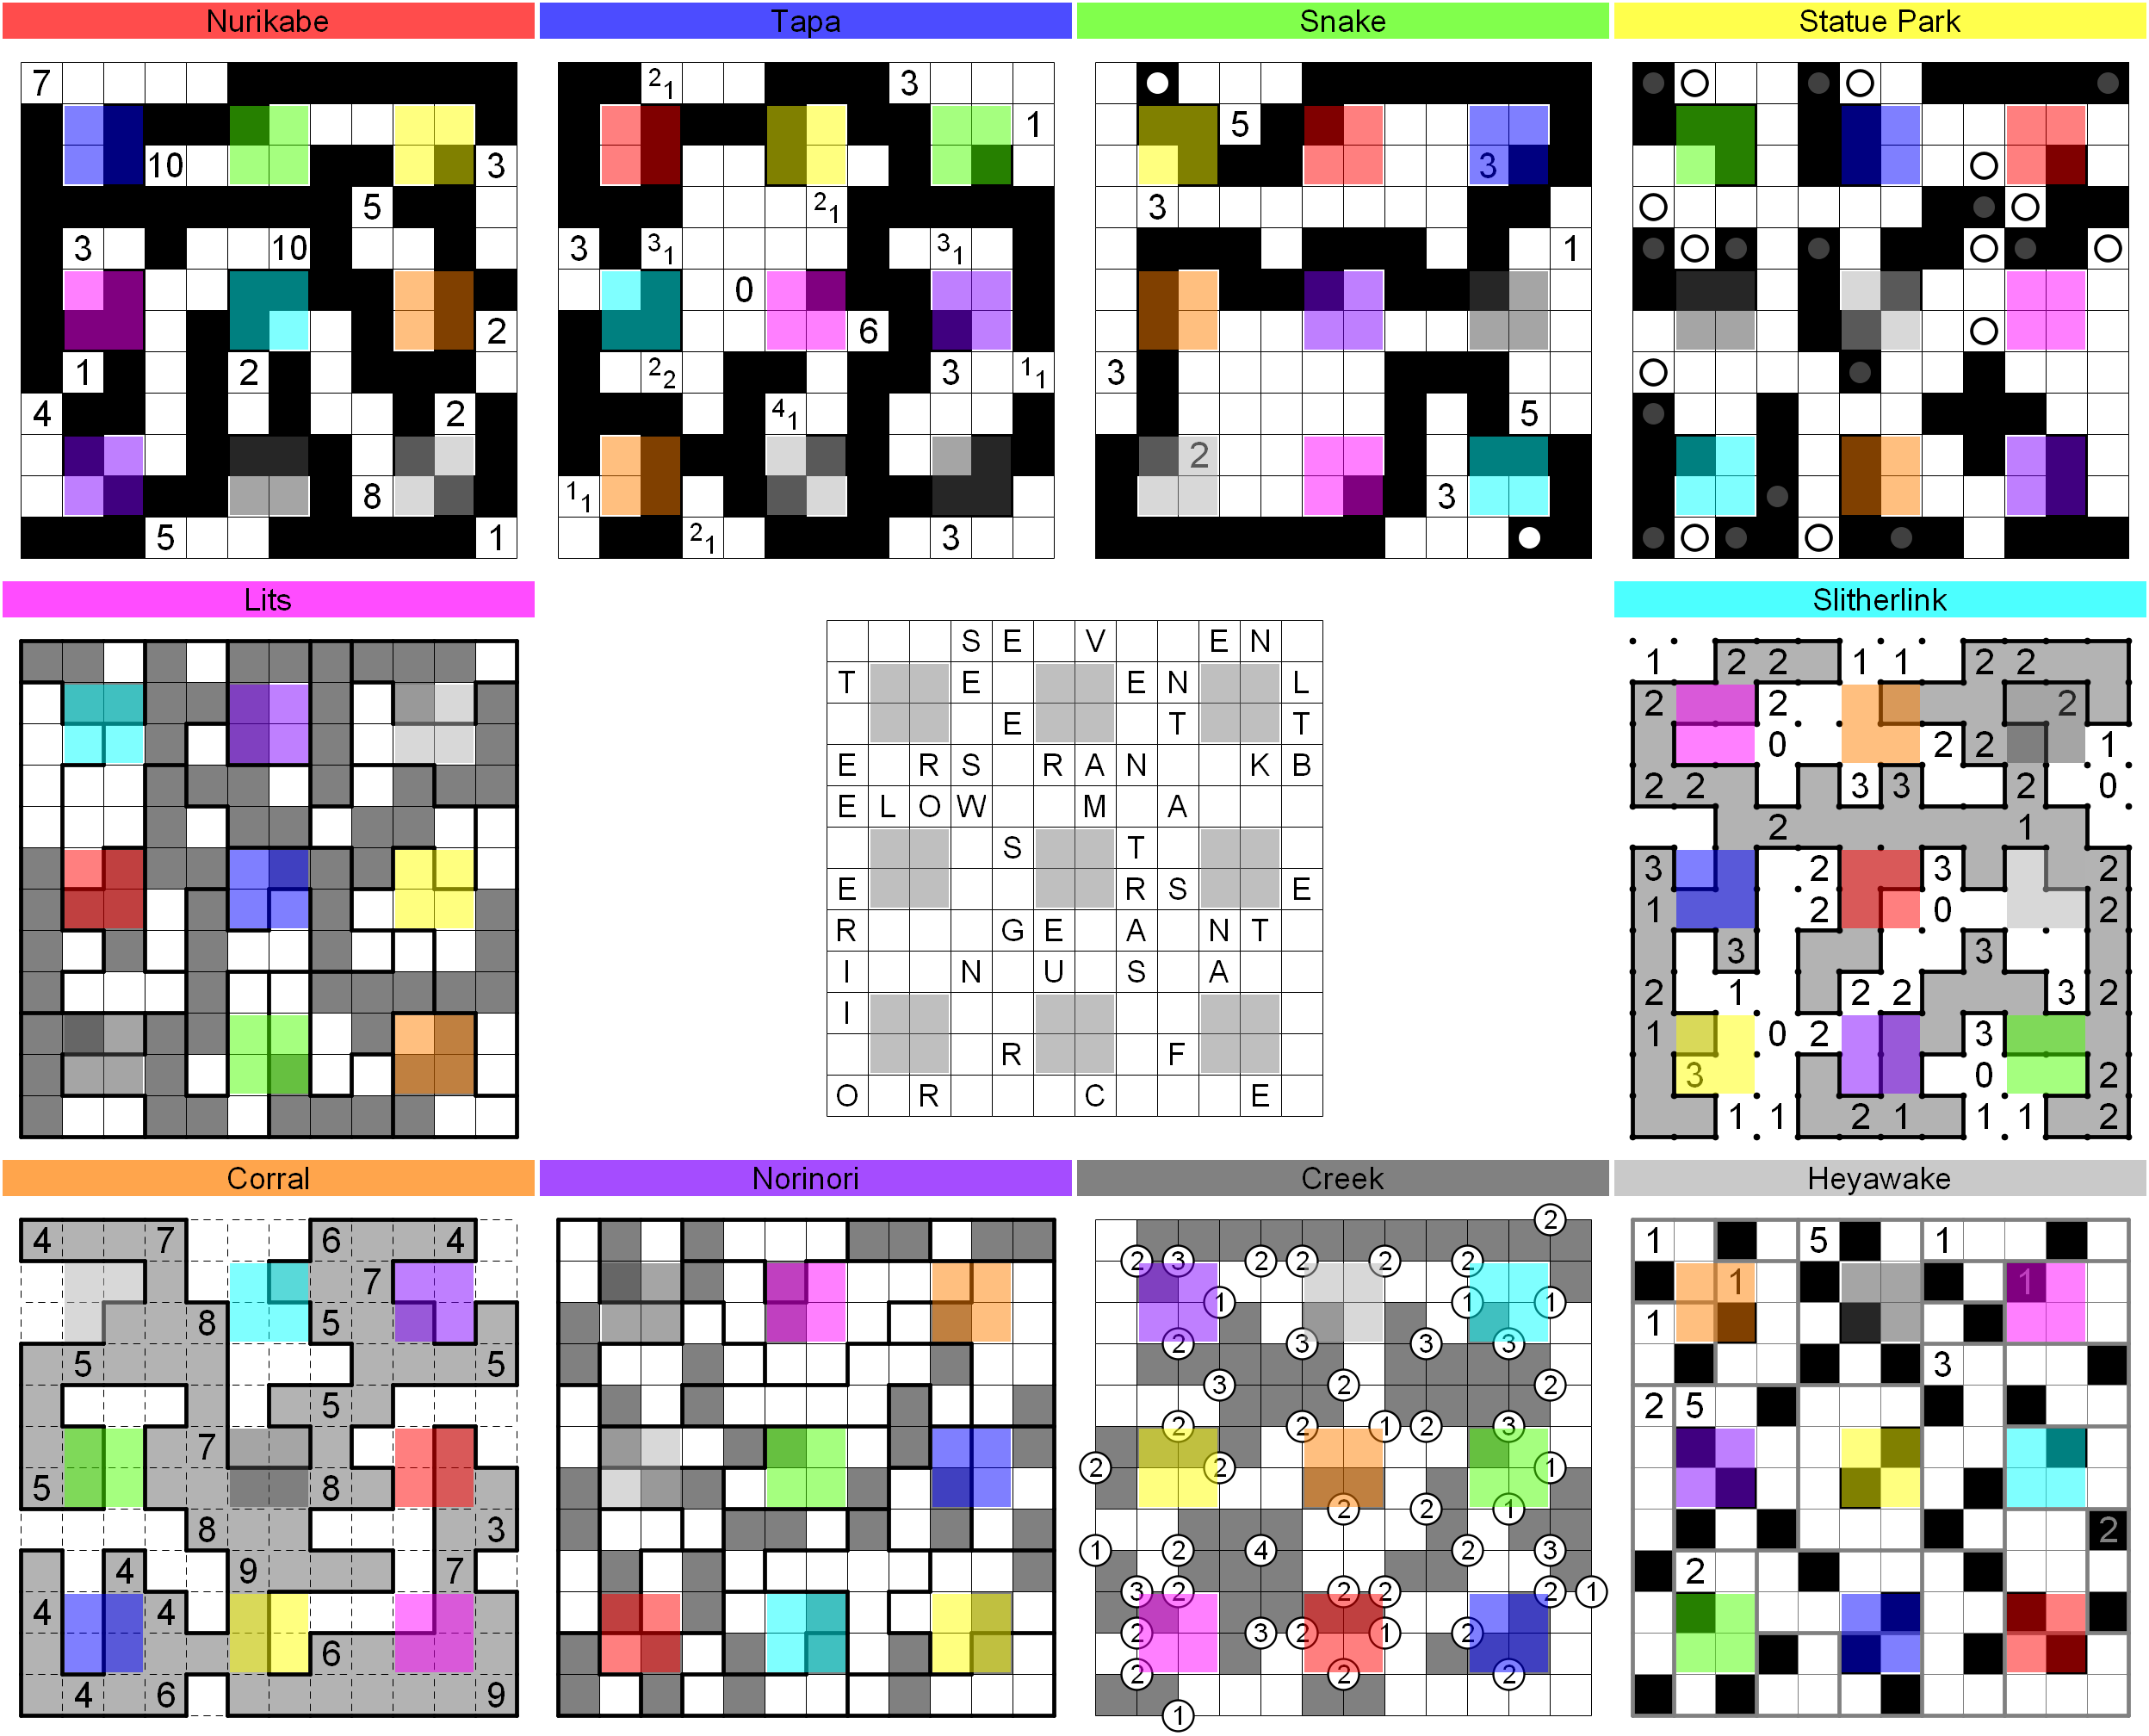
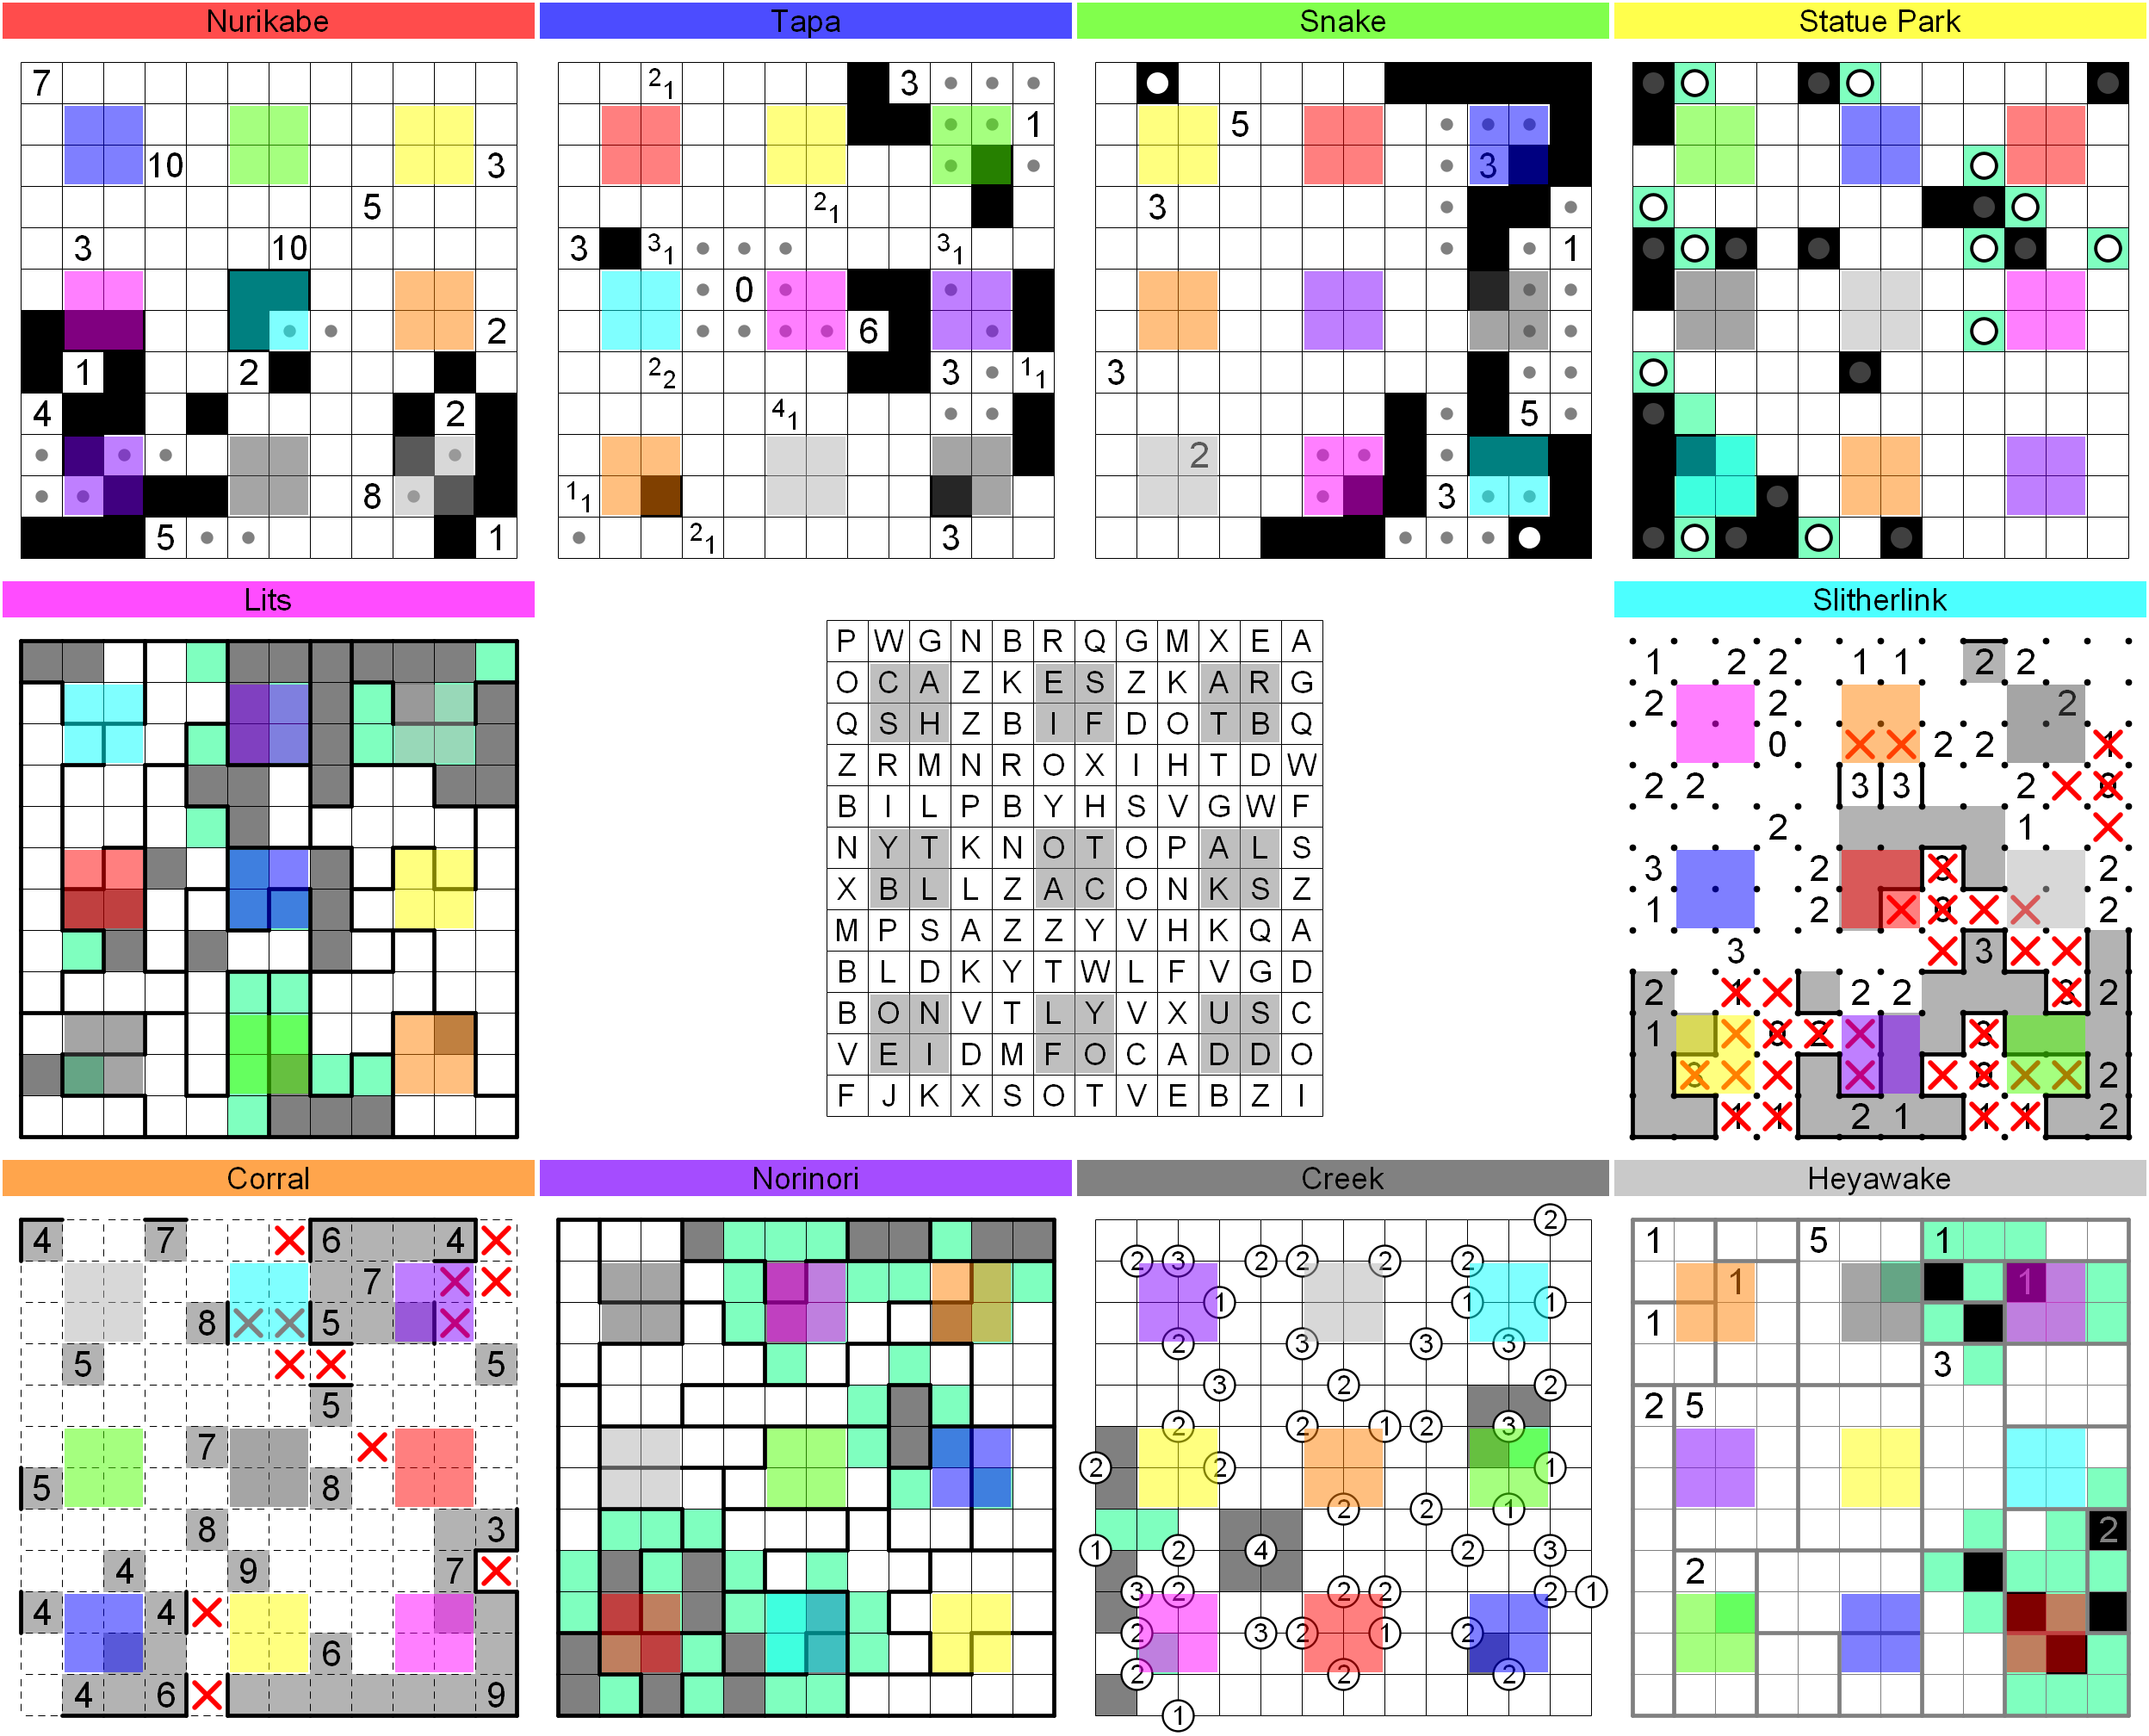
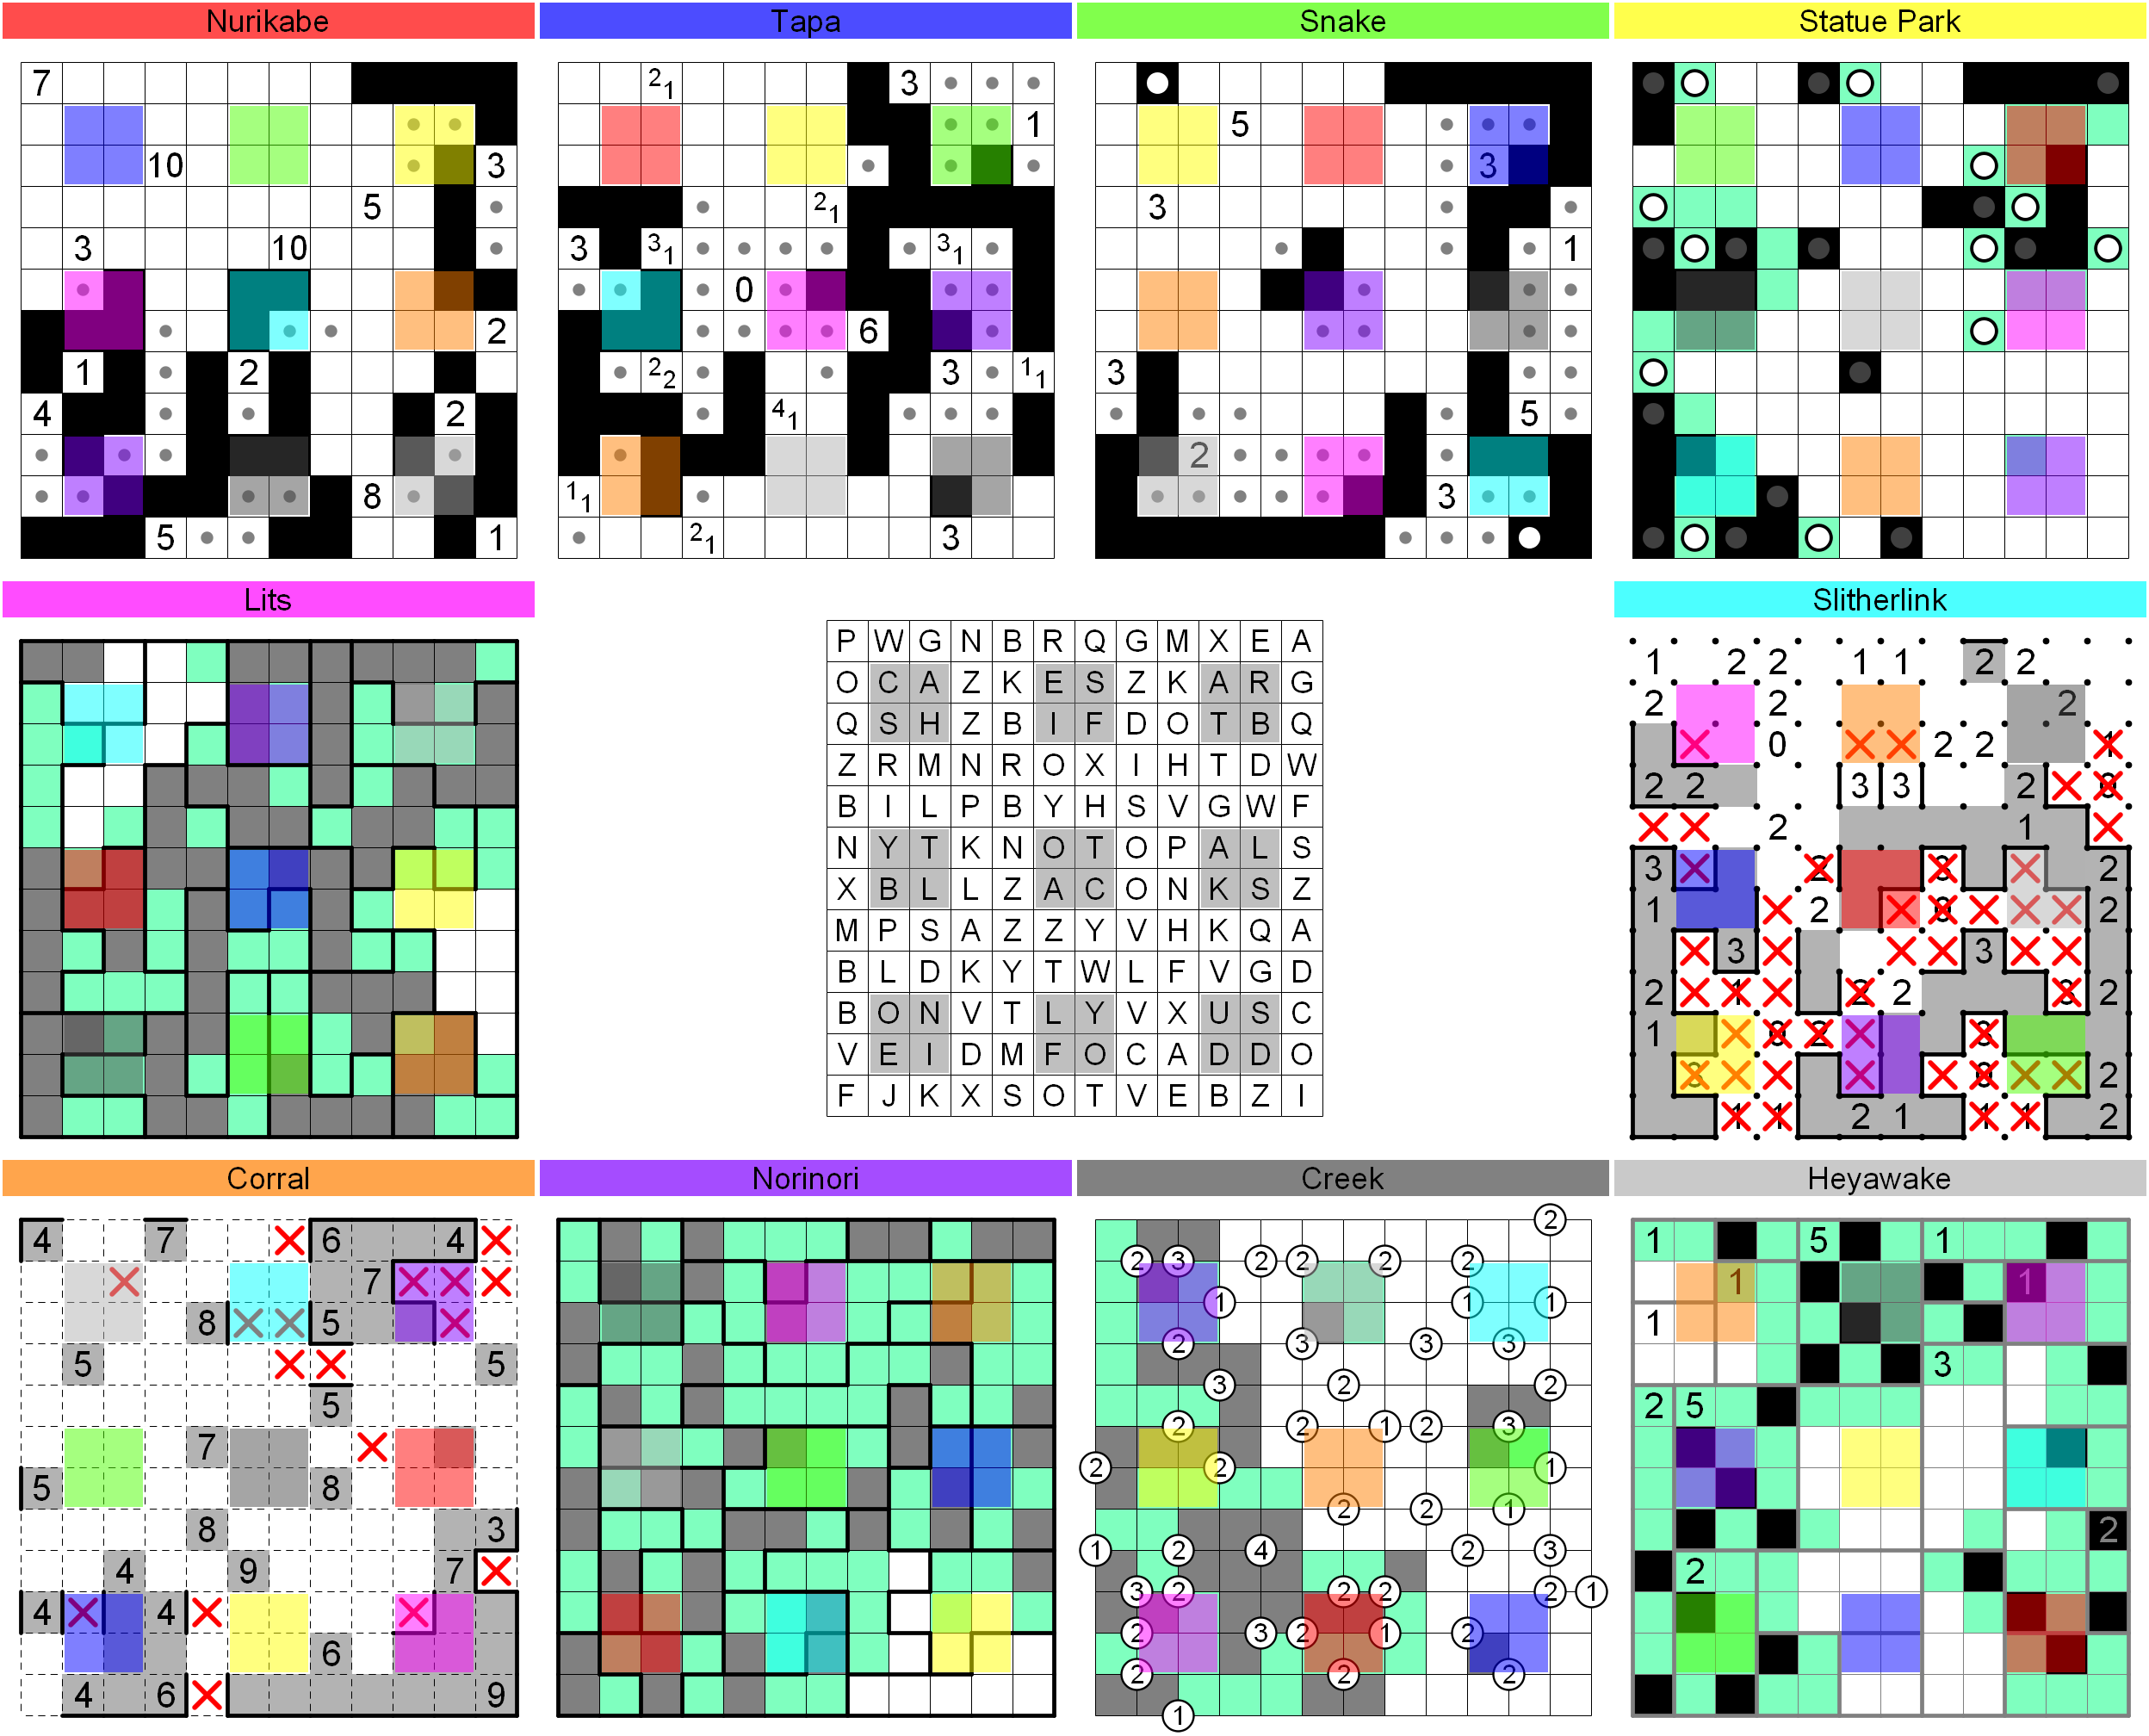
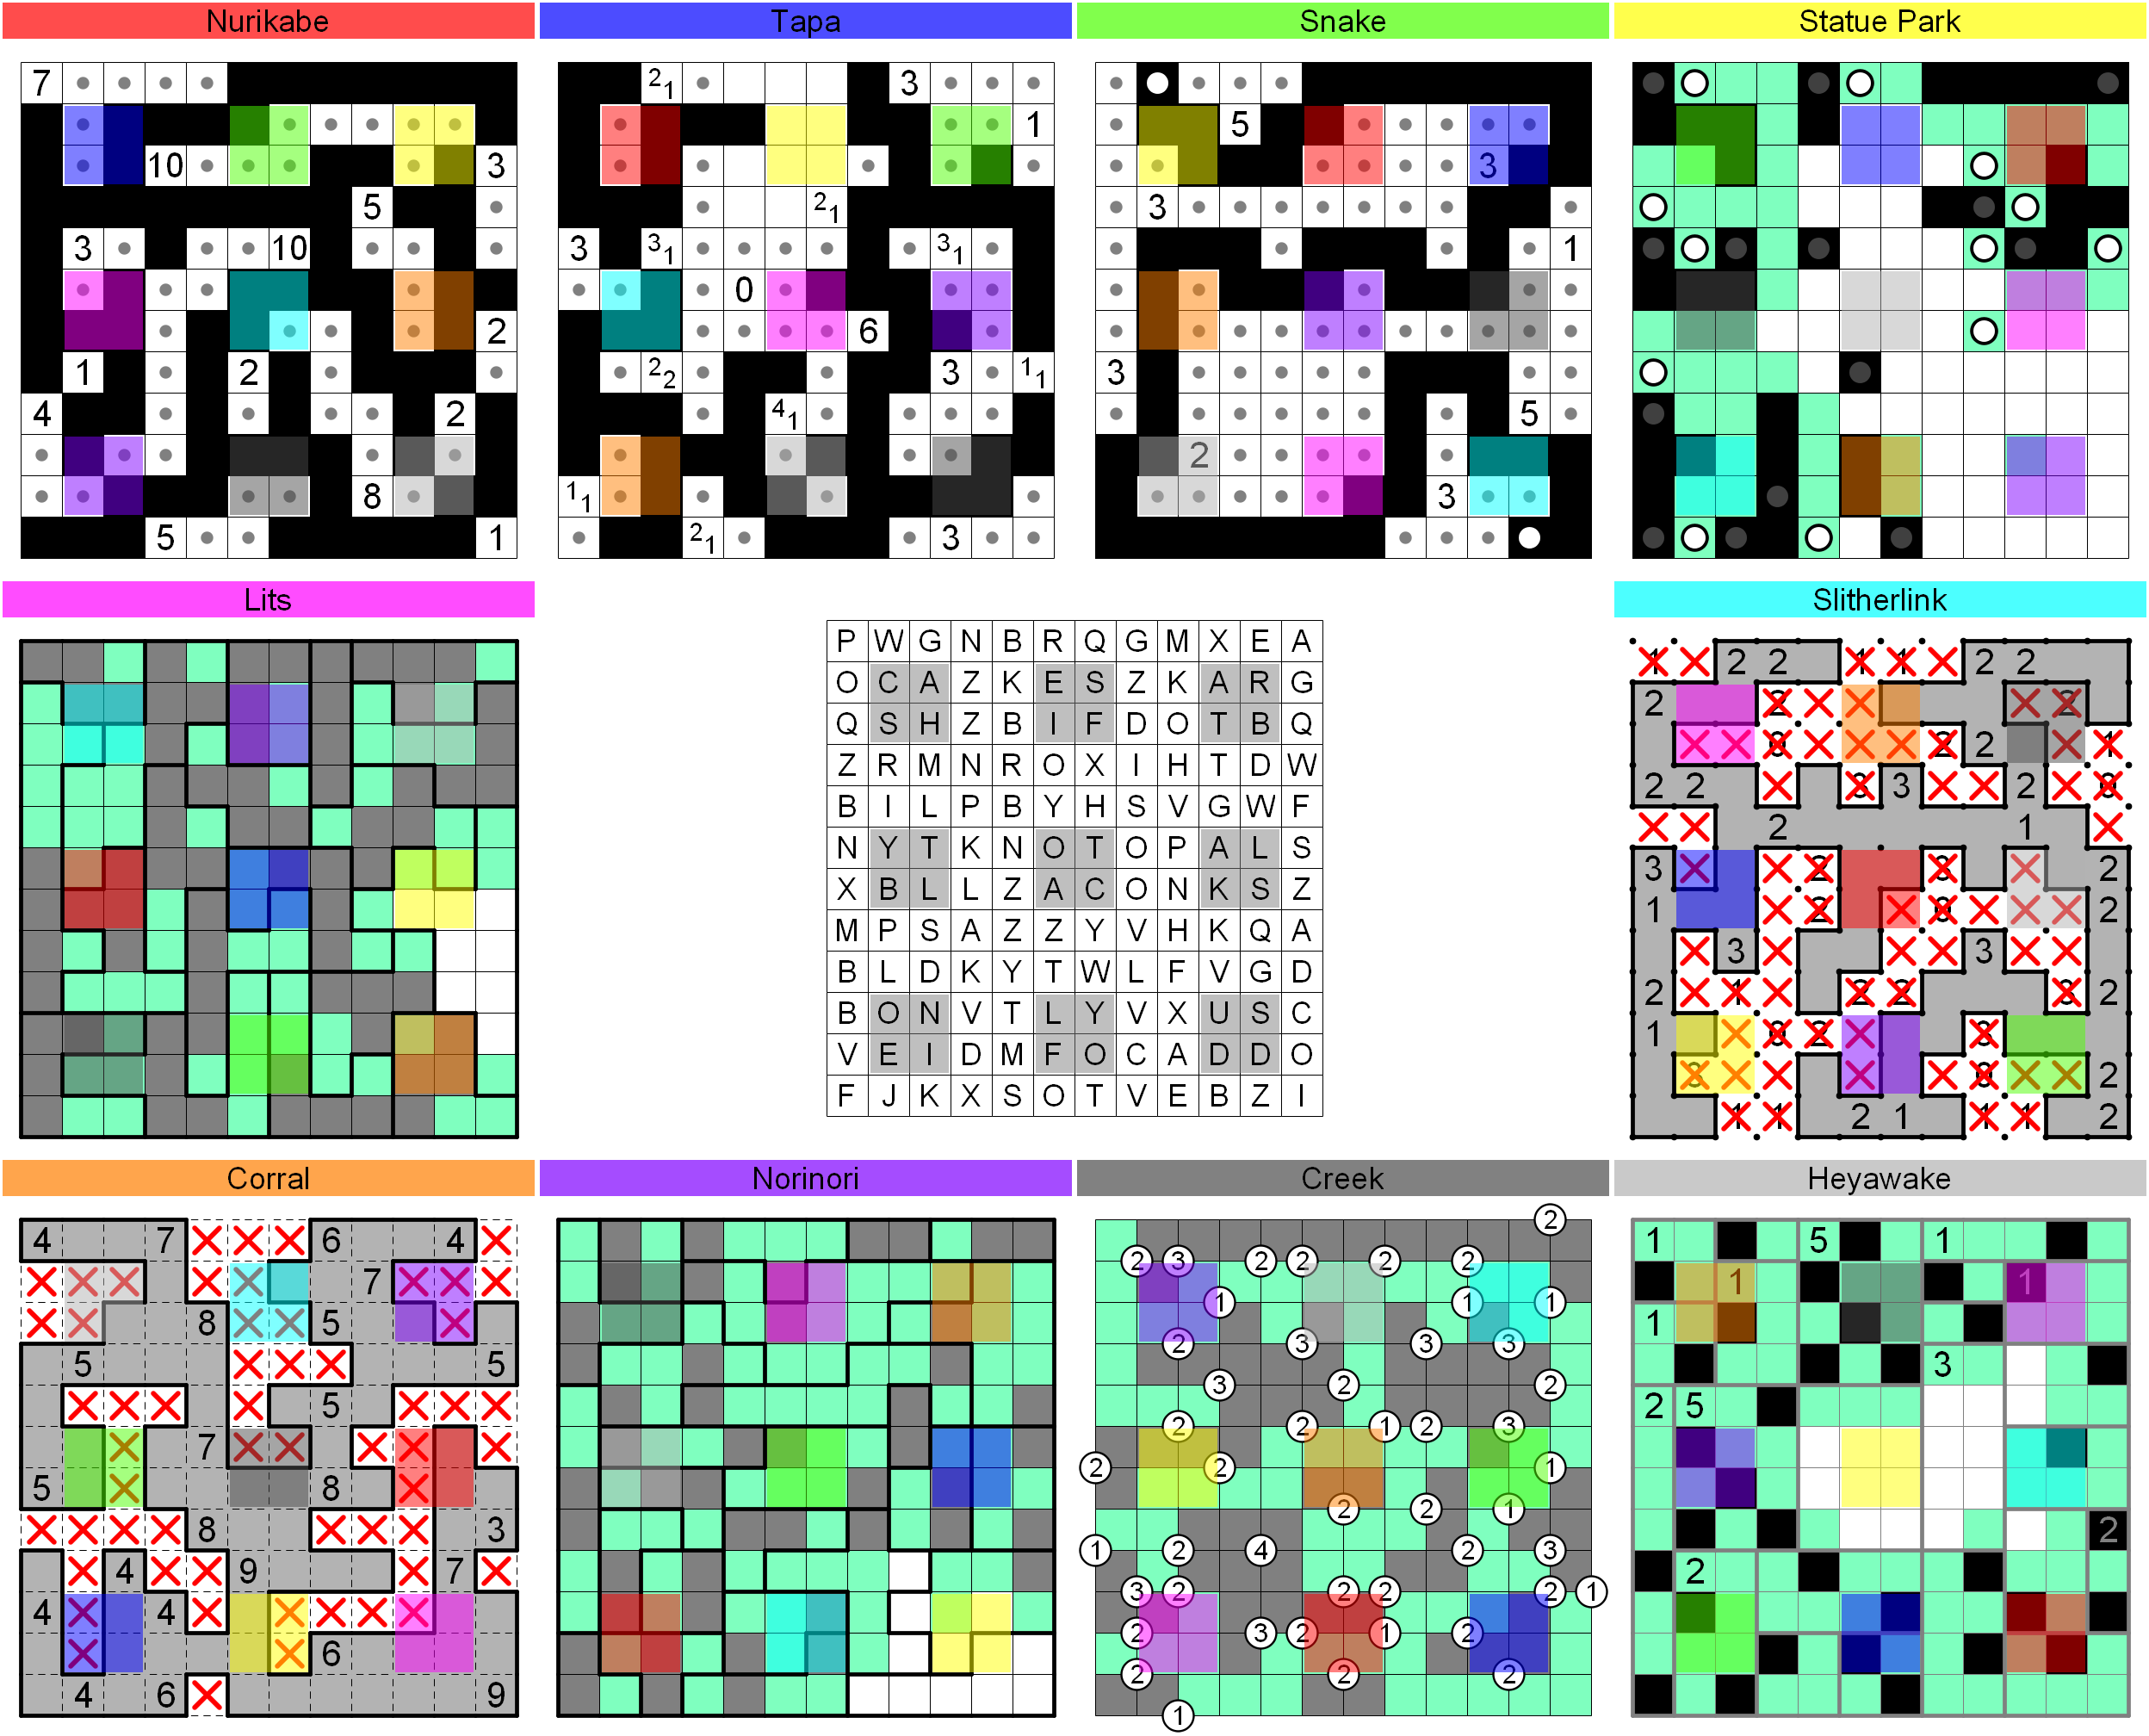
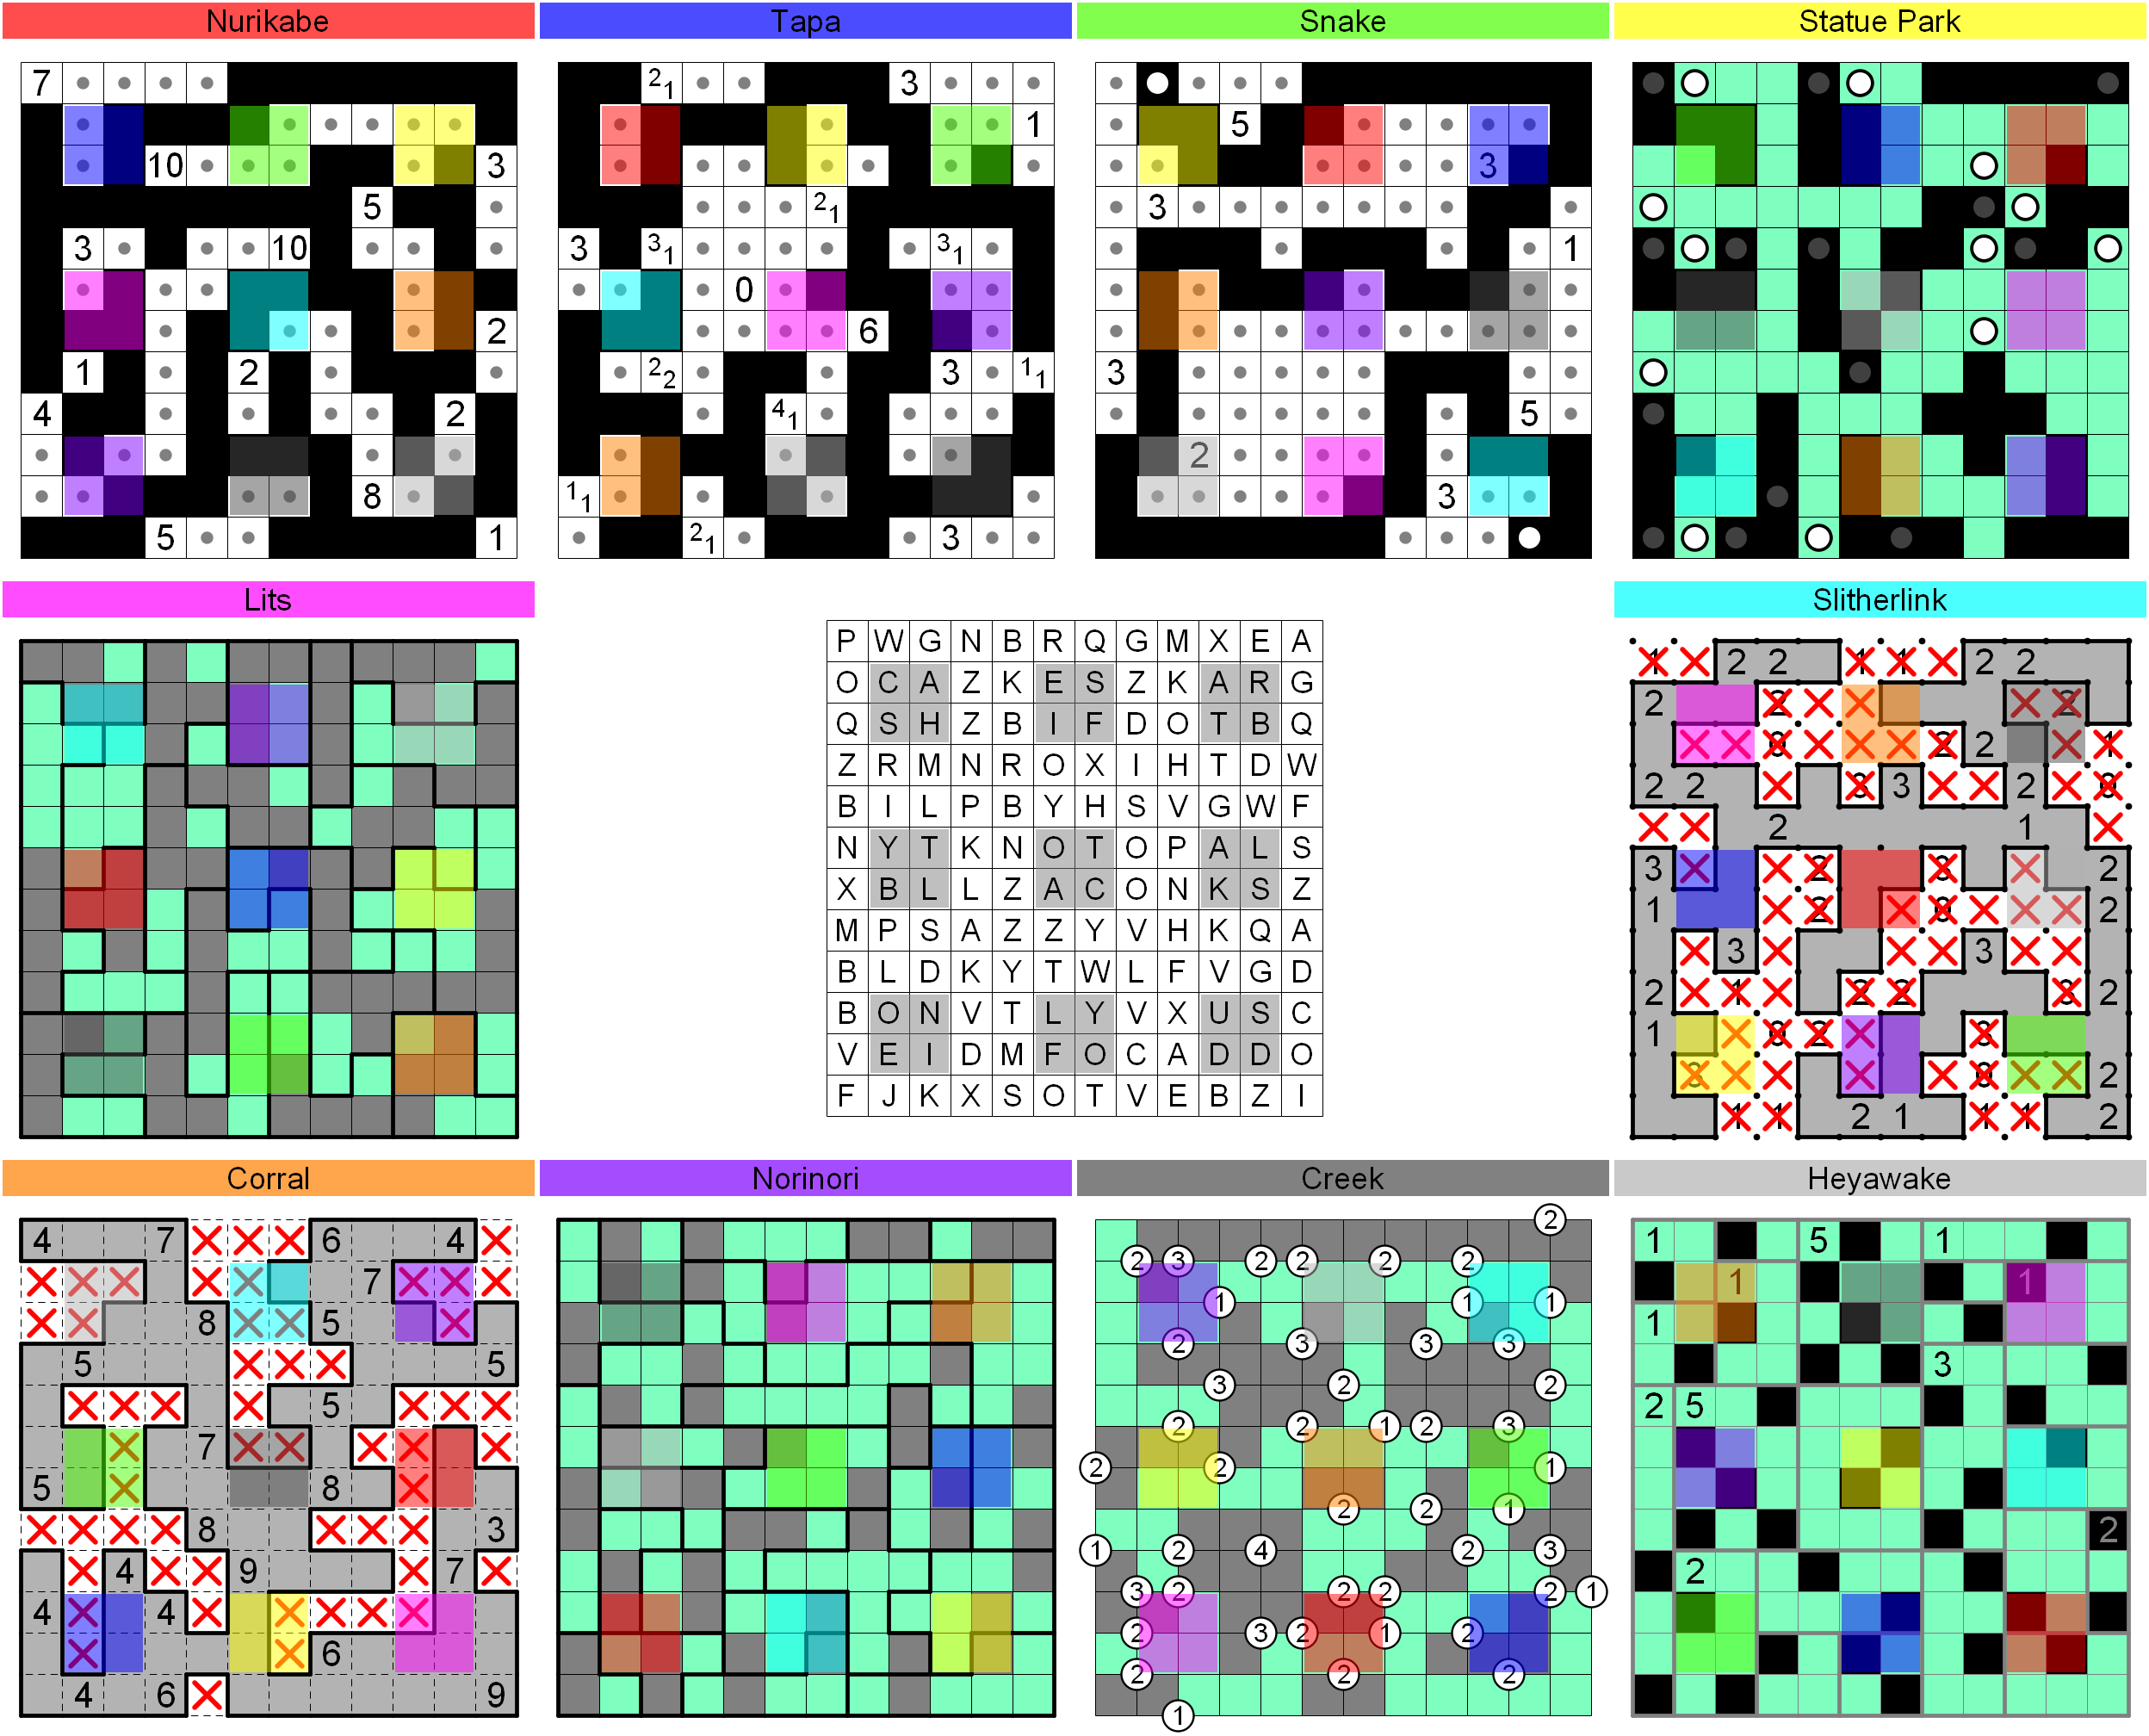
There is not much more to this puzzle than the directions given. Solve the 10 grids simultaneously using the directions given. Although there is almost nothing to be done in each grid when considered on its own, there is a unique solution for all 10 together:
To extract the answer, notice that in the grid of letters, the squares on the portal positions read, left to right top to bottom, "CAESAR SHIFT BY TOTAL BLACKS ONLY USE IF ODD". For each grid position, count up the total number of squares across all 10 grids where the square is black. If this number is odd, caesar shift the letter in that space by that total and record the letter. Otherwise if the number is even, erase the letter completely. When this is done, you will obtain the grid shown in the center of "portals_solution.png". It reads "SEVENTEEN LETTERS RANK BELOW MASTER SERGEANT IN US AIR FORCE". The rank directly below Master Sergeant in the US Air Force is TECHNICAL SERGEANT, which has seventeen letters. This is the puzzle's answer.
LOGICAL WALKTHROUGH
S1: This shows most of the reasonable deductions that can be made in all 10 puzzles without any use of the portal constraint. The only tough but crucial step here is Statue Park's R10C3 needing to be unshaded. This is determined by noting that exactly one of R9C2 and R10C2 must be shaded, so there is effectively a barrier to connectivity of unshaded squares between those two cells. The only way the unshaded square on R12C2 can escape is through R10C3.
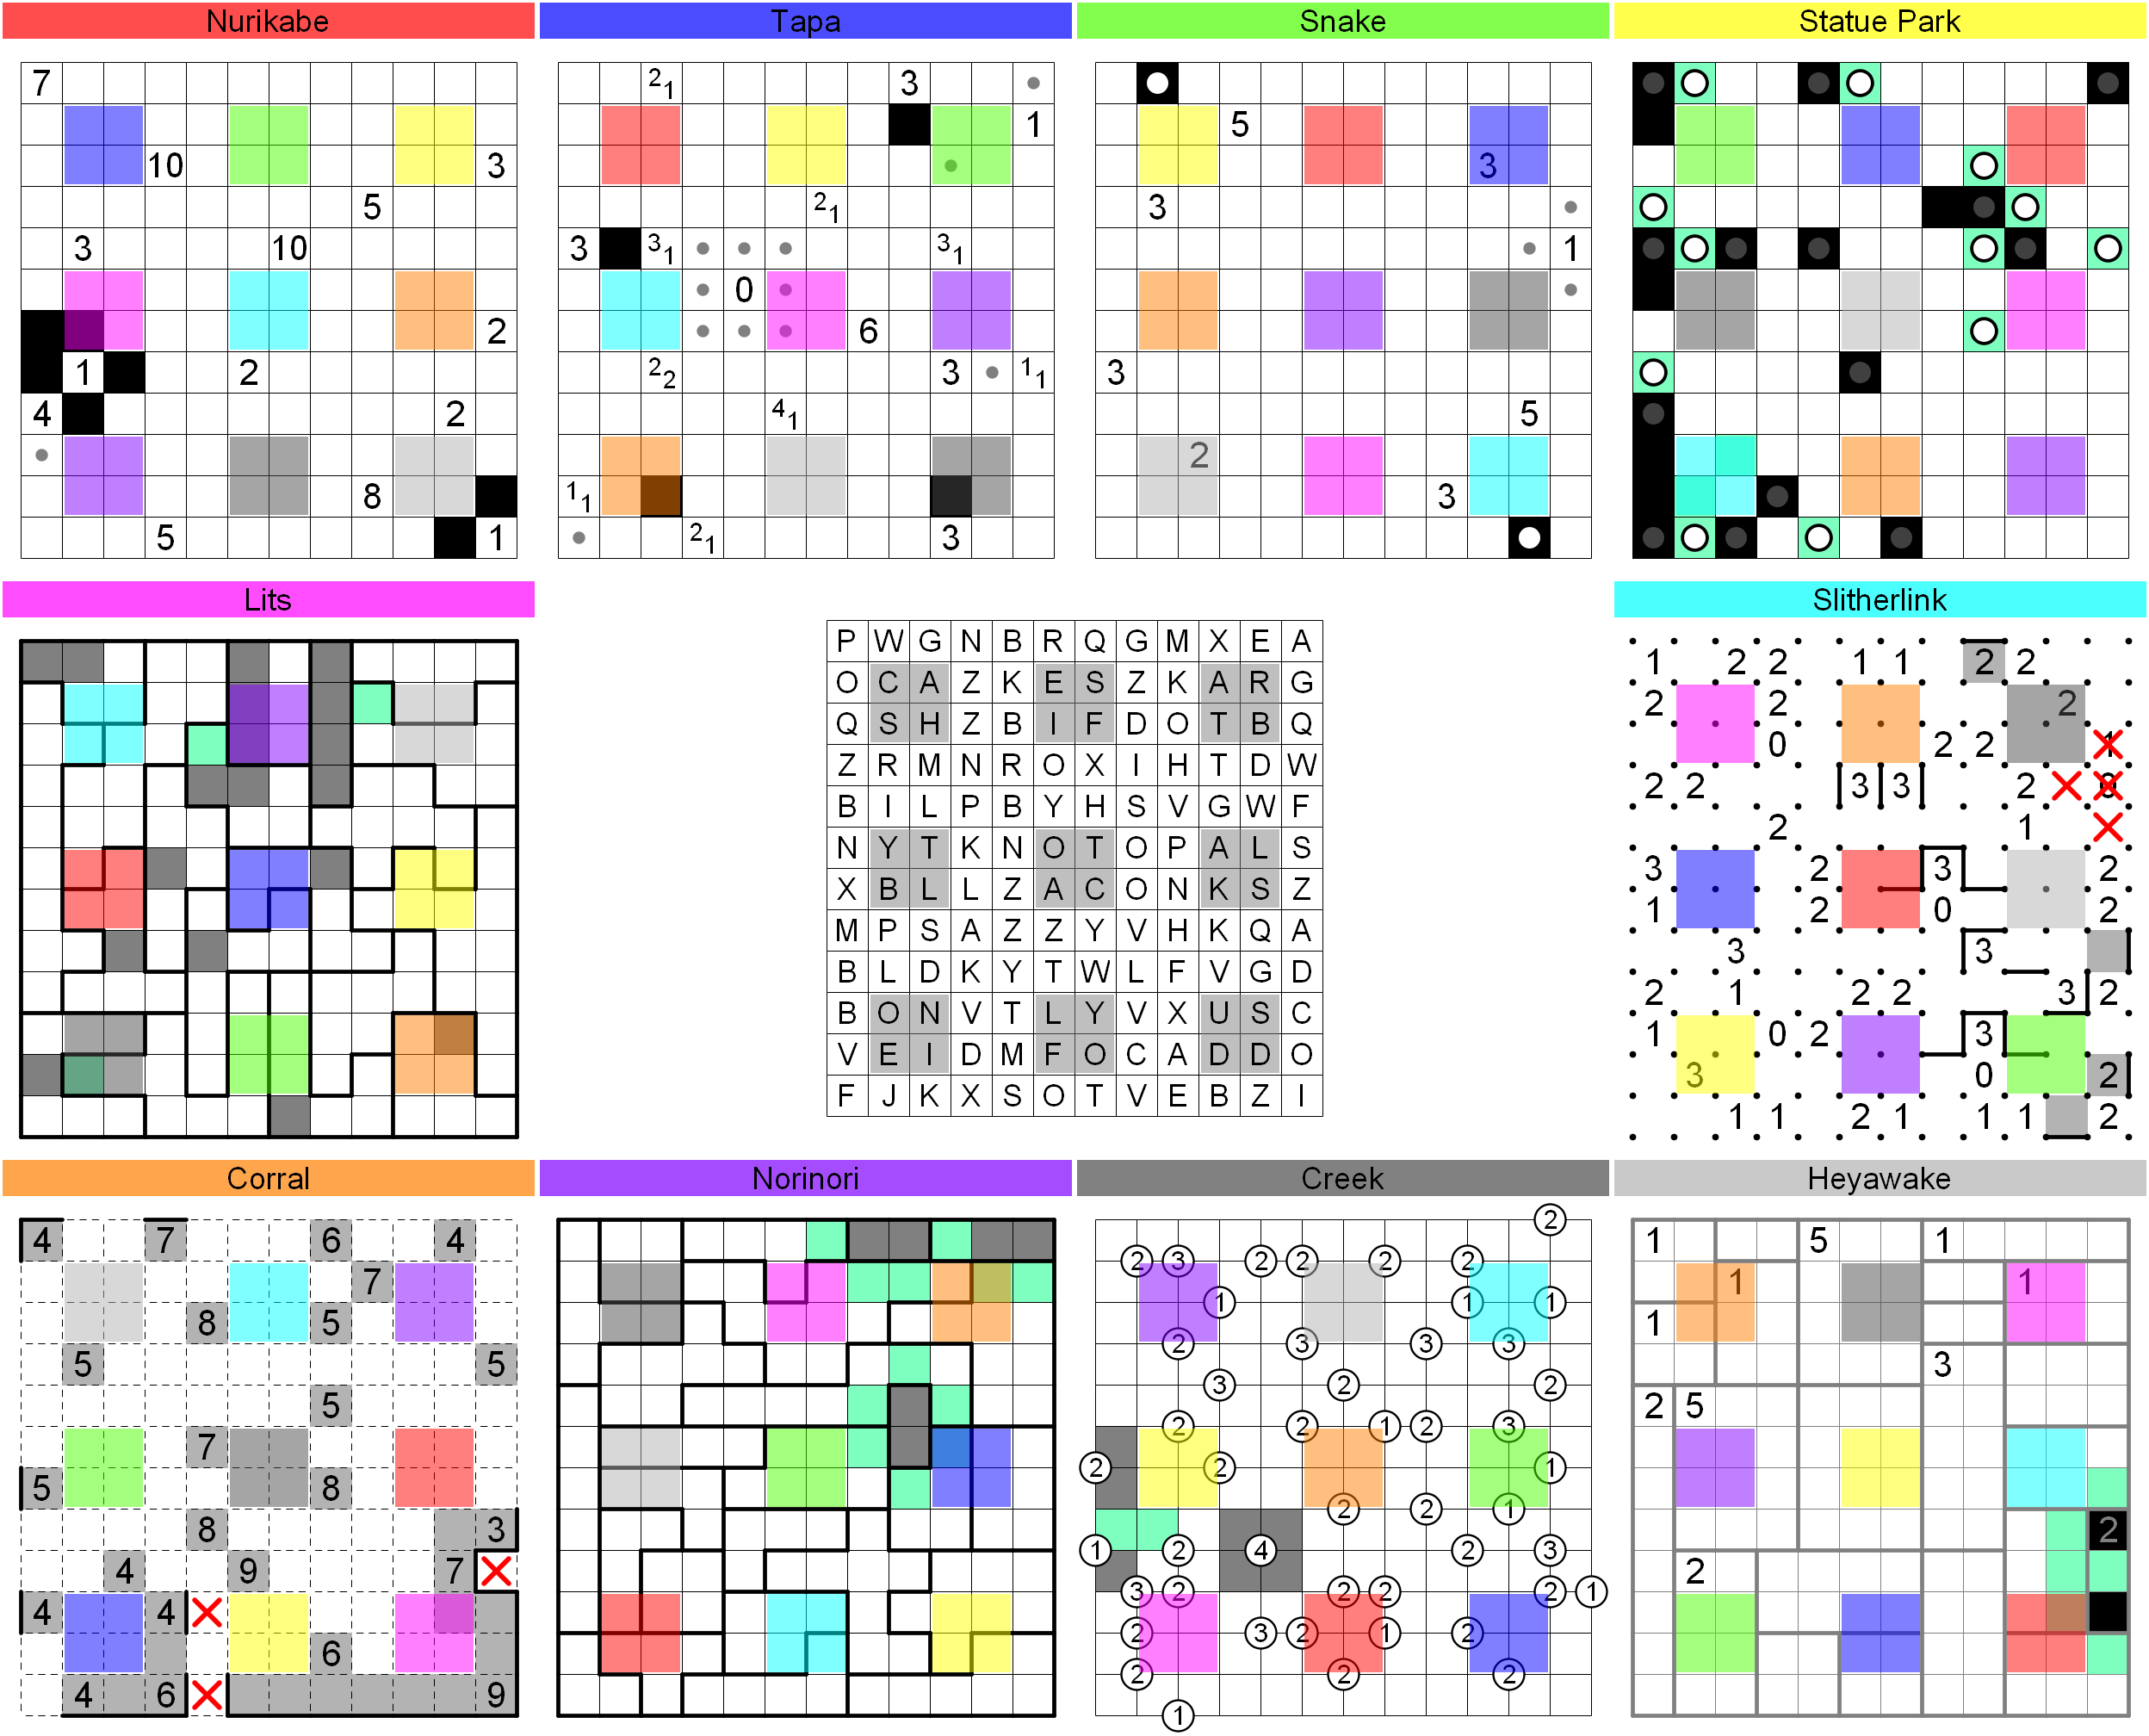
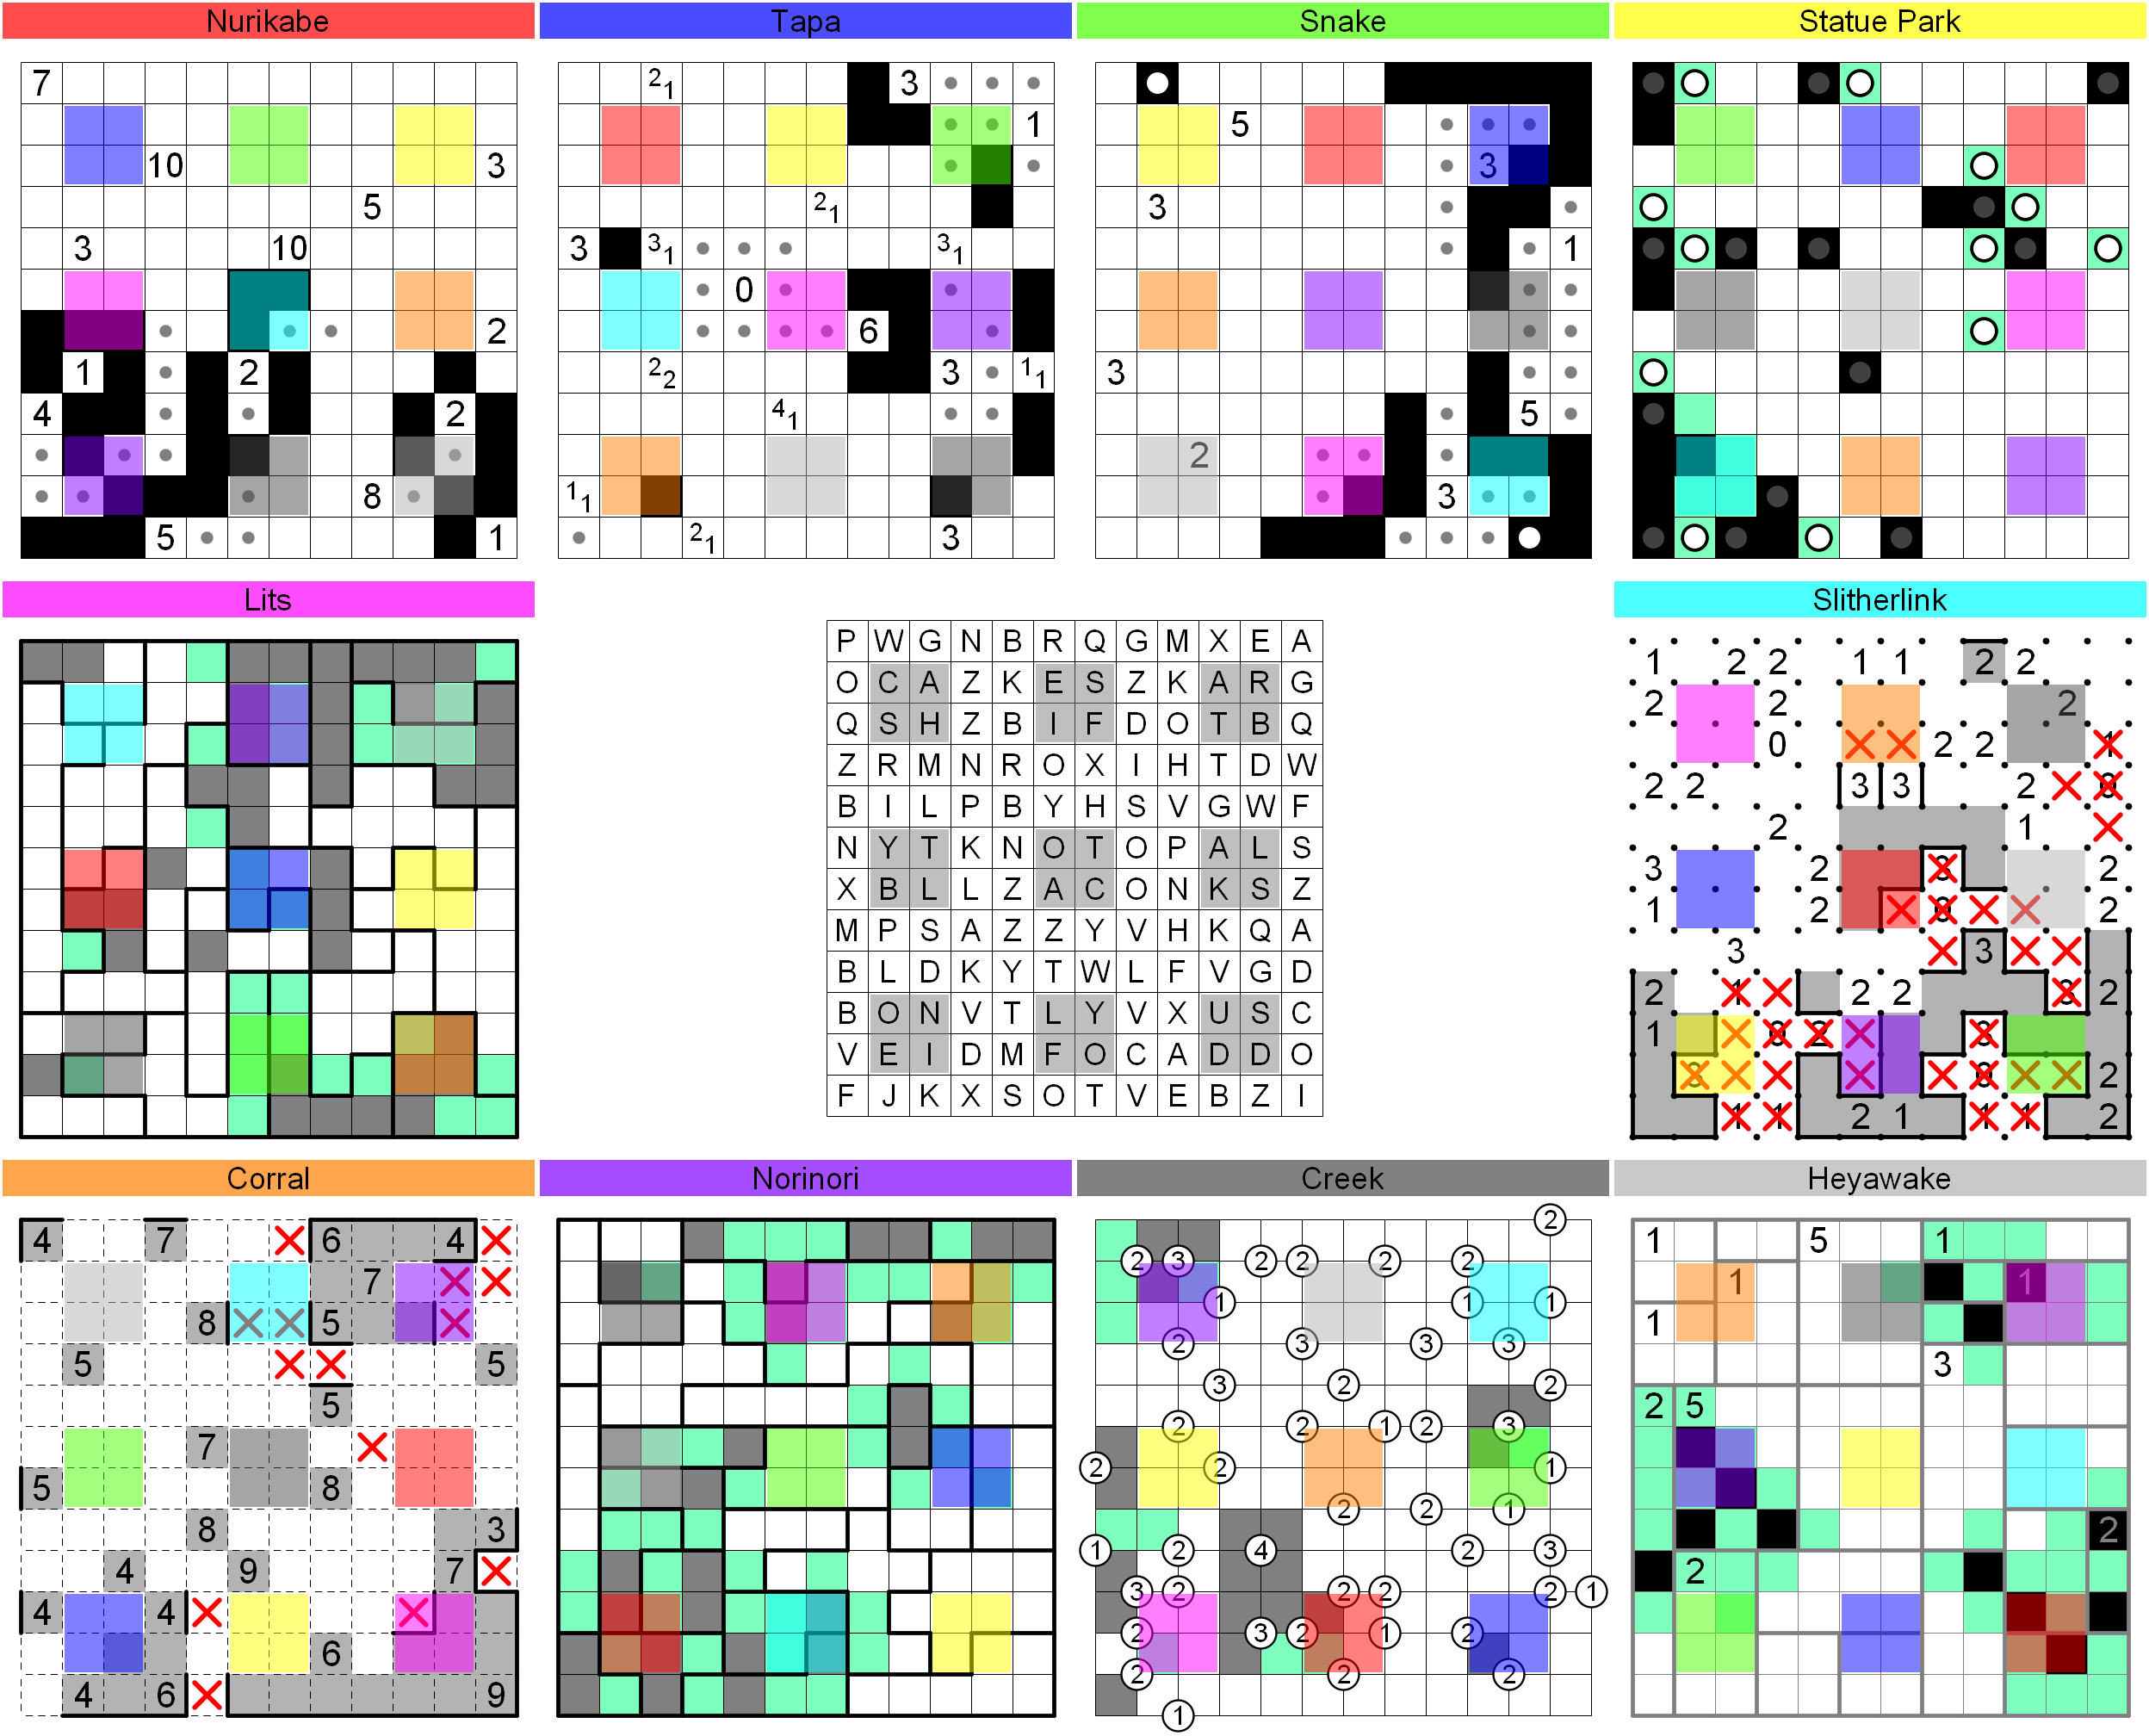
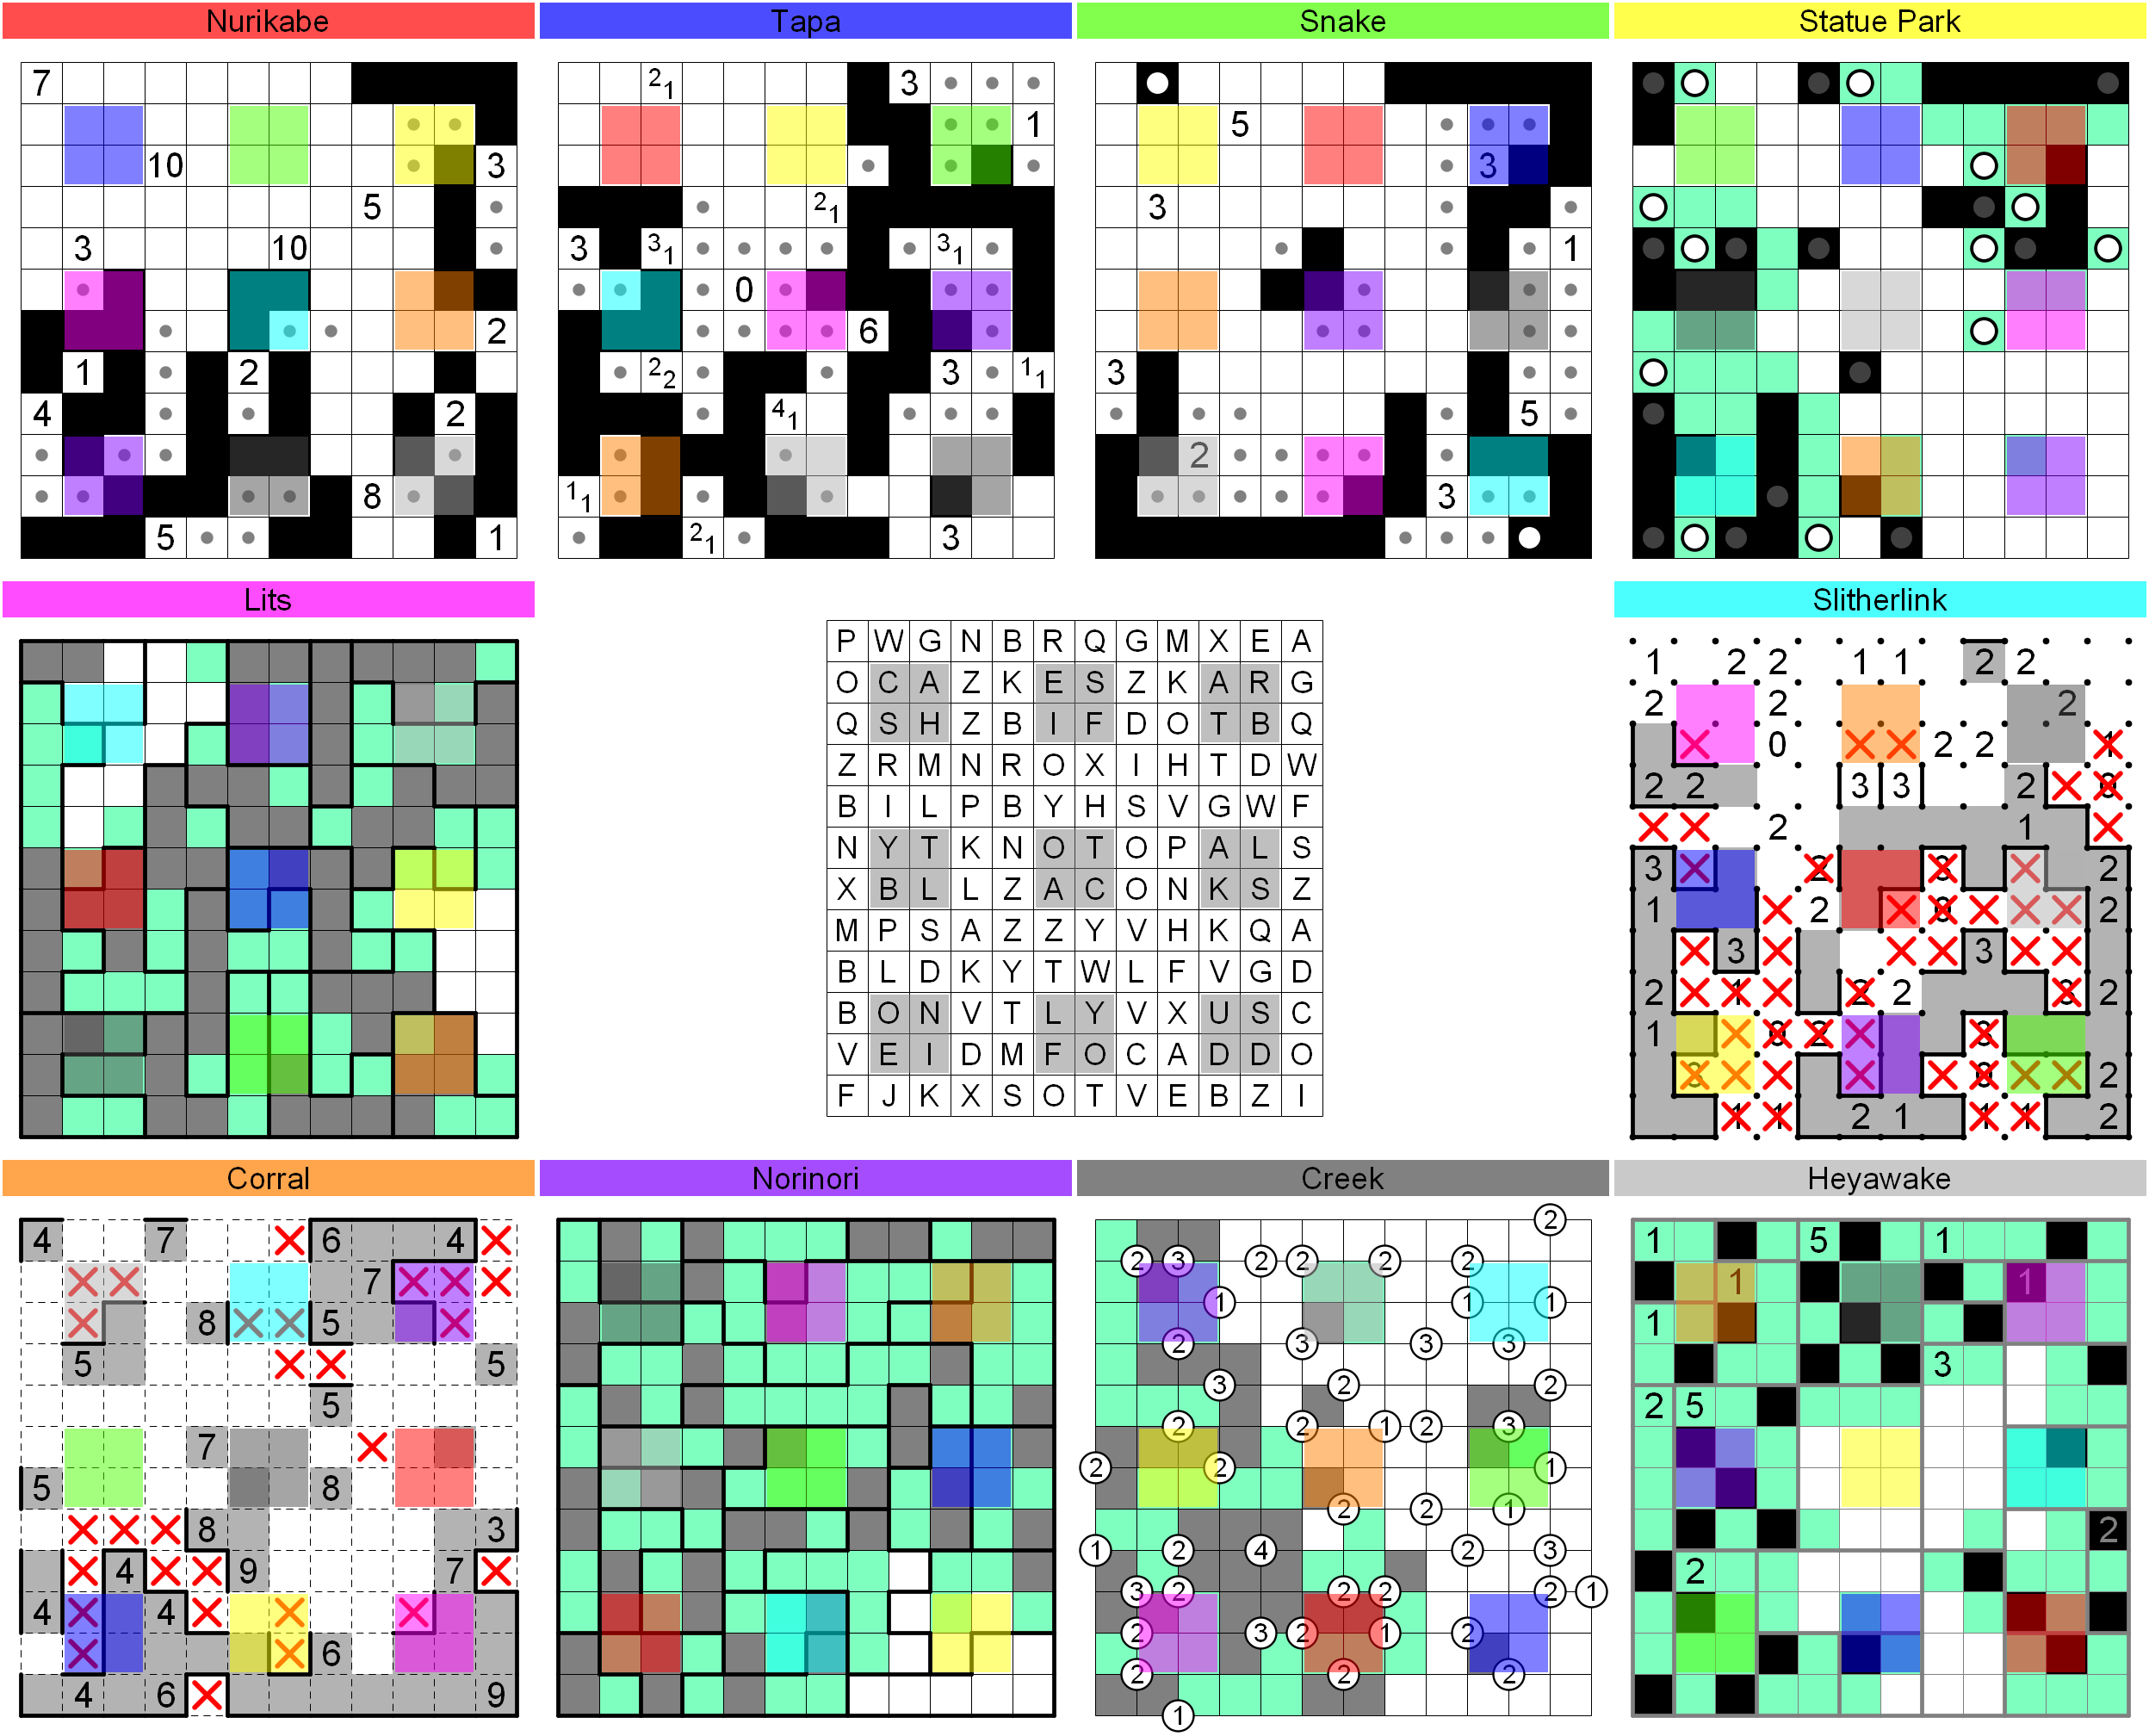
S2: This obtains...
- negligible (for now) progress in the following portals: Tapa-Corral (SW), Tapa-Creek (SE), Snake-Tapa (NE), Snake-Heyawake (SW), LITS-Creek (SW), Corral-LITS (SE), Norinori-Tapa (E)
- substantial but easily done progress in the following portals: Nurikabe-LITS (W), Tapa-LITS (C), Statue Park-Slitherlink (SW), LITS-Norinori (N), Norinori-Corral (NE), Heyawake-Nurikabe (SE)
- progress in the LITS-Heyawake (NE) portal by noting that the top right region has to use one square in the portal (otherwise two I tetrominoes touch), but the portal is in a Heyawake room with one black square.
- progress in the Slitherlink-Snake (SE) portal by using the fact that R10C10-11 are different colors (Slitherlink) and one configuration doesn't work in snake.
- progress in the Creek-Snake (E) portal by noting that if the Snake's 1 clue used R6C11 a contradiction would result in Creek.
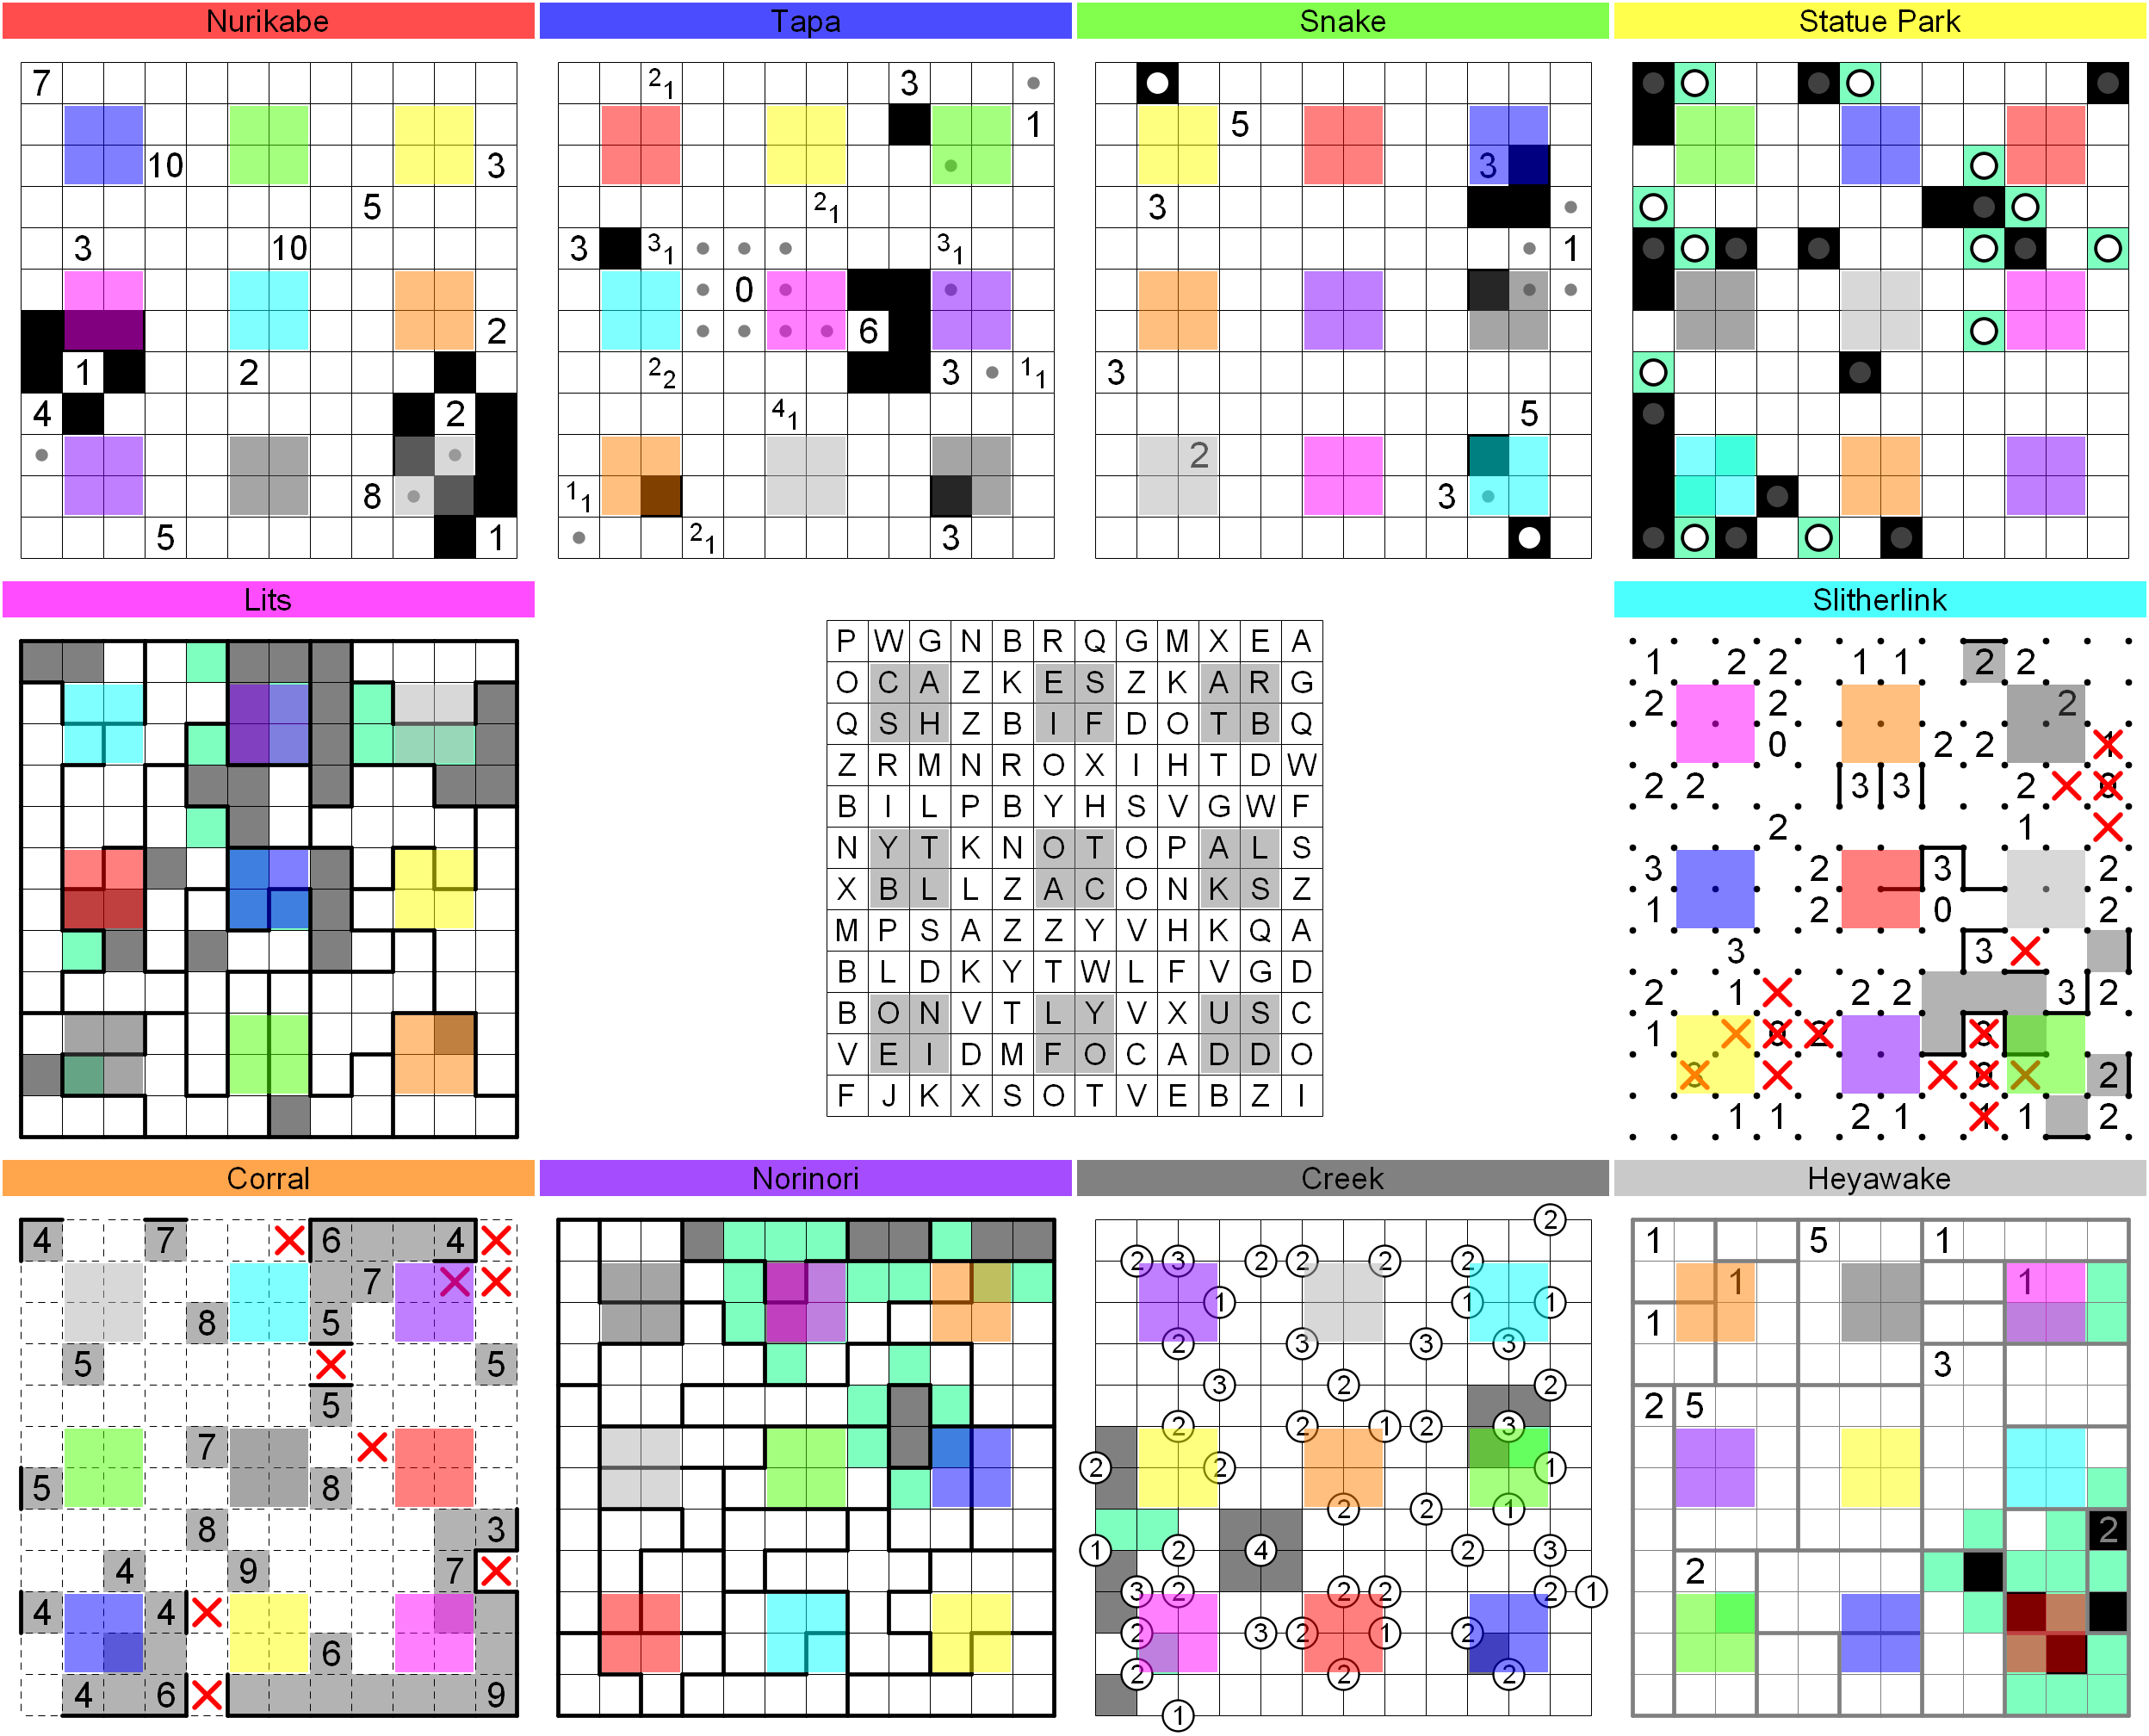
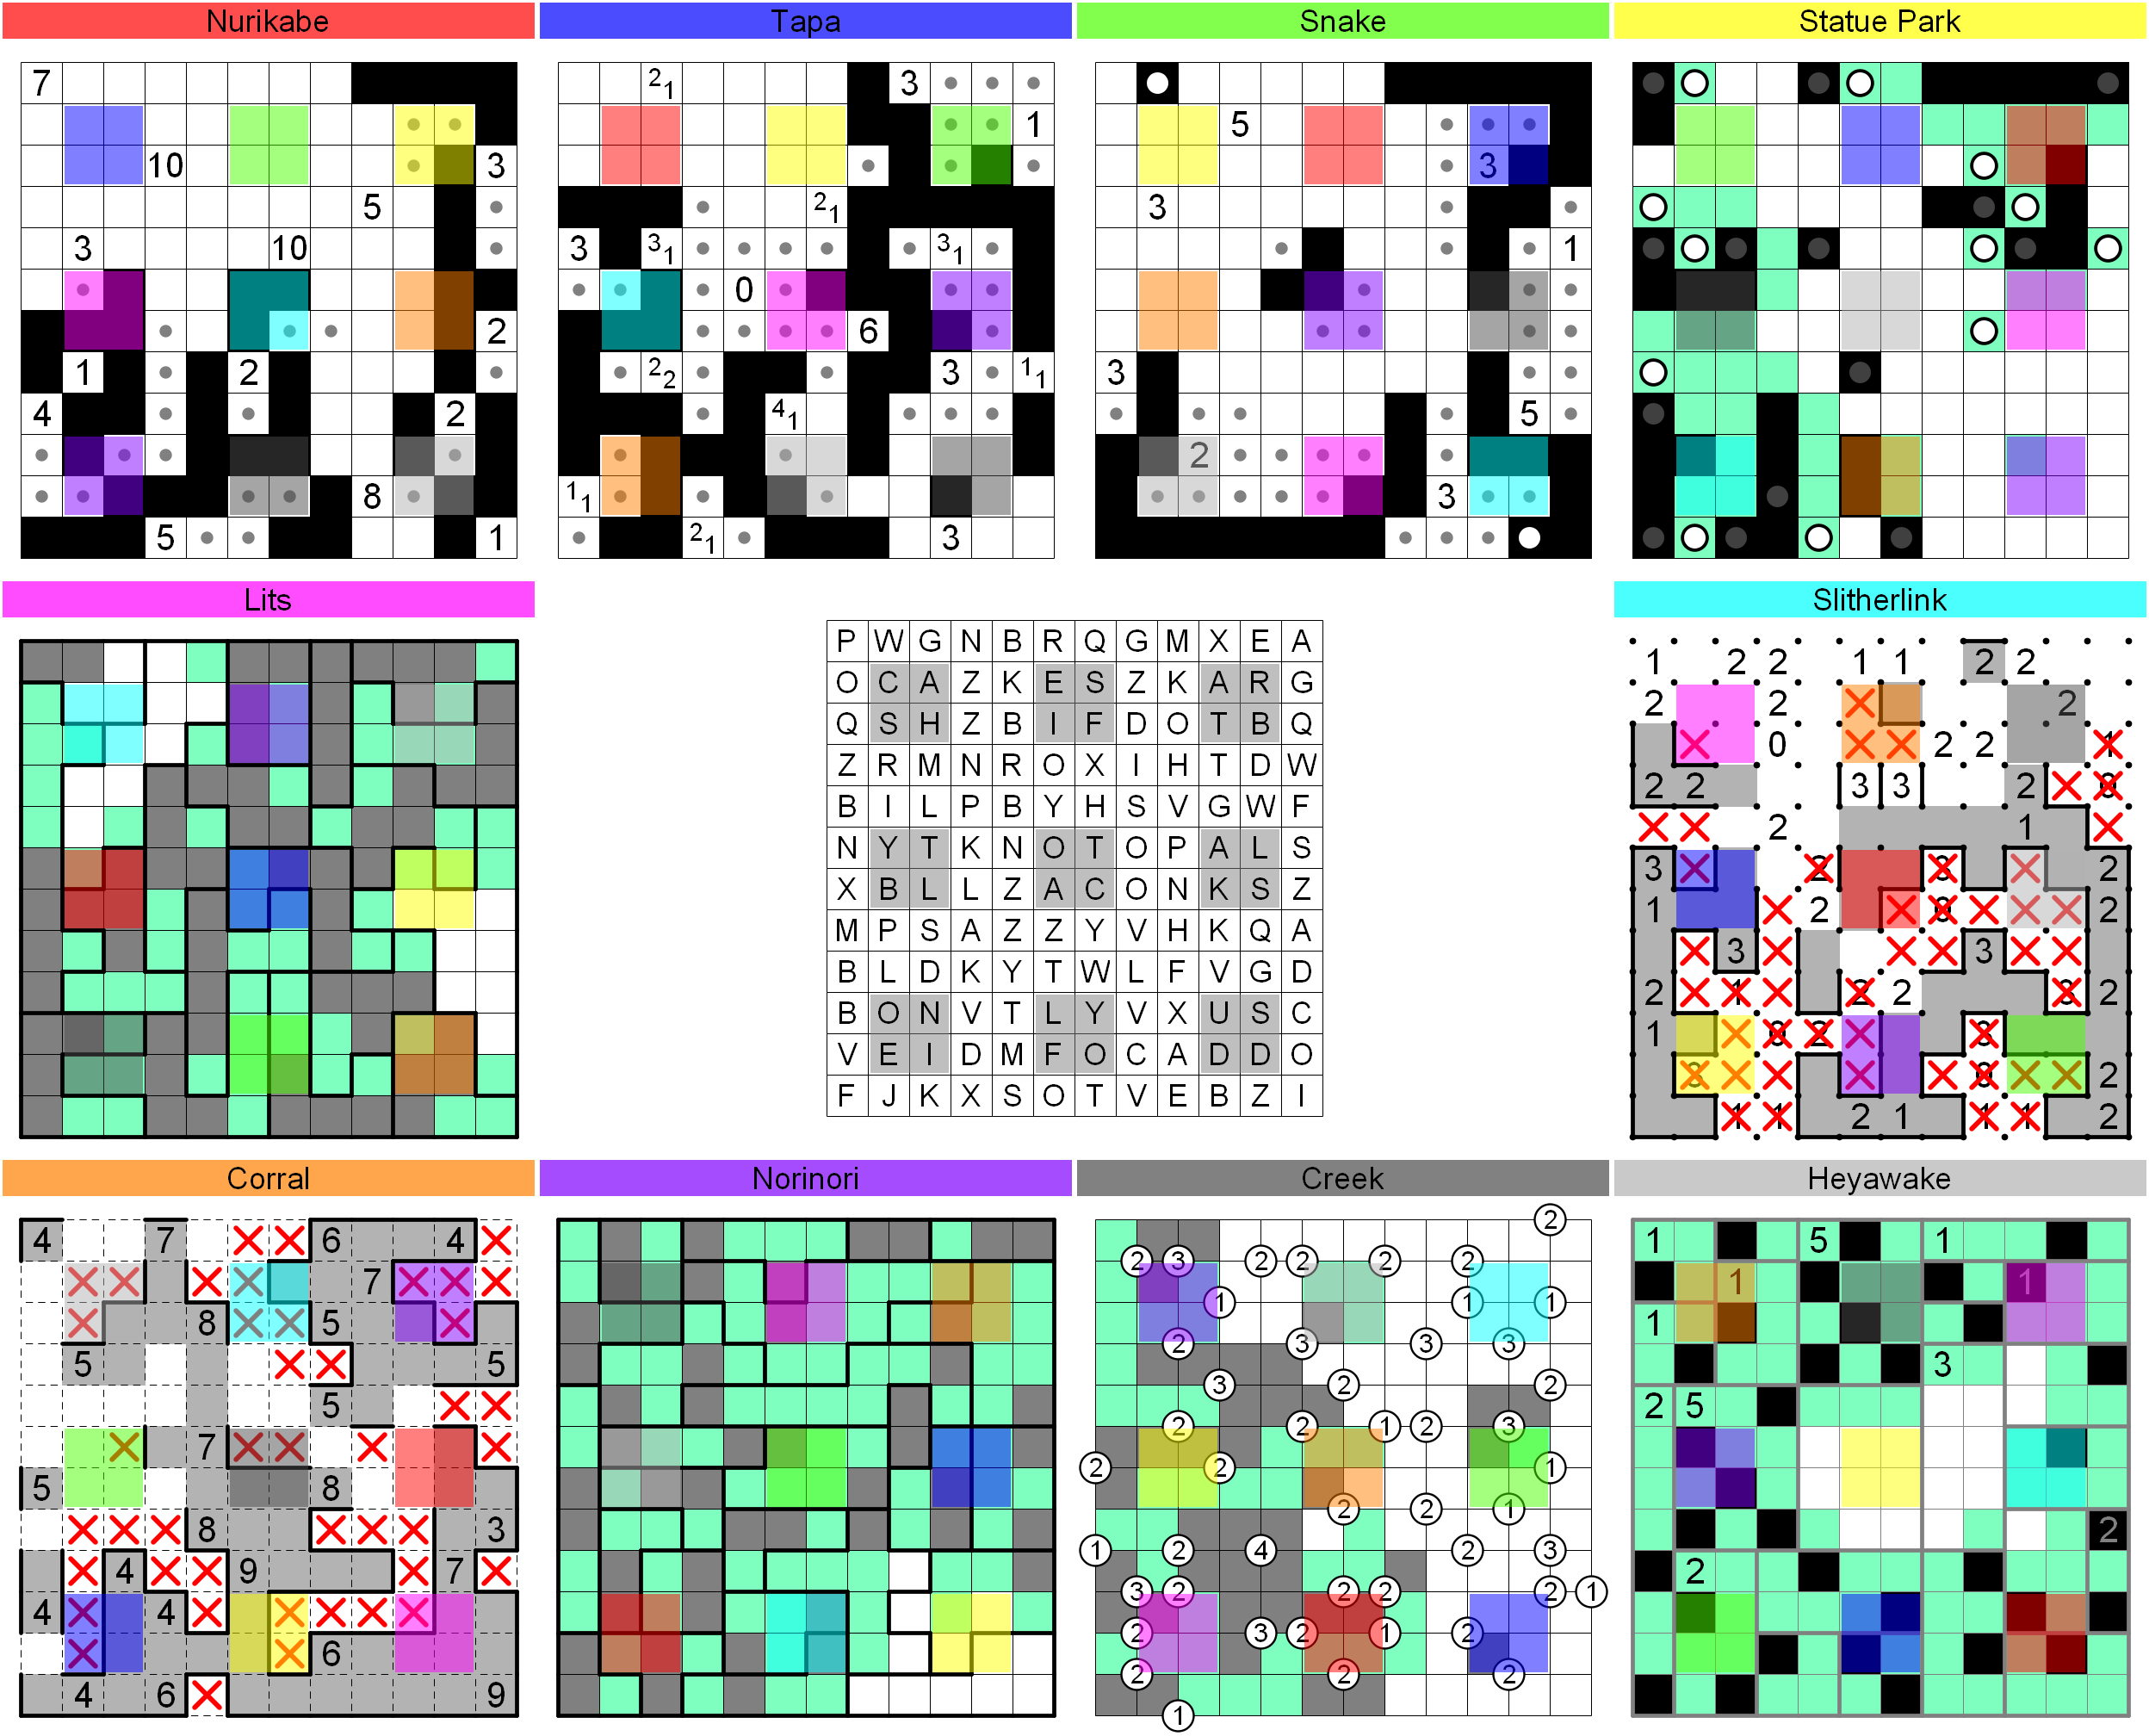
S3: This obtains...
- negligible (for now) progress on the Tapa-Norinori (E) portal.
- a finish to the Tapa-Snake (NE) portal. Easy.
- a finish to the Snake-Slitherlink (SE) portal. If the bottom snake head escapes through the bottom edge or right edge, the 3 or 5 clue respectively will have too many segments. So it escapes between the 3 and 5.
- a finish to the LITS-Heyawake (NE) portal with nontrivial steps in both grids. You can figure out the top right room of LITs by ensuring two Ls don't touch and only one portal square is shaded. This leads to more in the Heyawake.
- a finish to the Slitherlink-Statue Park (SW) portal. Notice that the 1 in R12C4 must be outside the loop, which almost seals in the bottom left.
- progress on the Corral-Slitherlink (N) portal. Slitherlink tells you both of R3C6-7 are shaded or unshaded. If both are unshaded we get a contradiction in Corral. Leads to simple progress in the corral-Norinori (NE) portal.
- a finish to the Norinori-Nurikabe (SW) portal. Nontrivial. First if Norinori's R11C2 is shaded, then R11-12C1-2 has three shaded squares total, a forbidden pattern in Norinori. So this square is unshaded. In Nurikabe, the same square is used by the 4, which gives us more information. After exchanging information between the two grids a couple more times the whole portal can be finished.
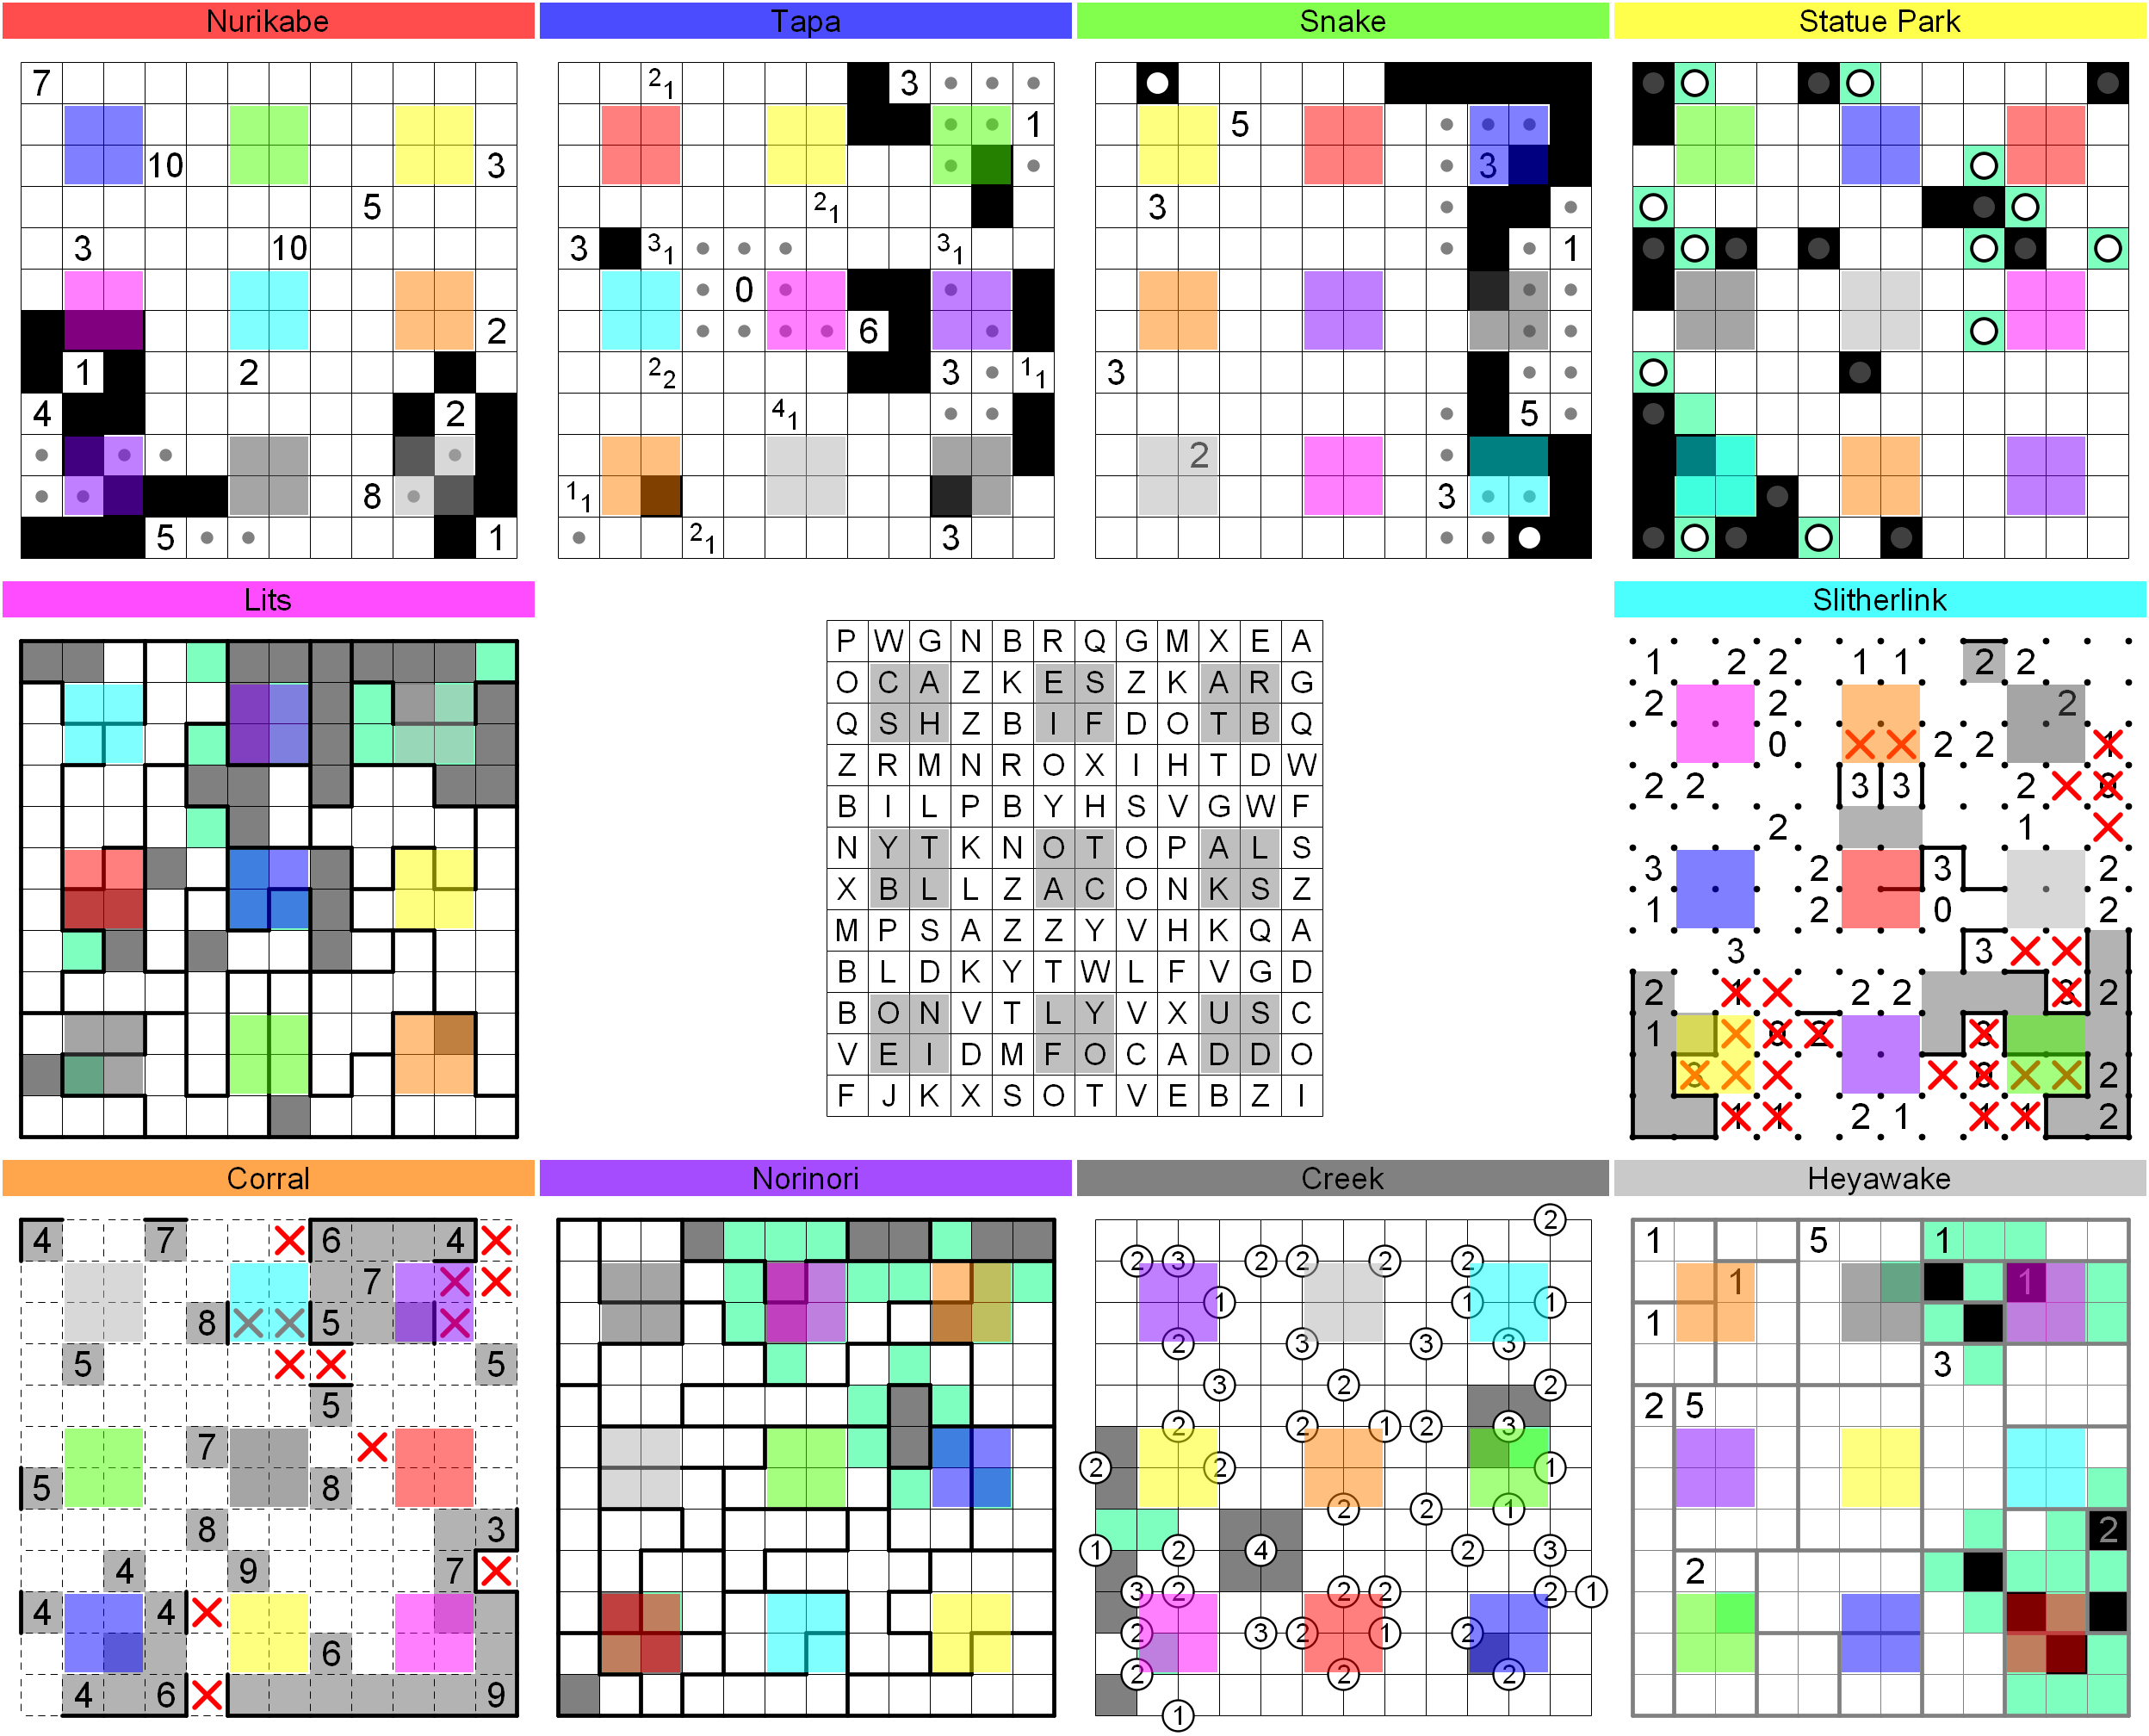
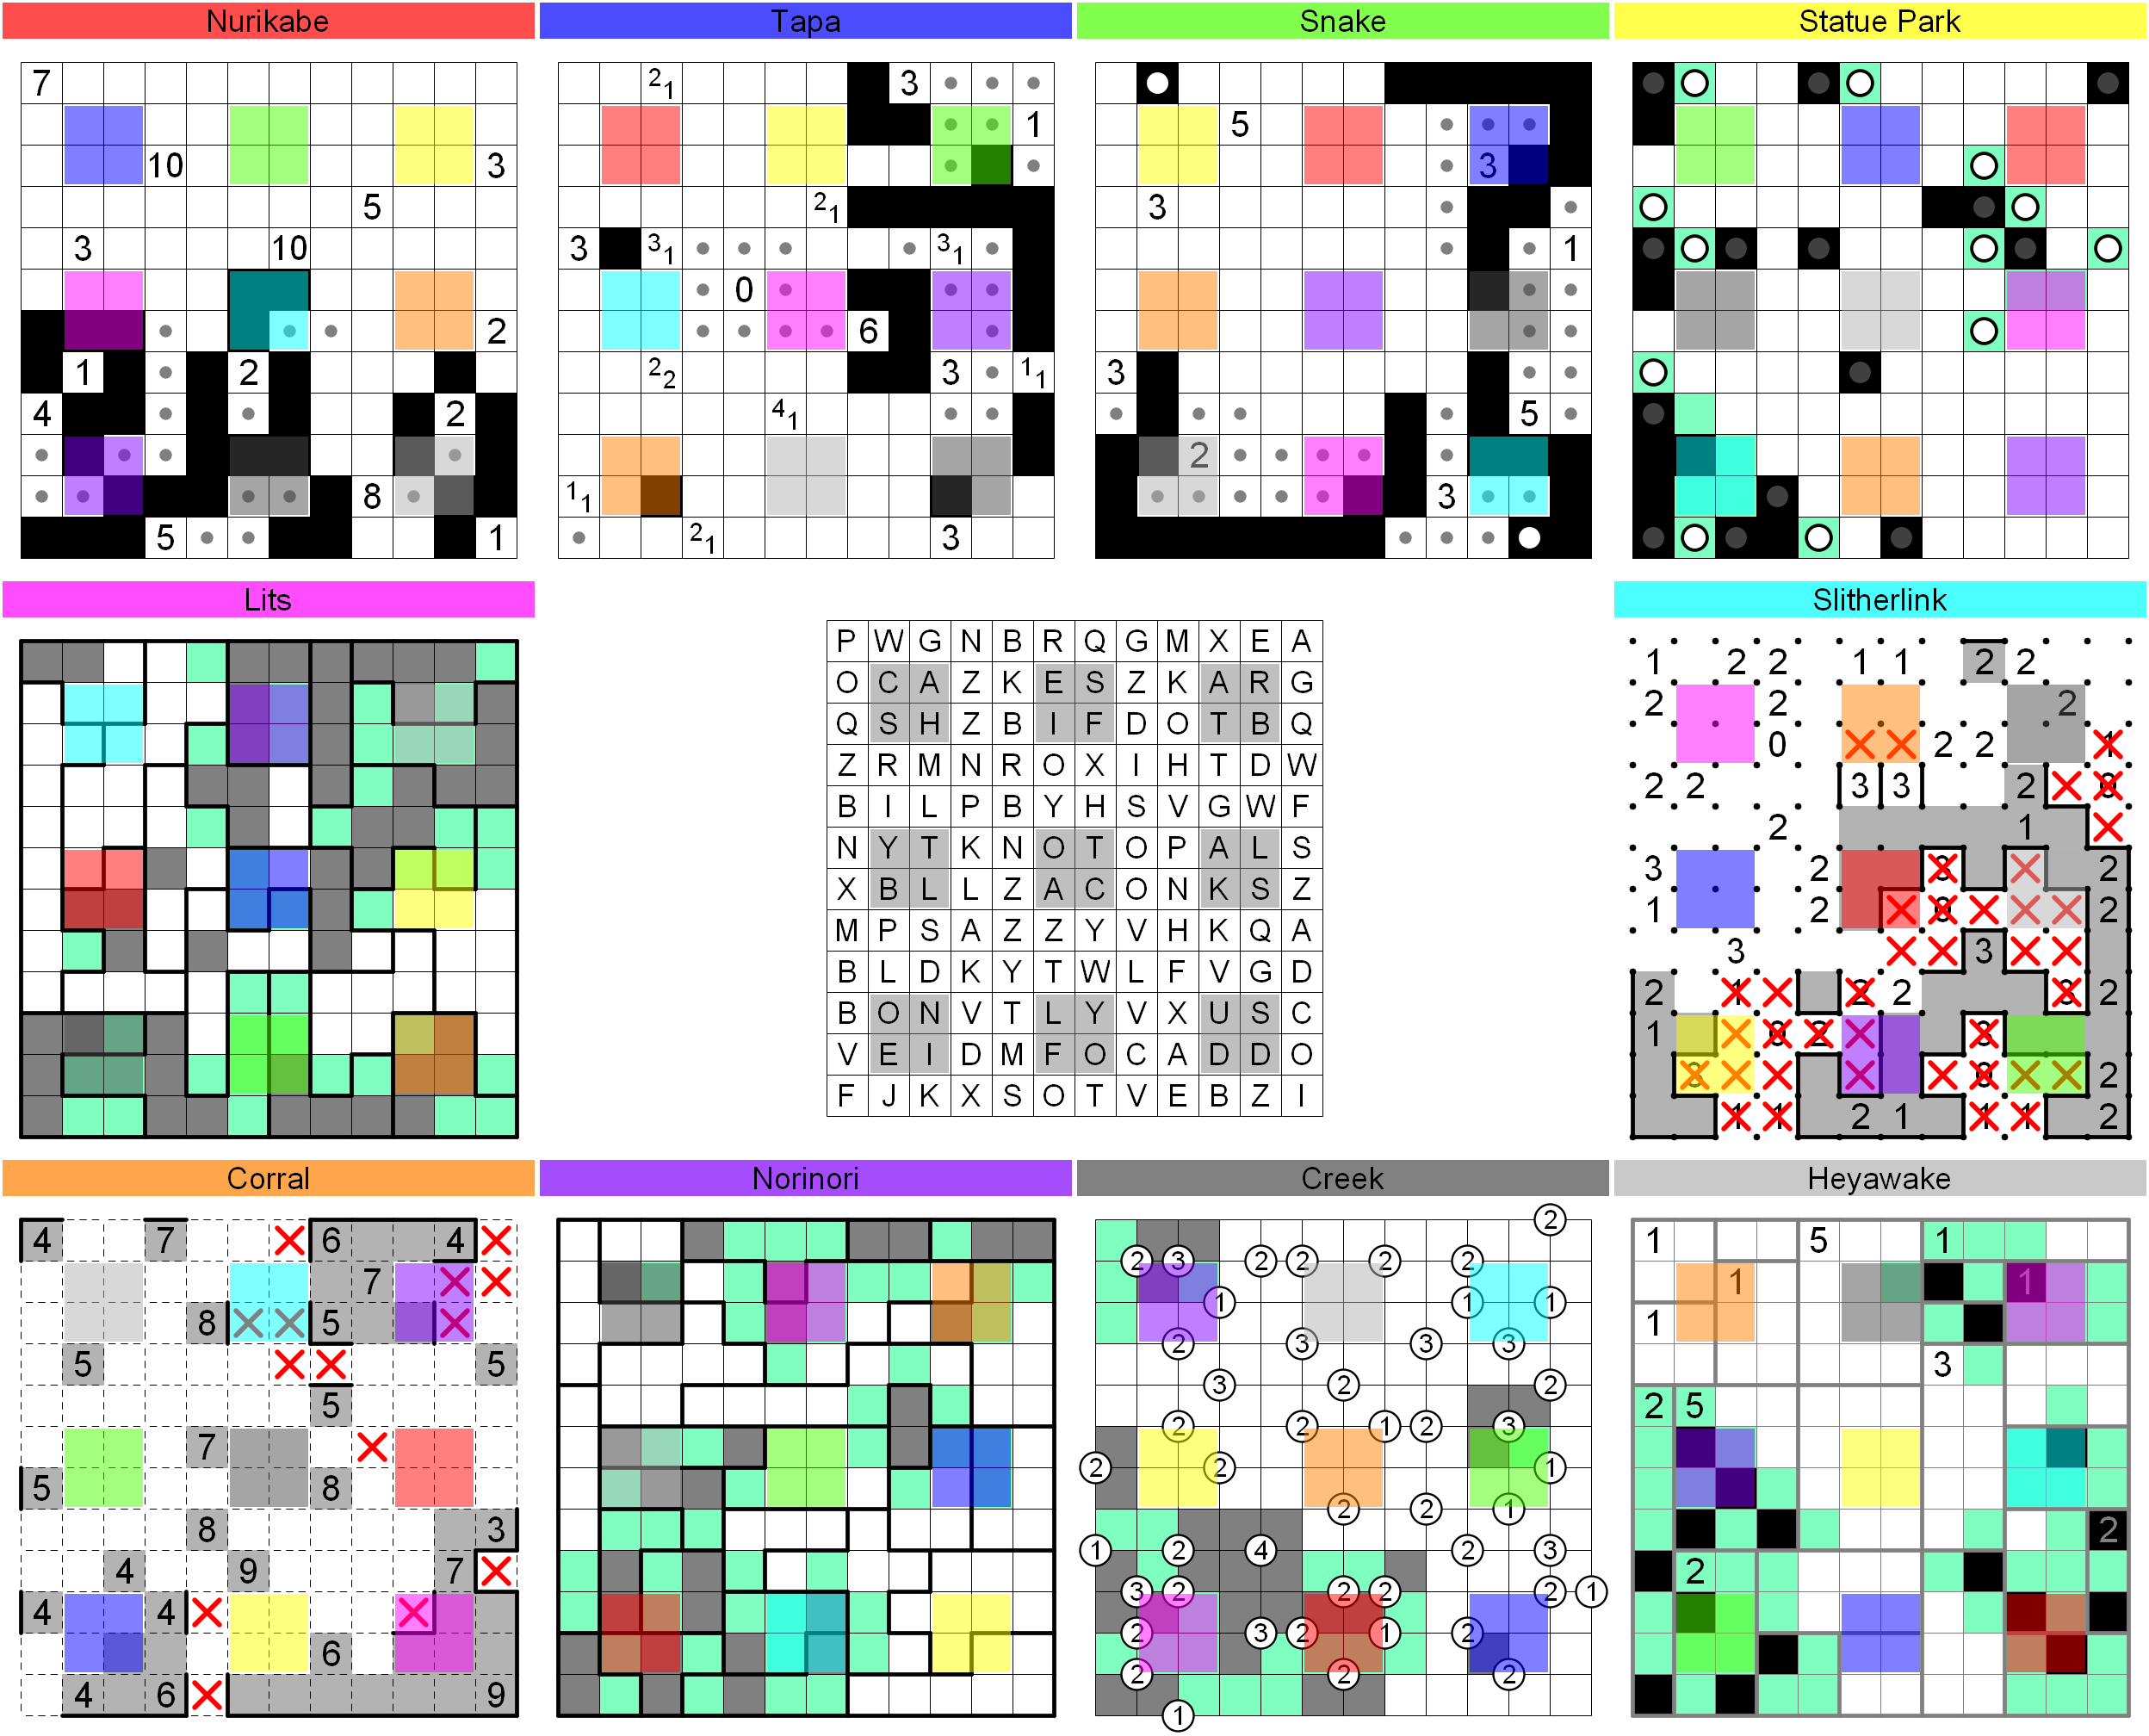
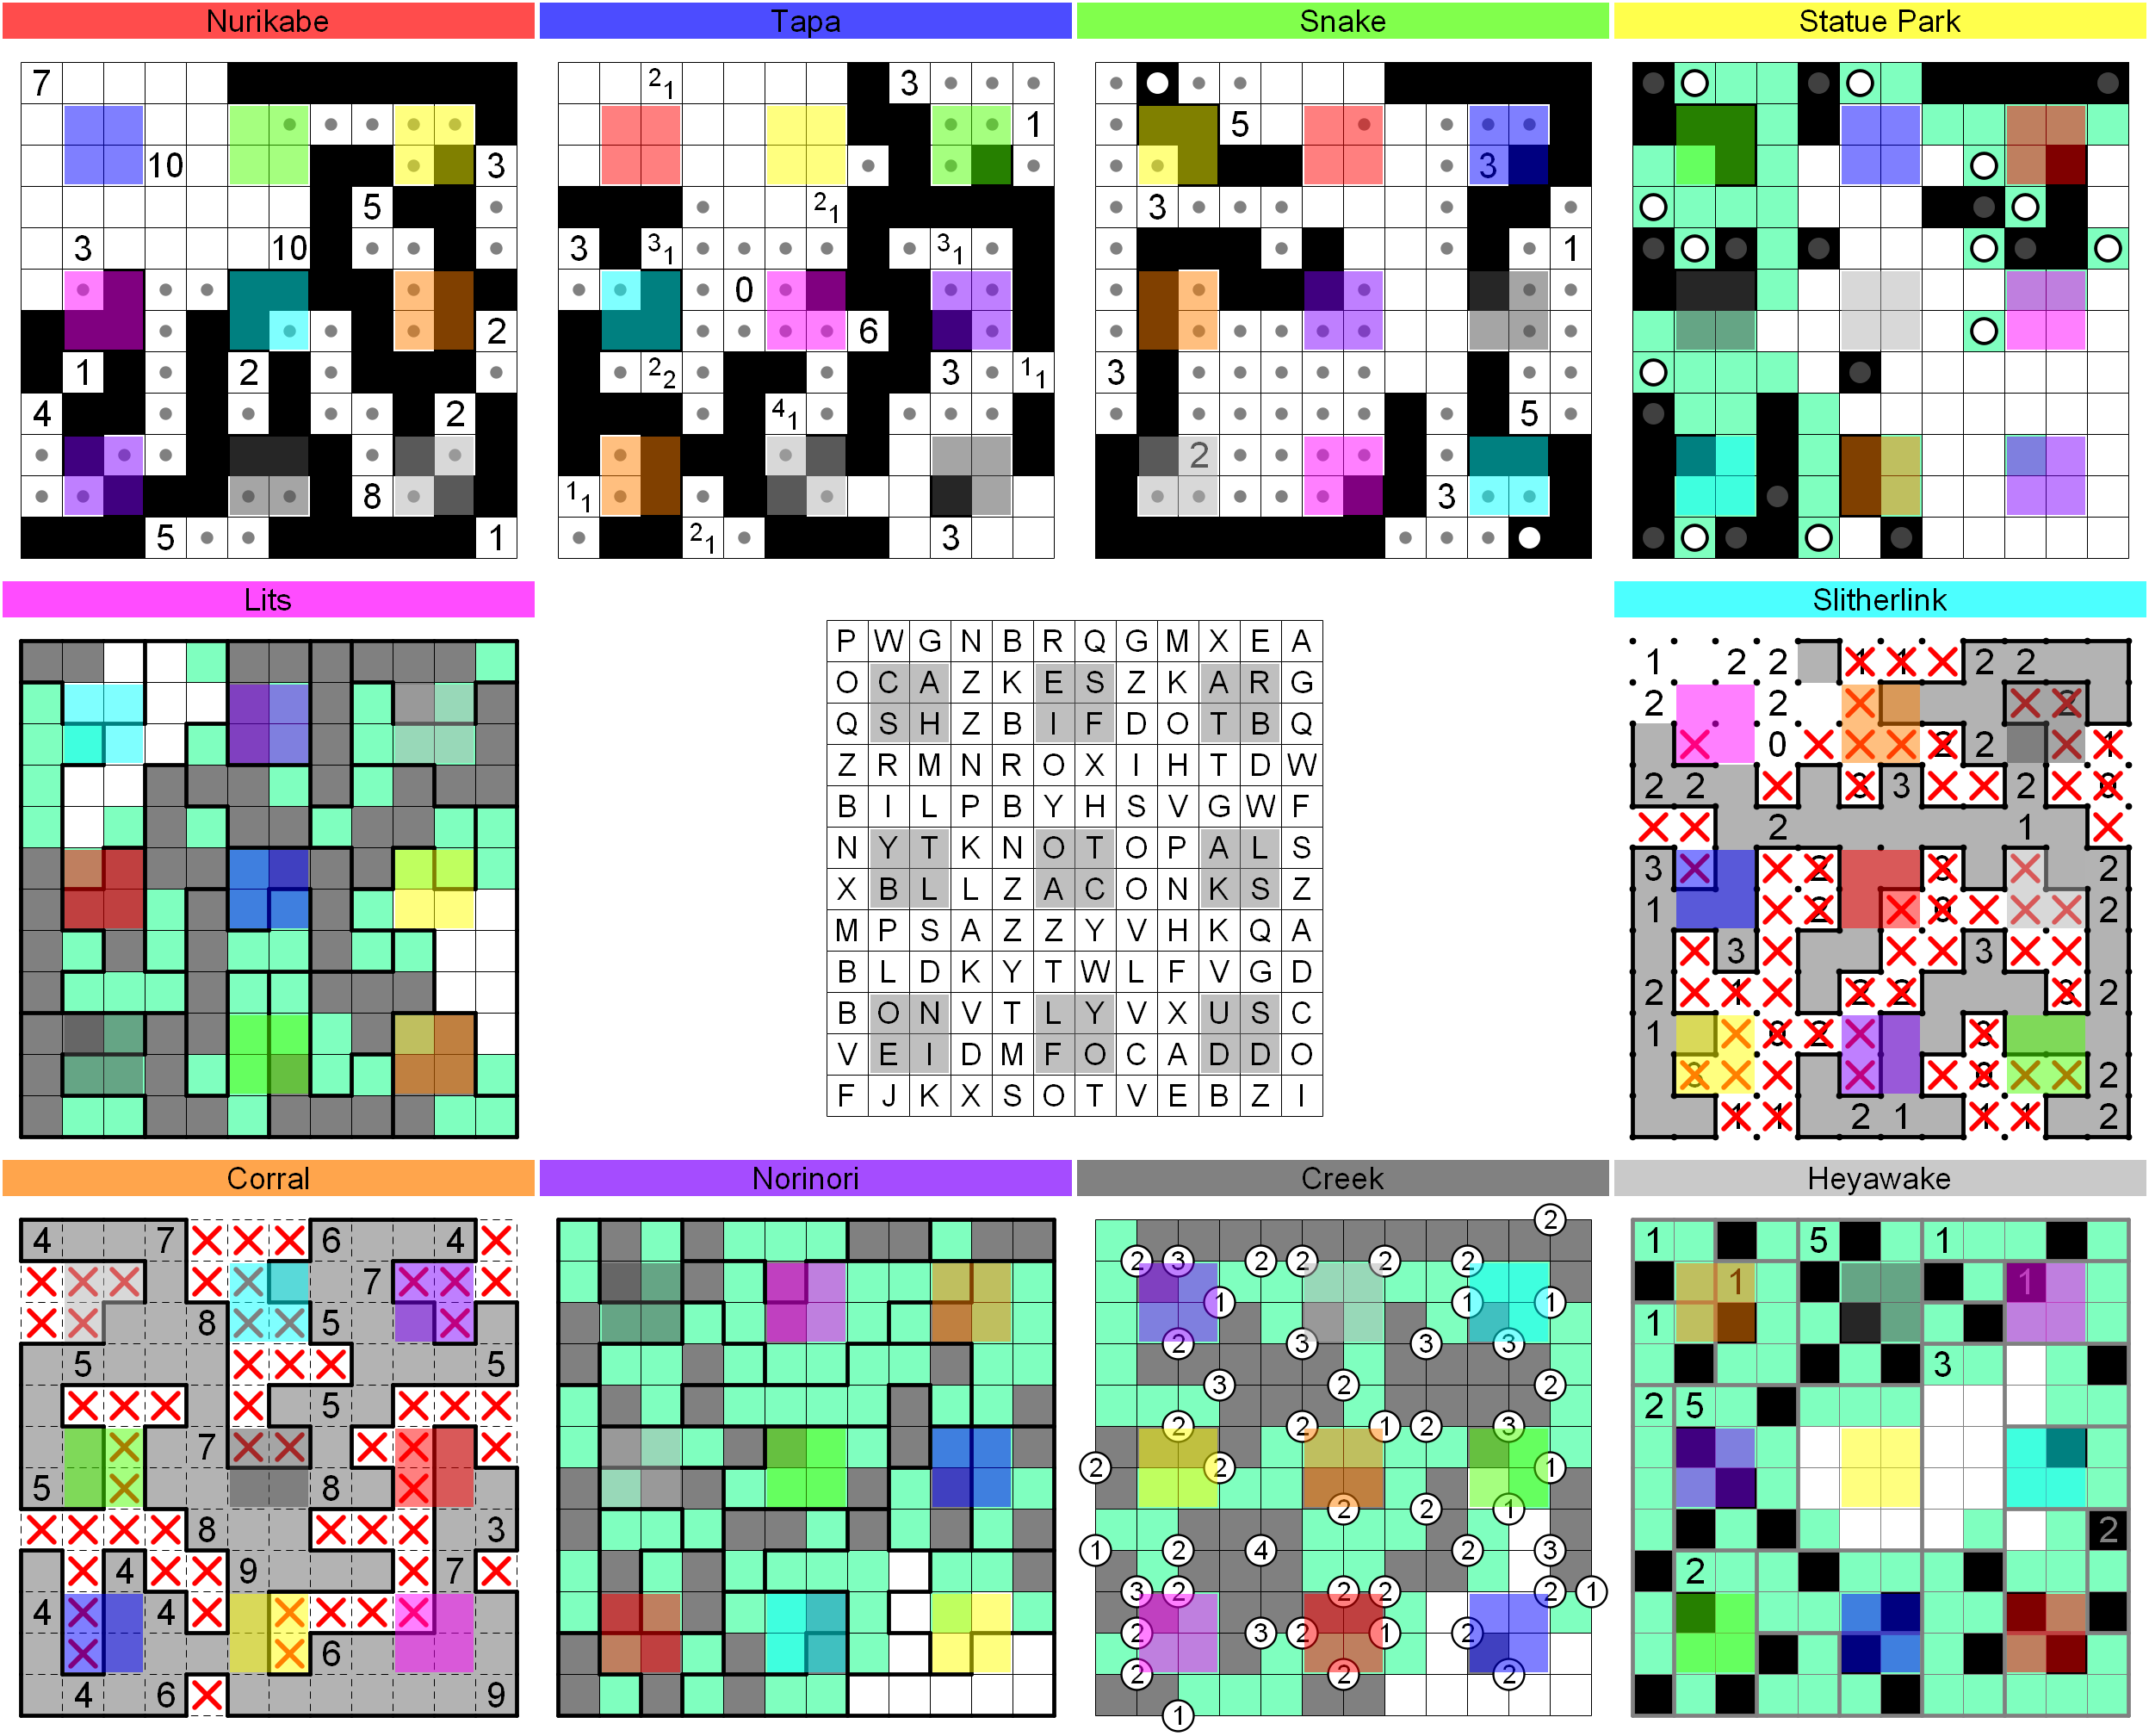
S4: This obtains...
- a finish to the Snake-LITS (S) portal. Easy using the Snake's 3 clue and then using the LITS grid.
- a finish to the Slitherlink-Nurikabe (C) portal, starting with the fact that R5C6-7 are inside the loop (found through the Slitherlink-Corral portal in the north last image).
- a finish to the Slitherlink-Norinori (S) portal. Nontrivial. In Slitherlink, use the 1 on R12C9 to get some segments in the bottom, also finishing the 1 on R12C7. This gets R10-11C7 both in the Slitherlink loop, which means they are both shaded in Norinori, finishing the portal. Leads to huge progress in both grids.
S5: This obtains...
- progress on the Nurikabe-Creek (S) portal. First, note that the unshaded Nurikabe region containing R10C3 can't link up with anything if it goes along the bottom (8 is too small). So it has to go through the top, to the left of the center 2. This finishes that 2 and means R10C6 is shaded, which leads to progress in Creek.
- a finish to the LITS-Corral (SE) portal. Simple if you keep in mind the bottom right region can't have an L.
- a finish to the Norinori-Heyawake (W) portal. Heyawake can't have adjacent shaded squares; applying this constraint to the Norinori grid makes the two rooms touching the portal uniquely solvable. When transferred to the Heyawake grid the 5 room can get a lot of progress too.
- progress on the Norinori-Creek (NW) portal. R2C3 must be unshaded as a Norinori pattern, which causes things to happen in Creek.
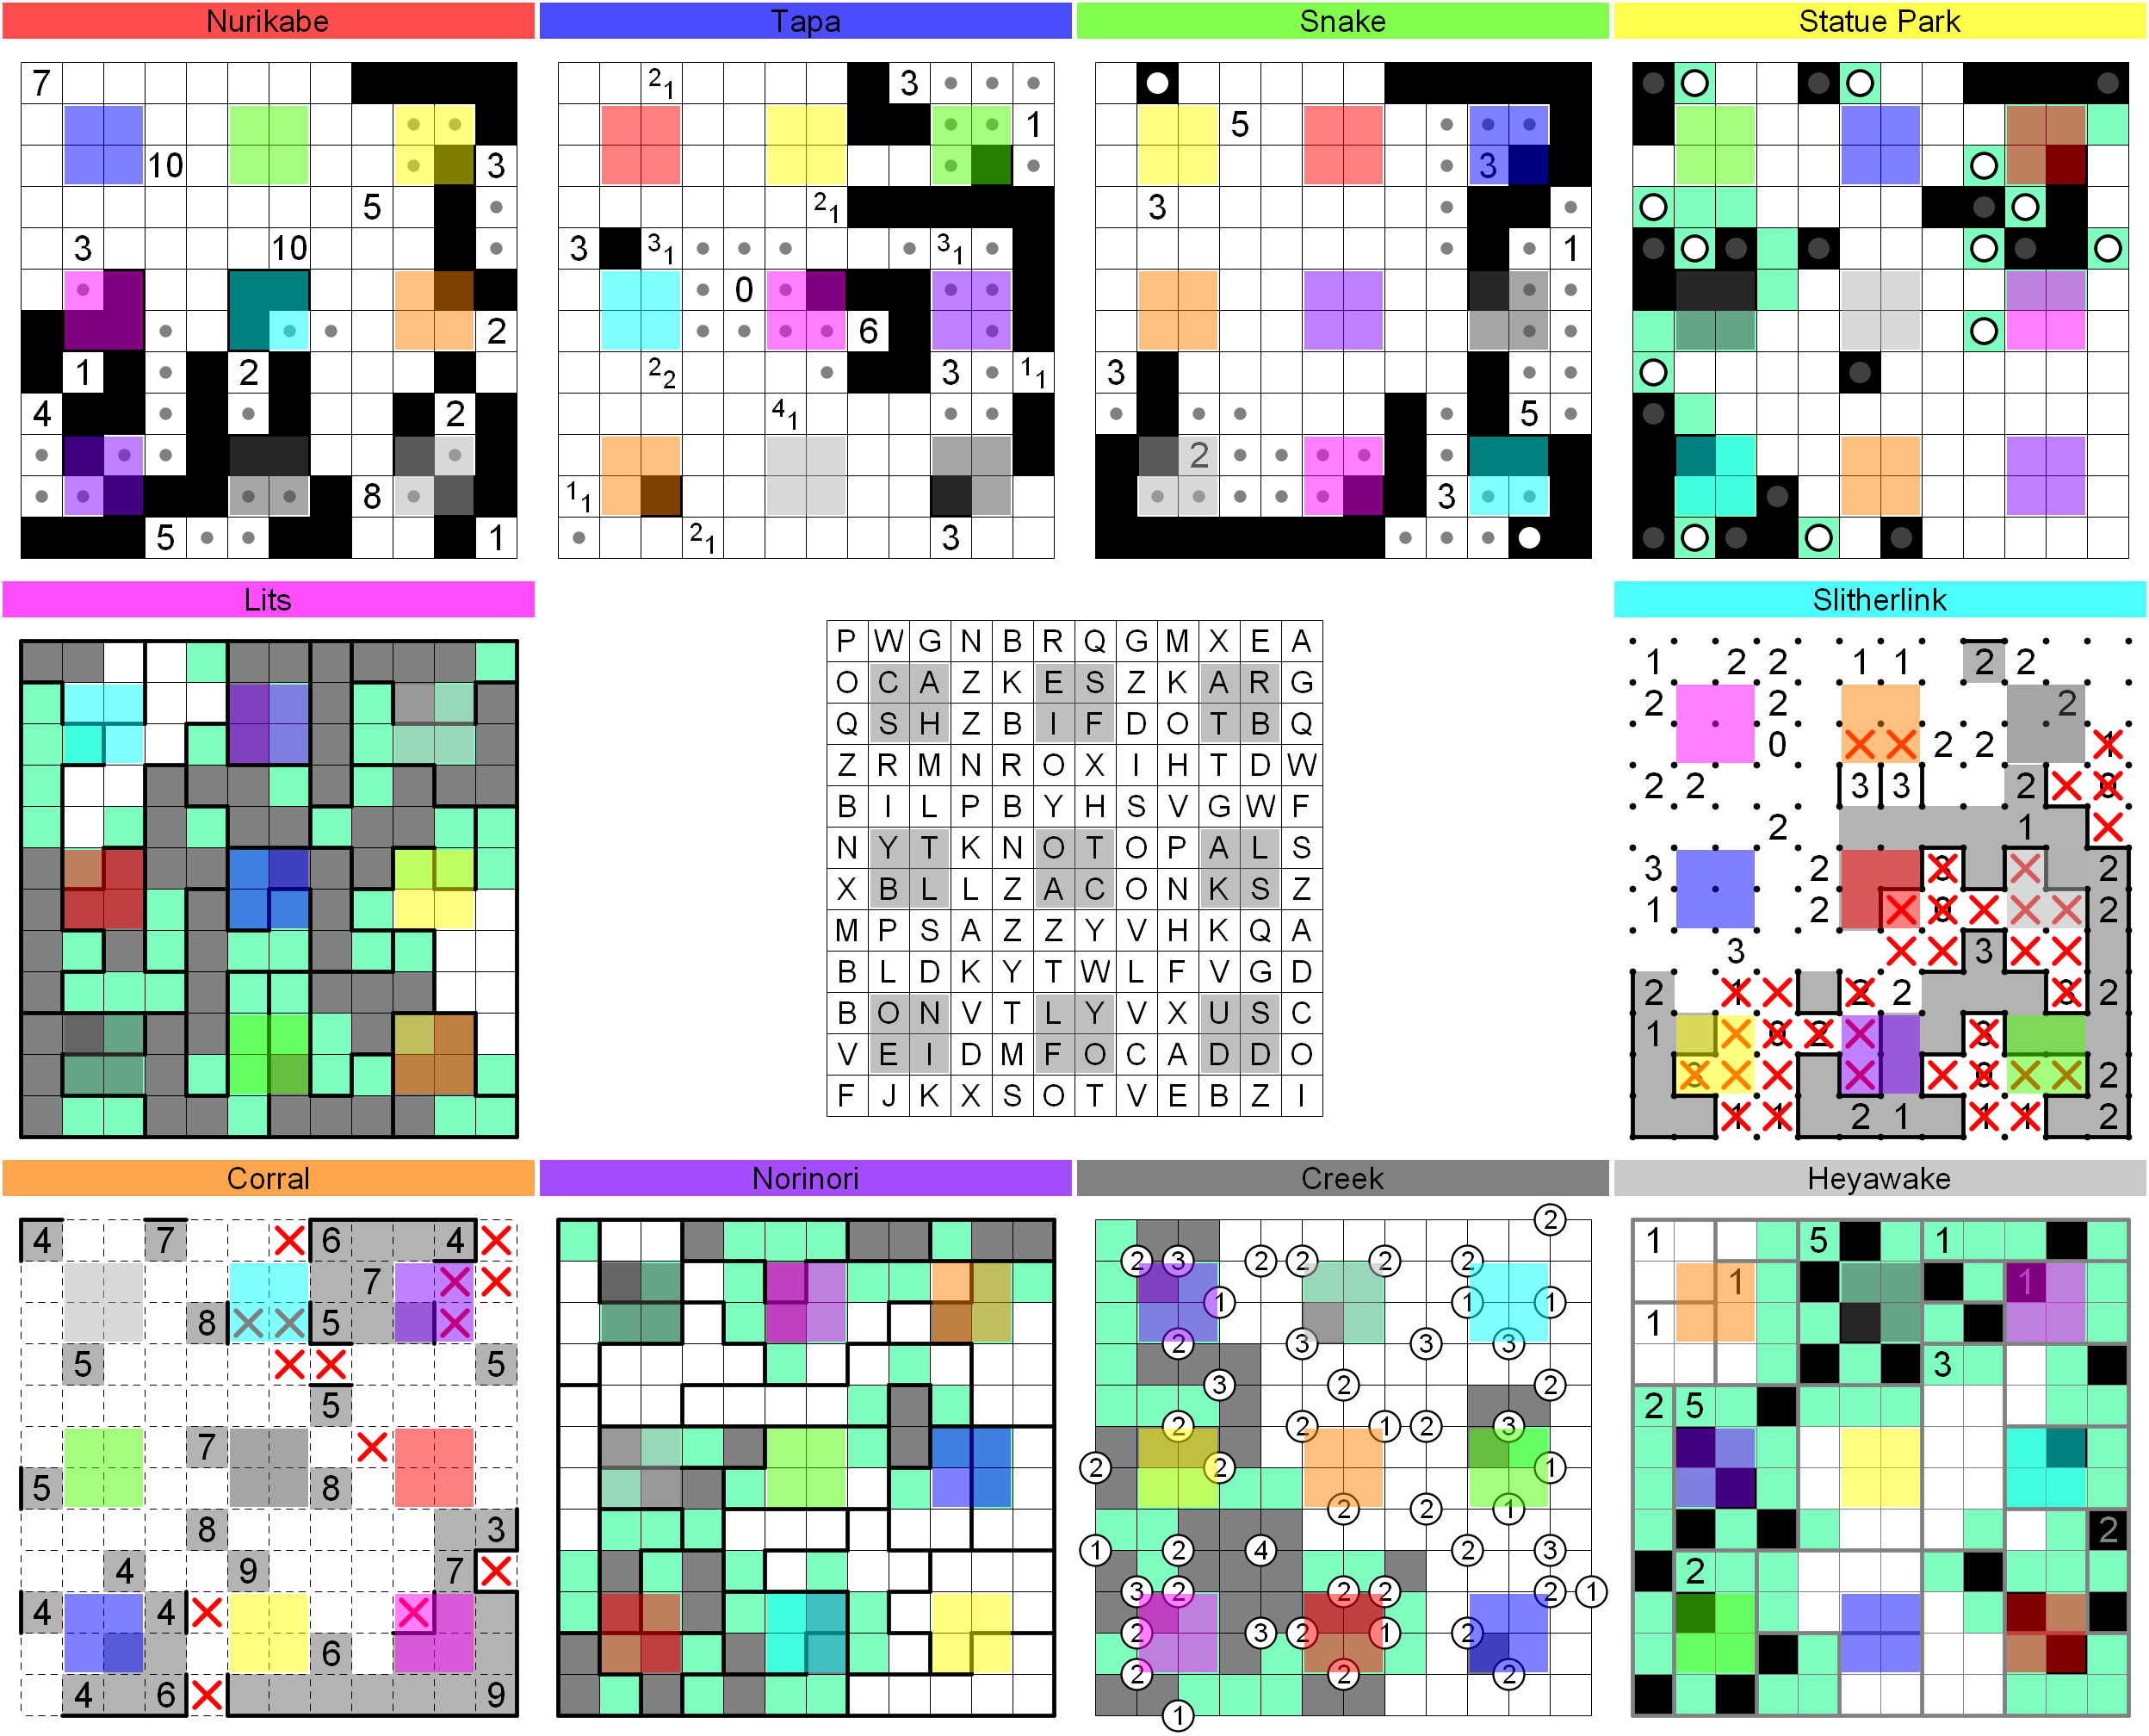
S6: This obtains...
- progress on the Tapa-Norinori (E) portal. Exclusively Tapa deductions, based on the east side being locked in. (We actually could have done this a little while ago.)
- a finish to the Snake-Heyawake (SW) portal. Nontrivial. In Heyawake R11C1 being shaded would get a contradiction, so R12C1 is. Then if R12C3 is not shaded we have two portal squares shaded in a pattern that's not allowed in Snake. So R12C3 is shaded also, finishing the portal. This gives more progress in the Snake grid.
- progress on the LITS-Statue Park (E) portal. Deductions in the LITS grid only. R5C12 must be unshaded, since otherwise the bottom right squares can't connect. A sequence of deductions shows there is only one way to do the 8-cell room containing R5C8-11 now.
- a finish to the Slitherlink-Heyawake (E) portal. Very nontrivial. The inside squares can't connect through the space below the center portal, so they have to go through the right. But the Heyawake portal does not allow adjacent interior squares. The loop can just barely squeeze by the portal and the 0.
- a finish to both the Creek-LITS (SW) portal and the Creek-Nurikabe (S) portal. The bottom left of Creek can't escape through the left edge, so it must go through the bottom. It's only barely possible to squeeze by some of the Creek clues around there.
S7: This obtains...
- a finish to the Statue Park-Nurikabe (NE) portal. Starts with Statue Park grid and uses both grids a few times.
- a finish to the LITS-Nurikabe (W) portal, obtained solely in the LITS grid. Two of the tetrominoes in the bottom left are almost sealed in, and a lot of the western portion can be solved by giving them an escape.
- a finish to the LITS-Tapa (C) portal, also obtained solely in the LITS grid. The eastern/western halves can only connect through that portal.
- a finish to the Creek-Statue Park (W) portal. Creek forces R7C2 to be unshaded, which causes a lot to happen in Statue Park.
- a finish to the Creek-Norinori (NW) portal. Easily done in the Creek grid after the above progress.
- a finish to the Heyawake-Creek (N) portal. Start in the Heyawake grid with the observation that R4C11 being shaded would cause problems. This eventually leads to R1C7 being unshaded, making the 5 room uniquely solvable.
S8: This obtains...
- a ton of progress in the Tapa grid. First, consider the 4,1 clue along with the Heyawake portal constraint; you can get that R8-10C4 must all be shaded. Hence R8C3 is unshaded. This gives a 2,2 clue pattern with R7C2 and R9C3 shaded. Transferring this to the Slitherlink can solve a large part of the west side, in particular getting R6C2 unshaded. Now the Tapa is almost disconnected, getting deductions all over.
- a ton of progress in the Norinori grid, almost to completion. Start from the west and working towards the right. This leads to a finish of the Norinori-Corral portal (NE), the Norinori-Snake portal (C), and the Norinori-Tapa portal (E).
- a bit of progress in the Heyawake grid. In the top left room, the shaded square must be in R2, since otherwise one of the first two columns would violate the three-room rule.
S9: This obtains...
- some progress in the Corral grid. The most nontrivial step is that the bottom left is sealed regardless of how the 4 on the left edge is resolved, so it must escape through R11. This gets most of the Corral-Statue Park (S) portal.
- some progress in the Statue Park grid, building off the Corral progress. The L pentomino can be found in the bottom, which then means the top right has the I pentomino.
- some progress in the Creek grid, building off the Corral progress.
- some progress in the Tapa grid, building off the Corral progress. The most nontrivial part is near the Tapa-Heyawake (S) portal. Remember that Heyawake does not allow adjacent black squares, so the southwest part of the Tapa wall has to connect to the southeast through the bottom row.
- a finish to the Heyawake-Corral (NW) portal. In Heyawake, if R4C3 were shaded, this would seal in the top. So instead R3C3 is shaded, and eventually the whole area can be finished once you realize the Corral rules allow at most one portal square to be shaded.
S10: This obtains...
- a lot of progress in the Corral grid. Start in the Creek grid; the western part must escape through the Corral portal, since the 3 above prevents it from going up. Thus the two upper squares of the portal are unshaded, which leads to a ton of progress in Corral.
- even more progress in the Corral grid. Mostly based on the 8 in R3C5, which is squeezed for space and must link up with the 7 and 8 below it. This allows all three to be finished. Then the 8 on R7C8 is squeezed for space.
- some progress in the bottom of the Heyawake grid. If either of R12C8 or R10C8 were shaded, R11 would violate the Heyawake three-room rule. This leads to the whole bottom being solved.
S11: This obtains...
- completion of the Corral grid. First use the Snake grid to get that R7C2 is inside the loop in Corral, and use both grids to finish the portal. This is the last portal, and the rest of the grid can be done in standard fashion.
- a lot of progress in the Nurikabe grid. Starts with the fact that the bottom right must escape through the bottom. Then one can finish the 8 and then the 5 on the right side.
- a lot of progress in the Creek grid, building off the finish of the Corral-Creek (C) portal. The top and bottom cannot connect through the center, so it must go along the right edge. It is also hard to squeeze through the top, so some of it can be done too.
S12: This obtains...
- a lot of progress in the Slitherlink and Creek grids. Start near the Slitherlink-Creek (NE) portal. We know the upper row is outside the loop; Creek tells us the lower two are one inside and one outside. If R3C11 were the inside one, it would be sealed in, so it's the other way. Both grids get a lot out of this.
- even more progress in the Slitherlink grid, this time stemming from the completed Slitherlink-Corral (N) portal.
- a finish of the Snake-Statue Park (NW) portal. If we go to the left of the 3 clue on R4C2, this would make too many unshaded squares in the Statue Park portal. So we go to the right instead.
S13: This obtains...
- completion of the Snake grid. First solve the 5 clue on top, then avoid linking head and tail too early in the center.
- completion of the Creek grid, as a result of getting the Snake portal done.
- some progress in the bottom of the Tapa grid, as a result of the Creek portal getting done.
- completion of the Slitherlink grid, done in tandem with the LITS (NW) portal.
- completion of the Nurikabe grid, as a result of getting the Snake portal done. The first step here is to notice that having the 10s link vertically makes a 2 by 2 black square. So they must link horizontally. Some work on the Tapa portal needed.
- a lot of progress in the Tapa grid, based on the finished Nurikabe portal.
- some progress in the Statue Park grid.
S14: This obtains the full solution. At this point things are simpler, with only the Statue Park grid needing a lot of attention. Here's how to finish Statue Park.
- If R3C6 were unshaded, the pentomino containing R3C6 would give a contradiction in all cases (duplicate I or seals the top in). This also gets R2-3C7 unshaded.
- It is tricky to make a pentomino with R5C5 while keeping in mind the Heyawake portal's constraint of no two adjacent shaded cells. The only way is to form an N with R8C6. This forces a P in the top center and a V in the bottom center. Tapa can now be finished.
- The only shapes we have left are T,W,X. The partial shape in the top must be W, finishing the Heyawake portal. Heyawake can now be finished.
- It remains to place the T and X. Without portals the only two places for the X are with center on R9C9 or R8C10. But the latter creates a contradiction in the LITS grid.
- The T has only two possible positions in the bottom right. One makes a contradiction in the Norinori grid. This finishes the Statue Park grid. LITS and Norinori can now be finished.